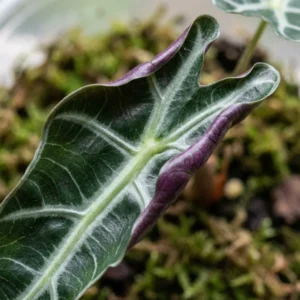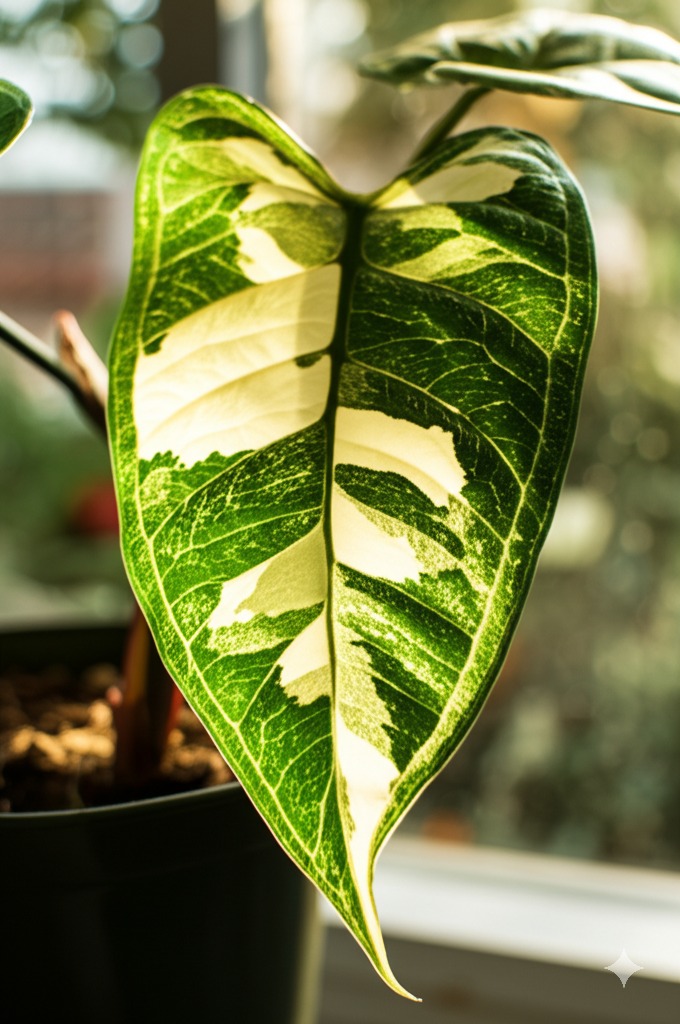
Hello fellow plant lovers and Alocasia aficionados! If you’ve welcomed a stunning variegated Alocasia into your home, you know they’re true jewels. Those splashes, stripes, or blocks of white, cream, or yellow against the deep greens are simply captivating. But as many of us discover, keeping that beautiful variegation vibrant and stable can feel like a bit of a puzzle. It’s a common journey many plant parents face: sometimes, frustratingly, new leaves emerge more green than the last, or the variegation seems to fade.
Don’t worry, you’re not alone! These plants are indeed special, and their unique beauty comes with unique care needs. The good news is that with a little understanding and some targeted care, you can significantly improve your chances of maintaining that gorgeous variegation. This guide is here to walk you through practical, actionable tips for variegated alocasia care, focusing specifically on achieving stable variegation and preventing reversion (that dreaded return to all-green). Whether you have a coveted Alocasia Frydek Variegata, a striking Macrorrhiza Variegata, or another variegated beauty, these principles, based on common grower experience and horticultural best practices, will help you nurture your plant.
Jump to Sections
ToggleWhat Makes Variegated Alocasias So Special (and Unpredictable)?
Before diving into the ‘how-to’, let’s quickly understand the ‘why’. Knowing what’s going on inside your plant helps make sense of its needs and why achieving perfectly stable variegation can sometimes be challenging.
The Magic of Variegation: More Than Just Pretty Patterns
Think back to basic biology: plants are green because of chlorophyll, the pigment that captures sunlight for energy (photosynthesis). Variegation occurs when parts of a leaf lack this chlorophyll, resulting in those beautiful white, cream, yellow, or even pink patches.
Most popular variegated Alocasias exhibit what’s called chimeric variegation. Imagine two different types of cells – green ones with chlorophyll and non-green ones without – growing together in the plant’s tissues. It’s a bit like a cake batter swirled with vanilla and chocolate; the pattern in each slice (or leaf) can be slightly different and unpredictable, a characteristic many experienced growers observe.
Why Variegation Can Fade: Understanding Instability
This chimeric mix is inherently unstable. Why? Because the non-green cells can’t produce their own energy; they rely on the green cells to do all the photosynthetic heavy lifting. From the plant’s perspective, green is efficient, while white/yellow represents an energy cost.
Therefore, the plant has a natural tendency to favor producing more green cells, especially when conditions aren’t perfect. Environmental factors, particularly light levels and overall plant stress, play a huge role in which type of cell growth dominates. This is why providing the right conditions is crucial for encouraging the plant to maintain its variegation.
The Golden Rule: Mastering Light for Vibrant Variegation
If there’s one takeaway message for keeping your variegated Alocasia happy and colorful, it’s this: Light is paramount.
Why Light is Everything for Variegated Alocasia Care
Because the variegated sections aren’t contributing to energy production, the remaining green parts need access to more light energy than an all-green Alocasia would require just to sustain the whole plant. They’re essentially working overtime!
Crucially, insufficient light is the number one reason variegation fades and plants start reverting to green. The plant, sensing low energy levels, prioritizes survival by producing more efficient, chlorophyll-rich green tissue. Meeting the optimal variegated alocasia light requirements consistently is fundamental to successful variegated alocasia care.
Finding the Sweet Spot: The Power of Bright, Indirect Light
So, what does “optimal light” mean in practical terms? We’re talking about very bright, but indirect sunlight. Direct, harsh sun, especially during the afternoon, will quickly scorch the delicate, non-pigmented areas, leaving unsightly brown patches – a common mishap even for careful growers.
- Ideal Spots: Place your Alocasia near an East-facing window where it can receive gentle morning sun. A spot a few feet back from a South or West-facing window, perhaps filtered by a sheer curtain, also works well. North-facing windows typically don’t provide enough light for these beauties.
- Signs of Too Little Light: Be vigilant for variegation becoming less pronounced on new leaves, new leaves emerging smaller or mostly green (this signals reversion may be starting!), or the plant becoming ‘leggy’ as it stretches towards a light source.
- Signs of Too Much Direct Light: Look for crispy brown spots or patches appearing specifically on the white or yellow sections of the leaves – classic sunburn.
Shine On: Using Grow Lights for Consistent Results
Let’s be honest, providing perfectly consistent natural light year-round can be tricky depending on your home’s orientation and the changing seasons. This is where grow lights can be a fantastic tool for nurturing variegated Alocasias. Many growers find they offer invaluable consistency, regardless of weather or time of year.
- Recommendation: Full-spectrum LED grow lights are generally considered energy-efficient and effective for houseplants.
- Usage Tips: Aim for about 10-14 hours of supplemental light per day. It’s important to position the light at the correct distance – close enough to provide intensity, but not so close that the heat damages the leaves. Always check the manufacturer’s recommendations for guidance, as intensity varies greatly between models.
Essential Care Tailored for Variegated Alocasias
While light is king, creating a stable and supportive environment through other care aspects is vital for encouraging your Alocasia to hold onto its beautiful patterns. Consistency across the board helps minimize stress, a known factor that can influence variegation expression.
Watering Wisdom: Quenching Thirst Without Drowning
Alocasias, in general, are known for disliking ‘wet feet’ (soggy soil), and variegated varieties can sometimes react more sensitively to the stress of overwatering or underwatering. Aim for consistent moisture, but allow the soil to breathe between waterings.
- How to Check: The most reliable method is often feeling the soil. Water thoroughly when the top 1-2 inches feel dry to the touch.
- Watering Technique: When you water, do so until water flows freely from the drainage holes, then discard the excess runoff after about 15-20 minutes. Never let the pot sit in water for extended periods.
- Drainage is Non-Negotiable: This can’t be stressed enough! Ensure your pot has adequate drainage holes and that your soil mix allows water to pass through readily. Root rot is a serious threat to Alocasias.
- Water Quality Note: If your tap water is particularly hard or heavily treated (high chlorine/chloramine), you might consider using filtered water, rainwater, or even distilled water. Some Alocasias can show sensitivity (like brown leaf tips) to the buildup of minerals or chemicals over time, according to grower reports.
The Right Foundation: Why Your Soil Mix Matters
Using the right soil is foundational for preventing waterlogging and ensuring healthy roots. Standard potting soil is typically too dense for Alocasias, holding too much moisture and not allowing enough air circulation around the roots.
- Think Chunky and Airy: Opt for a high-quality, well-draining aroid mix. You can often find these pre-bagged, or enjoy creating your own blend, which many enthusiasts prefer for customization.
- Helpful Ingredients: A successful mix often contains elements like coco coir (for moisture retention), perlite or pumice (for aeration), orchid bark (adds chunkiness and airflow), horticultural charcoal (believed by many to help keep the soil fresh and absorb impurities), and perhaps some worm castings (for a gentle nutrient boost). The goal is a substrate that retains some moisture but drains quickly and allows plenty of oxygen to the roots – many experienced growers consider this the best soil for variegated alocasia.
Humidity Hacks: Keeping Delicate Leaves Happy
Ever noticed those frustrating crispy brown edges, especially on the lighter parts of the leaves? Low humidity is a very common culprit. The non-pigmented sections are generally more delicate and lose moisture to the air more readily than the tougher green parts.
- Target Humidity: Alocasias thrive in higher humidity, typical of their tropical origins. Aim for 60% relative humidity or higher for best results. Meeting these humidity requirements for variegated alocasia can make a big difference in leaf quality.
- Ways to Increase Humidity:
- Use a Humidifier: This is typically the most effective and consistent method for significantly raising humidity levels in the plant’s immediate vicinity.
- Create a Pebble Tray: Place the plant pot on a tray filled with pebbles and water, ensuring the bottom of the pot sits on the pebbles, above the water level. As the water evaporates, it increases local humidity slightly.
- Group Your Plants: Plants release moisture through transpiration. Grouping several humidity-loving plants together can create a more humid microclimate through collective transpiration.
- Strategic Location: Bathrooms or kitchens sometimes offer naturally higher humidity, but only choose these spots if the crucial light requirements can also be adequately met!
Feeding Finesse: Providing Nutrients for Variegation
Fertilizing provides essential nutrients for growth, but a careful, balanced approach is recommended for variegated plants, as their needs can be slightly different.
- Feeding Schedule: Provide nutrients primarily during the active growing season (typically spring and summer, when you see active new growth).
- What to Use: A balanced liquid fertilizer (where the N-P-K numbers are roughly equal, e.g., 10-10-10 or 20-20-20) is generally a good starting point. Crucially, dilute it to 1/4 or 1/2 of the strength recommended on the product label. Over-fertilizing can be more harmful than under-fertilizing. Apply this diluted solution every 2-4 weeks while the plant is actively growing.
- A Note on Nitrogen: You may encounter advice suggesting low nitrogen fertilizer for variegation. The underlying theory is that excessive nitrogen primarily promotes the production of chlorophyll and vigorous green growth, which might inadvertently encourage the plant to produce fewer variegated cells. While this is debated among growers and not a hard-and-fast rule, using a balanced fertilizer at the recommended diluted strength is a safe and widely accepted practice. It avoids potentially overloading the plant with nitrogen while still providing necessary nutrients. Finding the right fertilizer for variegated plants often means finding this balance and observing your specific plant’s response.
- Winter Slowdown: Significantly reduce or completely stop fertilizing during the fall and winter months when the Alocasia’s growth naturally slows or stops in response to lower light and cooler temperatures.
Preventing and Managing Reversion: Keeping the Green at Bay
Okay, let’s tackle the topic many variegated Alocasia owners worry about: reversion. This refers to the plant progressively losing its variegation and producing new leaves that are partially or entirely green. Understanding how to approach preventing reversion in variegated alocasia is key.
What is Reversion and Why Does My Alocasia Look Greener?
Simply put, reversion is often the plant’s response when it prioritizes survival and energy production over maintaining its energy-costly variegation. New growth emerges without the characteristic white, cream, or yellow patterns.
As discussed, the overwhelmingly primary cause reported by growers is insufficient light. When the plant isn’t receiving enough light energy, it tends to shift resources to produce more chlorophyll-rich green tissue. Other significant stressors – like a severe pest infestation, chronic underwatering or overwatering, or significant root damage – can sometimes also contribute to alocasia variegation fading or trigger a full variegated alocasia reverting.
Stay Variegated! Proactive Steps to Prevent Reversion
Prevention is always better than cure when it comes to reversion! Success largely hinges on providing consistent, optimal conditions:
- Light, Light, Light: This cannot be overstated. Providing consistent, appropriately bright, indirect light is your number one defense against reversion. If your natural light is variable, seriously consider using a grow light for stability.
- Maintain Stability: Try to keep the plant’s environment stable. Avoid dramatic temperature fluctuations, cold drafts, or erratic watering habits (letting it get bone dry then flooding it). A stable plant is generally a less stressed plant, which seems to favor maintaining variegation.
- Be Observant: Keep a close eye on new leaves as they develop. If you notice the proportion of variegation starting to decrease consistently over several leaves, it’s an early warning sign to reassess conditions, especially light levels.
Reversion Started? Management Strategies (and Realistic Hope)
If you see new leaves unfurling completely green, take a deep breath – there are things you can try, but it’s important to have realistic expectations. Sometimes, you can slow or stop it, but reversing it completely isn’t always possible with chimeric variegation.
- Step 1: Immediate Light Check & Adjustment: The very first action is to critically evaluate the light the plant is receiving. Is it truly bright enough, consistently? If there’s any doubt, move it to a brighter (still indirect!) location or introduce/increase supplemental grow light duration. Often, improving light is the most impactful step you can take to potentially stop alocasia reversion.
- Step 2: Consider Strategic Pruning (A Potential Technique): This method aims to encourage growth from buds located in still-variegated parts of the plant. It comes with no guarantees, but is often attempted by growers facing reversion:
- Carefully examine the main stem. Identify the highest point (closest to the newest growth) where a leaf still displays good variegation.
- Locate a node (often a subtle ring or bump on the stem where a leaf was attached) just below that last well-variegated leaf.
- Using a clean, sharp, sterilized knife or pruning shears, make a clean cut across the stem just above that node in the variegated section.
- The hope? Removing the reverting top growth might stimulate dormant auxiliary buds located lower on the stem (in the variegated part) to activate and grow. These might produce variegated leaves.
- Manage Expectations: It’s crucial to understand that the new shoot(s) that emerge could still be green. This technique redirects energy but doesn’t alter the genetic potential of the buds already present. It offers a chance, not a certainty.
- Step 3: Propagation as Insurance: If parts of your plant (like a side shoot, or perhaps the top part you pruned off if it retained some pattern) still show strong variegation, consider propagating them separately. Standard propagation methods for Alocasia apply. This preserves the variegated genetics you still have. You can also attempt propagating variegated alocasia corms (the small bulbils sometimes found around the base), but success rates vary wildly; many corms from variegated parents yield all-green plants, as observed by countless growers. It’s a bit of a genetic lottery.
So, can reverted alocasia become variegated again? Generally, once a specific growth point has consistently produced all-green leaves, that point itself is unlikely to spontaneously revert back to producing variegation. Pruning back to an existing variegated section offers the possibility of activating dormant buds that might still carry the variegation, but it doesn’t typically change the reverted part itself.
Troubleshooting Common Issues in Variegated Varieties
Due to the more delicate nature of the non-pigmented tissues, variegated Alocasias can sometimes show cosmetic blemishes more readily. Here’s how to tackle common concerns:
Pesky Pests: Why Vigilance is Key
While not definitively proven scientifically, many growers feel that variegated plants might be slightly more susceptible to pests, possibly due to being under a baseline level of stress simply maintaining their unique coloration.
- Arch Nemesis: Spider Mites: These incredibly tiny pests are notorious fans of Alocasias, variegated or not. They thrive in warm, dry conditions (another reason humidity helps!) and feed by sucking sap. Signs include fine yellow or white stippling on leaves, eventual yellowing or browning, and sometimes visible fine webbing, especially on leaf undersides and petioles. Dealing with spider mites alocasia variegata is a frequent task for owners.
- Other Potential Intruders: Keep an eye out for thrips (tiny, slender insects causing silvery damage and black fecal spots) and mealybugs (small, white, cottony pests often hiding in crevices).
- Your Defense Plan: Regular inspection is critical! At least once a week, carefully check the tops and especially the undersides of all leaves, plus the stems and petioles. If you spot any pests on variegated alocasia, act fast: Isolate the plant immediately to prevent spread. Treat thoroughly with insecticidal soap or neem oil spray, ensuring you get into crevices and under leaves where pests hide. Repeat treatments according to product instructions (usually every 5-7 days for several weeks) to catch hatching life cycles effectively.
Tackling Browning Edges and Spots
Seeing brown marks develop on those prized leaves can be alarming, but often has a clear cause.
- Crispy Brown Edges: This is overwhelmingly caused by low humidity. The delicate variegated sections lose moisture faster than the green parts. Review the ‘Humidity Hacks’ section and boost humidity levels! Chronically inconsistent watering (letting the plant dry out too much between waterings) can also contribute significantly to variegated alocasia crispy edges.
- Brown Spots:
- If spots appear primarily on the white/yellow areas, look dry and potentially papery, and the plant receives strong light, it’s likely sunburn (variegated alocasia brown spots from direct sun exposure). Adjust the lighting immediately.
- If spots are softer, potentially with a yellow halo around them, overwatering or poor soil drainage leading to root issues could be the culprit. Re-assess your watering habits and ensure the soil mix is appropriately airy.
- Less commonly, fungal or bacterial spots can occur, often exacerbated by poor air circulation or water sitting on leaves for prolonged periods. Improve airflow if possible.
- Occasionally, fertilizer salt buildup in the soil can ‘burn’ sensitive leaf tissues, especially edges. If you suspect this and haven’t flushed the soil recently, doing so with plain water at the next watering can help remove excess salts.
Spotlight: Alocasia Frydek Variegata Care Tips
The Variegated Frydek (Alocasia micholitziana ‘Frydek’ Variegata) deserves a special mention due to its immense popularity and breathtaking beauty – those deep, velvety green leaves dramatically contrasted with white or cream variegation are truly special.
- Core Needs: All the general advice in this guide is highly relevant! However, pay particular attention to providing consistently very bright, indirect light. This variety is somewhat notorious among collectors for being prone to Alocasia Frydek Variegata reverting if light levels drop even slightly. Maintaining that stunning contrast requires optimal lighting.
- Handle Velvet with Care: The unique velvety leaf texture means water can sit on the surface rather than rolling off easily. It’s generally advisable to try to avoid wetting the leaves during watering, as water spots can sometimes form or potentially invite fungal issues in stagnant air. Water the soil directly at the base of the plant.
- Spider Mite Magnet: Be extra vigilant for spider mites; they seem particularly drawn to Frydeks according to many grower reports. Maintaining high humidity can help deter them, alongside the crucial regular inspections mentioned earlier.
- Applying these specific alocasia frydek variegata care tips diligently, alongside the general principles, will maximize your chances of keeping this sometimes-fussy but incredibly rewarding plant looking its best.
Conclusion: Patience, Observation, and Enjoying Your Jewel
Caring for a variegated Alocasia is undoubtedly more involved than looking after many common houseplants. It’s often described as a relationship that rewards patience, careful observation, and a willingness to fine-tune conditions based on your specific environment and plant. Achieving perfect, unchanging, stable variegation forever might be an elusive goal with inherently unstable chimeric varieties, but you can certainly influence it positively through attentive care!
Remember these key pillars of variegated alocasia care:
- Bright, indirect light is absolutely fundamental. Make optimizing this your top priority.
- Consistency in watering, humidity, and temperature reduces stress and supports stability, creating an environment where variegation is more likely to be maintained.
- Observe your plant regularly and respond promptly. Watch how new leaves develop and check frequently for pests or signs of distress like browning or yellowing. Early detection makes a world of difference in managing potential issues.
Most importantly, find joy in the process! These plants are stunningly beautiful, even with the occasional minor imperfection that comes with chimeric variegation. Celebrate each new variegated leaf as a small victory, learn from the challenges (we all face them!), and appreciate the unique, living art that your Alocasia brings into your home. Happy growing!