Alocasias, with their stunning, often jewel-like leaves, are true showstoppers in any houseplant collection. Whether it’s the velvety darkness of a ‘Black Velvet’, the striking veins of a ‘Polly’, or the architectural stems of a ‘Zebrina’, these plants capture our hearts. But sometimes, unwelcome guests try to crash the party. If you’ve noticed strange silvery marks or tiny moving specks on your beloved Alocasia, you might be dealing with thrips. Don’t panic! While frustrating, thrips are a manageable problem, and this guide is here to walk you through spotting and eradicating them, step-by-step.
Jump to Sections
ToggleUh Oh, Are Those Tiny Specks Moving? Meeting the Alocasia Thrips Threat
Seeing anything tiny crawling on your precious Alocasia can be alarming. Let’s get acquainted with the culprit so you know what you’re up against.
What Exactly Are Thrips? (Tiny but Mighty Annoying)
Thrips are minuscule insects, typically only 1-2 millimeters long. They look like tiny moving slivers or dashes, ranging in color from yellowish or brown to black. You might need good eyesight or even a magnifying glass to see them clearly! Their young ones (larvae) are even smaller and often paler, looking like tiny whitish specks. Thrips have a relatively quick life cycle, and frustratingly, part of it (the pupal stage) often happens in the soil or leaf litter, making them persistent pests that require consistent effort to eliminate.
Why Do Thrips Love Alocasias So Much?
It can feel personal when pests target your favorites, right? Alocasias, unfortunately, tick a few boxes for thrips. Their often large, relatively tender leaves provide a good surface for feeding. The plant’s structure, with its sheaths and leaf folds, offers excellent hiding places. Thrips are particularly drawn to the tender new growth your Alocasia pushes out. Remember, a stressed plant (perhaps getting inconsistent water or suboptimal light) can also be more vulnerable.
Playing Detective: Spotting Thrips and Their Damage on Your Alocasia Jewel
The absolute key to tackling thrips effectively is early detection. So, grab your reading glasses or a magnifier, and let’s get up close and personal with your Alocasia leaves.
Finding the Culprits: Identifying Adult and Larval Thrips
Check your Alocasia thoroughly, paying extra attention to these hotspots:
- Leaf Undersides: This is a favorite hiding spot. Flip those leaves over!
- Along the Veins: They often congregate here for feeding and shelter.
- New, Unfurling Leaves: Tender growth is a prime target and damage here is common.
- Nooks and Crannies: Check where the leaf meets the petiole (leaf stalk).
Look for those tiny, fast-moving slivers (adults) or paler, smaller specks (larvae). They might dart away quickly when disturbed by your breath or touch.
Tell-Tale Signs: Recognizing Thrips Damage on Alocasia Leaves
Even if you don’t spot the bugs themselves immediately, the damage they leave behind is often a dead giveaway. This is crucial for identifying thrips damage on leaves:
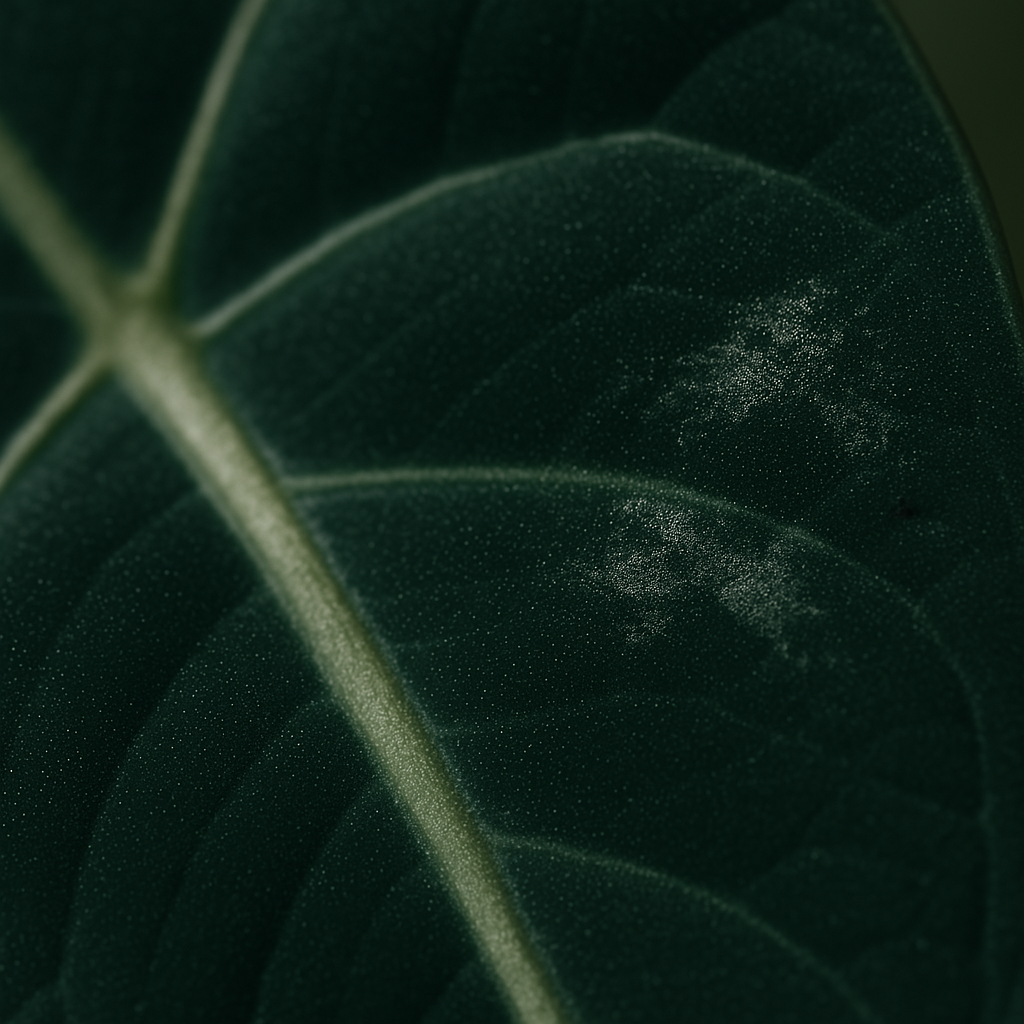
- Silvery or Stippled Patches: This is the classic calling card. As thrips use their piercing mouthparts to suck cell contents, they leave behind tiny discolored spots. On Alocasia leaves, this often manifests as patches of silvery sheen or pale, almost bleached-looking stippling. On darker leaves like ‘Black Velvet’ or ‘Regal Shields’, it can be particularly noticeable as an unnatural metallic glint where the rich color has been stripped away.
- Tiny Black Specks: Look closely within or near the damaged, silvery areas. You’ll likely see tiny, shiny black dots, like miniature pepper flakes. This isn’t dirt; it’s thrips frass (their excrement!). Finding these specks alongside the silvery damage is a very strong indicator you’re dealing with thrips.
- Distorted New Growth: Heavy feeding on developing leaves, before they even unfurl, can cause them to emerge twisted, deformed, stunted, or with rough, papery edges.
- Yellowing or Dropping Leaves: While many things can cause this, a severe, prolonged thrips infestation stresses the whole plant, potentially causing older, lower leaves to yellow and eventually drop prematurely.
Is it Thrips or Something Else? Quick Comparison
Sometimes, other issues can cause confusion. Here’s a quick check:
- Spider Mites: Also cause stippling, but you’ll almost always find fine, silken webbing, especially on leaf undersides or where leaves join stems. The mites themselves look like tiny moving dots, often reddish or pale.
- Aphids: Generally larger than thrips, pear-shaped, and often cluster visibly on new stems or buds. They are slow-moving and leave behind sticky ‘honeydew’.
Operation Eradication: Your Action Plan to Banish Thrips from Alocasia
Okay, diagnosis complete: it’s thrips. Time to roll up your sleeves and take action! Dealing with pests requires persistence, but you absolutely can win this battle and save your Alocasia. Here’s your straightforward plan:
Step 1: Isolate and Inspect Immediately!
First things first: get that infested Alocasia away from your other plants! Thrips are mobile and will happily spread. Move it to another room if possible. Now, give the isolated plant a thorough inspection to understand how widespread the infestation is. If some leaves are absolutely covered and severely damaged, consider pruning them off – seal them immediately in a plastic bag and dispose of it outside your home. Avoid removing too many leaves at once, though.
Step 2: Give Your Alocasia a Refreshing Shower (Physical Removal)
This simple step can make a big difference. Take your Alocasia to a sink or shower (or use a hose outside, gently). Using a moderately strong stream of lukewarm water, thoroughly rinse all surfaces – tops and bottoms of leaves, stems, petioles. Gently support the delicate leaves with one hand while spraying with the other. This physically dislodges and washes away many adult and larval thrips. Let the plant air dry completely in a spot with good circulation, away from direct sunlight.
Step 3: Choose Your Weapon – Treatment Options Explained
Washing helps reduce numbers, but follow-up treatments are usually essential for full eradication. Here are common options, suitable for various preferences and budgets, starting with the gentlest:
Gentle & Natural Approaches (Often the First Line of Defense):
- Insecticidal Soap: A great starting point. These soaps work on contact by disrupting the outer protective layer of soft-bodied insects like thrips.
- How to use: Always mix according to label directions – resist the urge to make it stronger. Spray the entire plant until dripping, focusing intently on leaf undersides and crevices where thrips hide.
- Frequency: Essential: Repeat every 5-7 days for several weeks. Insecticidal soap only kills the thrips it directly contacts, so repeated applications are needed to catch newly hatched larvae.
- Pro Tip: Always wise to test spray on a small, inconspicuous leaf first and wait 24-48 hours. While generally safe for Alocasias, individual plants or specific varieties might show sensitivity.
- Neem Oil: Another popular weapon in the natural arsenal. Pure, cold-pressed neem oil acts in multiple ways – it can repel thrips, stop them from feeding, interfere with their growth and molting, and even suffocate them.
- How to use: Mix concentrated neem oil with water and a small amount of insecticidal soap or mild dish soap (this acts as an emulsifier, helping the oil mix with water). Spray thoroughly, just like insecticidal soap, ensuring complete coverage. Also lightly spray the soil surface, as this might help disrupt pupae.
- Frequency: Apply every 7-10 days for several weeks.
- Cautions: Neem has a distinct, somewhat garlicky/nutty smell that lingers. Crucially, apply neem oil during cooler parts of the day (early morning or evening) and keep the plant out of direct sunlight until the leaves are dry to prevent leaf burn. A patch test is recommended here too.
When You Need More Firepower: Chemical Controls
- Contact Sprays (Pyrethrins/Pyrethroids): These offer faster knockdown than soaps or neem oil. Pyrethrins are derived from chrysanthemums, while pyrethroids are synthetic versions.
- How to use: Follow label directions precisely for mixing and application. Thorough coverage is still critical.
- Cautions: While effective for immediate reduction, repeat sprays are often needed. They can be harmful to beneficial insects (less critical indoors, but worth noting). Always check the label confirms it’s safe for indoor houseplants and your specific plant type if possible. Use basic safety precautions like gloves.
- Understanding Systemic Insecticides for Thrips on Alocasia
Now let’s dive into systemic insecticide for thrips alocasia. These work quite differently and can be very effective for persistent infestations. Think of it like giving your plant internal protection.- How Systemics Work: The insecticide is absorbed by the plant, typically through the roots when you apply granules to the soil and water them in. It then circulates through the plant’s vascular system (its “veins”). When thrips pierce the leaves or stems to feed, they ingest the insecticide and are eliminated.
- Common Options for Houseplants: Look specifically for products labeled for indoor houseplants containing active ingredients like Imidacloprid or Acetamiprid. These often come as ready-to-use granules you sprinkle onto the soil surface and water in, making application relatively easy. Critical Point: Never use systemic products intended for outdoor/garden use on your indoor plants unless the label explicitly states it is safe for houseplants/containers. Outdoor formulas can be too strong or behave differently in pots. For detailed information on specific products, always consult the product label and manufacturer’s instructions.
- Pros: Highly effective against hidden thrips and those within plant tissues. Provides longer-lasting protection (often several weeks to months from one application). Targets sucking insects effectively. Can be less work than frequent spraying.
- Cons & Cautions: They don’t work instantly – it takes time for the plant to absorb and distribute the insecticide. Following label instructions EXACTLY is non-negotiable regarding dosage (measure carefully!) and frequency. Over-application can harm your Alocasia and is unsafe. Always wear gloves when handling granules or systemic sprays. Keep treated plants out of reach of children and pets. There’s also a potential for pests to develop resistance over time if used exclusively and repeatedly. They represent a stronger chemical approach, so consider them if gentler methods haven’t controlled the problem or if the infestation is severe. They can fit a moderate budget, as one application replaces multiple spray sessions.
Consistency is Key: The Importance of Repeat Treatments
This cannot be stressed enough! Whichever treatment you choose (except perhaps long-lasting systemic granules), you must be consistent and persistent. Thrips have overlapping life cycles. Eggs hatch continually, and pupae can emerge from the soil days or weeks after your first spray. A single treatment will never eradicate an established infestation. Plan to inspect your Alocasia closely every few days and re-treat (with contact methods like soap or neem) every 5-10 days for at least 3-4 weeks, perhaps longer, even if you stop seeing active bugs. This persistence is crucial to break the life cycle completely.
Fort Knox Your Foliage: Preventing Future Thrips Attacks
An ounce of prevention is worth a pound of cure, especially with pests! Here’s how to make your home less inviting for thrips:
Quarantine New Arrivals Like Royalty
Make this your golden rule! Any new plant joining your collection should spend 3-4 weeks in isolation, far from your other green buddies. Inspect it meticulously several times during quarantine before introducing it. I know it’s exciting to add a new plant, but this step has saved me countless headaches!
Become an Alocasia Detective: Regular Inspections Pay Off
Get into the habit of really looking at your plants regularly. When you water, take those extra 30 seconds to gently turn over a few leaves, check the undersides, and glance at new growth. Catching just one or two thrips early is infinitely easier than battling an army later.
Happy Plant, Fewer Pests: The Role of Good Alocasia Care
It’s simple but true: a healthy, thriving Alocasia is naturally more resistant to pests and diseases. Ensure you’re meeting its specific needs for light (bright, indirect is usually best), water (consistently moist but never soggy), humidity (they crave it!), and occasional feeding during the growing season. Avoid stressing your plant, as stress weakens its defenses. For more tailored advice, look up care tips for your specific Alocasia variety.
Consider Sticky Traps for Monitoring
Yellow or blue sticky traps are inexpensive tools that can act as an early warning system. Place one or two near your Alocasia collection. Adult thrips (especially winged ones) are attracted to these colors and get stuck. They won’t solve an infestation, but they can alert you to the presence of thrips before you see widespread damage.
Your Alocasia Will Shine Again: Recovery and Encouragement
Dealing with pests like thrips on a treasured Alocasia can definitely feel disheartening. I remember the first time I saw that tell-tale silvery damage on one of my own – it’s easy to feel discouraged! But please remember: you spotted the problem, you learned how to tackle it, and with patience and persistence, you absolutely can get rid of them.
The existing damage on the leaves – those silvery patches or spots – unfortunately won’t heal or disappear. Plants can’t repair leaf tissue like that. But the important thing is that you’ve stopped the pests from causing more damage. As your Alocasia recovers and puts out new growth under your dedicated care, those leaves will be beautiful, healthy, and thrips-free. Focus on that new growth! Be patient with your plant as it bounces back, and be proud of yourself for tackling the problem. Every perfect new leaf is a victory. You’ve got this, fellow Alocasia aficionado! Keep nurturing those gorgeous green jewels.