Hello fellow Alocasia admirers! If you love these stunning foliage plants as much as I do, you might have felt that little pang of worry when winter approaches. Your vibrant Alocasia starts to slow down, maybe even drops its leaves, and you wonder, “Is it dying?!” Don’t panic! Chances are, your plant is just entering dormancy, a natural rest period. And hidden beneath the soil are little treasures – Alocasia corms, often called ‘bulbs’ by many houseplant lovers – which are nature’s backup plan.
Understanding how to care for these corms during dormancy can make all the difference. This guide is here to walk you through exactly how to approach storing alocasia corms, ensuring they stay safe and sound, ready to burst back into life when the time is right. It might sound complicated, but trust me, it’s a totally manageable and incredibly rewarding process!
Jump to Sections
ToggleWhy Bother Storing Alocasia Corms? Understanding Dormancy
First, let’s quickly chat about why your Alocasia might be taking a nap and why storing its corms separately is often a great idea.
What Makes Alocasias Go Dormant?
Like many plants, Alocasias respond to environmental cues. The primary triggers for dormancy are decreasing light levels, shorter daylight hours, and cooler temperatures – basically, the typical conditions we experience indoors during autumn and winter in many regions. The plant naturally slows its growth way down as a survival strategy. Seeing leaves yellow and die back during this time is often completely normal, so don’t assume the worst!
The Big Benefits of Corm Storage
While some Alocasias might happily overwinter in their pots with reduced watering, actively storing the corms offers several advantages, especially for beginners or those in cooler homes:
- Prevent Rot: This is a big one. A dormant plant uses very little water. Keeping corms in soil that might stay cold and damp for extended periods significantly increases the risk of them rotting away. Storage provides a controlled, drier environment where you manage the moisture.
- Conserve Plant Energy: Think of it like letting the corm have an efficient sleep. It can rest peacefully without trying to support struggling leaves or battle less-than-ideal soil conditions.
- Propagation Powerhouse: When you harvest and store corms, you essentially have ready-to-go propagation units! Come spring, you can easily pot them up individually to grow new plants – a fantastic way to multiply your favourite Alocasia varieties. Experienced growers often use this method.
- Peace of Mind: If your main Alocasia plant looks particularly rough during dormancy (sometimes they die back completely to the soil line), knowing you have healthy corms tucked away safely is a great insurance policy for future growth.
Finding Your Treasures: How to Harvest and Prep Alocasia Corms
Ready to find these hidden gems? It’s easier than you think.
Spotting Healthy Corms: What to Look For
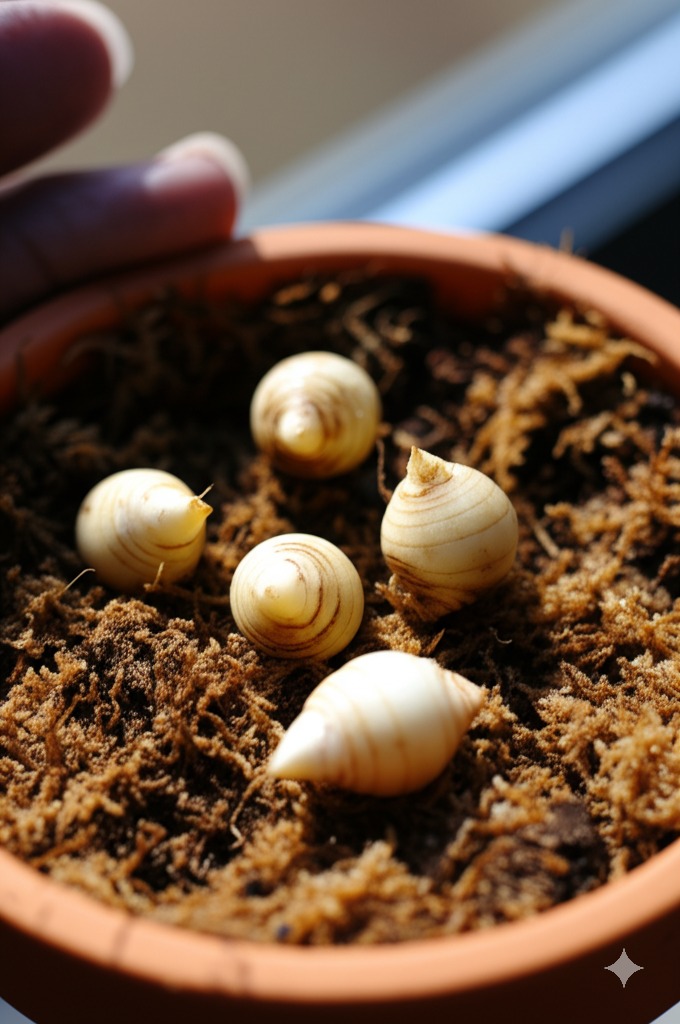
Alocasia corms are small, swollen underground stems – technically not true bulbs, but they function similarly as energy storage. They look like little brownish nodules, sometimes slightly hairy, and you’ll find them nestled around the base of the mother plant, often attached to the roots or just beneath the soil surface. Healthy corms should feel firm and plump when gently squeezed. Avoid any that are soft, mushy, or obviously damaged.
Timing is Key: When to Harvest Your Corms
The ideal time to harvest corms is when your Alocasia clearly signals it’s entering dormancy – growth has significantly slowed or stopped, and leaves are yellowing or dying back naturally. This often happens in late autumn or early winter. You might also discover corms when you’re repotting your Alocasia at other times of the year; feel free to harvest healthy ones then too.
Clean and Cure: Essential First Steps for Success
Once you’ve gently unearthed your corms (be careful not to nick them!), you need to prep them properly. This prep work is key for learning how to store alocasia bulbs over winter successfully.
- Clean: Gently brush or wipe off most of the soil. Avoid aggressive washing right away unless necessary (e.g., heavy pest presence). If you do rinse them, ensure they air dry completely.
- Cure: This step is crucial for preventing problems later! Let the cleaned corms air dry in a shaded, well-ventilated spot for about 1 to 3 days. This allows any tiny surface scratches to seal over, or ‘callus’, which drastically reduces the risk of rot or infection during storage. They should feel dry to the touch before you proceed.
The Safe Haven: Choosing the Best Way to Keep Alocasia Corms Viable
Now for the main event: tucking your corms away safely. The goal is to keep them cool, dark, and relatively dry but not so dry they shrivel up completely. Finding the best way to keep alocasia corms viable often involves choosing the right medium and location.
Picking Your Storage Medium: What Works Best?
You need something to nestle your corms in. Here are common choices:
- Sphagnum Moss: Long-fiber sphagnum is popular. The key is to use it slightly damp. Wet a handful, then squeeze out absolutely all excess water until it feels barely moist to the touch. It helps retain just enough humidity but can cause rot if it’s too wet, so proper squeezing is vital.
- Perlite or Vermiculite: These inorganic materials provide excellent aeration. Use them mostly dry, or perhaps very slightly dampened (barely perceptibly moist). They are less likely to stay soggy but might require you to check that corms aren’t drying out too much, especially in very dry homes.
- Peat Moss: Similar to sphagnum, use it only slightly damp, ensuring it’s fluffy and not compacted.
- (Less Common but Possible): A simple paper bag can work, sometimes with a handful of dry peat or wood shavings added for cushioning, but corms might dry out faster this way, needing more frequent checks.
Container Matters: Selecting the Right Home
Air circulation is vital to prevent stale, moist air that encourages rot!
- Paper Bags: Simple, breathable, easy to label. A good basic option.
- Cardboard Boxes: Allow airflow if not sealed tightly. You can layer corms and medium.
- Plastic Containers (with Ventilation): If using plastic tubs (like Tupperware), you MUST ensure good airflow. Either drill several holes in the lid and sides or leave the lid significantly ajar. Trapped moisture is the enemy here.
Ideal Conditions: The Sweet Spot for Temperature and Light
Where you store them matters significantly:
- Temperature: Aim for a cool, stable temperature, ideally between 50-60°F (10-15°C). Avoid places that experience freezing temperatures or get too warm. A cool closet, a stable basement (if not overly damp), or an unheated garage (if temps stay reliably above freezing) are often good spots in many homes.
- Light: Keep them in the dark. Light can signal them to start sprouting before you’re ready.
Step-by-Step: Packing Your Corms for Their Winter Nap
- Place a shallow layer of your chosen (appropriately moistened or dry) medium in the bottom of your ventilated container or bag.
- Arrange the cured corms on top. Try to space them out so they aren’t tightly packed against each other, allowing air to circulate around them.
- Cover them gently with more medium.
- Label your container clearly! Include the Alocasia variety (e.g., ‘Polly’, ‘Black Velvet’, ‘Zebrina’) and the date you stored them. This is super helpful later, especially if you’re storing multiple types.
Keeping Watch: How to Monitor Corms During Storage
Storing isn’t a ‘set it and forget it’ deal entirely. A little check-in now and then is wise to catch any potential issues early.
How Often Should You Peek?
Check on your stored corms roughly every 3-4 weeks, or at least once a month. A quick look and gentle feel is usually sufficient.
Spotting Trouble: Rot vs. Healthy Drying vs. Desiccation
When you check, gently feel a few corms:
- Healthy: They should still feel firm, like a small pebble or firm grape. A little surface dryness or slight wrinkling might be perfectly okay, especially if using a drier medium like perlite.
- Rot: This is the main concern. Look for soft, mushy spots, any bad or sour smell, or visible mold (usually white or grey fuzzy patches). If you find a rotten corm, discard it immediately to prevent it from affecting others in the container.
- Desiccation: If the corms look excessively shriveled and feel very lightweight and brittle, they might be drying out too much.
Quick Fixes if Issues Arise
- Too Damp/Mold: If the medium feels damp or you see early signs of mold, increase air circulation immediately. Open the container fully for a while to air out, or even carefully remove the corms, let them air dry briefly, and repack in slightly drier medium. Always discard any clearly rotten corms.
- Too Dry: If using a very dry medium and the corms seem overly shriveled (though still firm), you might consider a very light misting of the medium (not the corms directly) or mix in a tiny amount of barely damp sphagnum. However, be extremely cautious when adding moisture, as it increases rot risk. Often, slightly shriveled but still firm corms remain viable. When in doubt, it’s generally safer to err on the side of slightly too dry rather than too wet.
The Spring Awakening: Replanting Your Stored Alocasia Corms
After their long rest, it’s truly exciting to wake your corms up and watch them grow!
Timing the Wake-Up Call: When to Replant
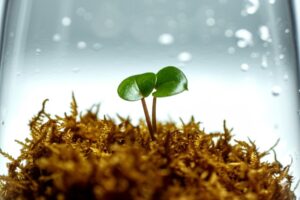
The best time is usually in spring, as temperatures naturally warm up and daylight hours increase, signaling the end of dormancy. You can also decide to plant them if you notice they’ve started sprouting a small growth point while still in storage.
Potting Up Your Corms: The How-To
- Mix: Prepare a very well-draining potting mix suitable for Alocasias. Standard houseplant soil amended generously with perlite, orchid bark, coco chips, or pumice works well. Excellent drainage is non-negotiable to prevent rot as they wake up.
- Pot: Choose small pots, typically 2-4 inches in diameter, depending on corm size. One corm per pot is usually best initially to give it space and prevent competition. Ensure pots have drainage holes.
- Planting: Plant the corm about 0.5 to 1 inch deep. If you can clearly see a pointy end (the growth tip), that generally goes upwards. If you’re unsure, planting the corm on its side is perfectly fine – it will figure out which way is up!
- Water: Water lightly after planting, just enough to make the mix slightly moist throughout, but definitely not soggy. Allow excess water to drain away.
Care After Planting for Sprouting Success
Now comes the waiting game, but you can certainly help things along:
- Warmth: Alocasia corms love warmth to sprout. Consistent warmth is key. Placing the pots on a seedling heat mat provides gentle bottom heat and can significantly speed up the sprouting process. Aim for soil temps around 70-80°F (21-27°C).
- Light: Provide bright, indirect light. Avoid placing them in harsh, direct sun, which can scorch tender new growth.
- Humidity: High humidity helps encourage sprouting and leaf development. You can cover the pot with a clear plastic dome (like a cut bottle top) or place it inside a clear plastic bag – just make sure to open it daily for fresh air exchange to prevent mold.
- Patience! This is absolutely crucial. Some corms sprout quite quickly (within a few weeks), while others might take a couple of months or even longer, depending on the corm’s health and conditions. Keep the soil lightly moist (water when the top inch or so feels dry) and maintain warmth and humidity. Don’t give up too soon!
Your Alocasia Corm Storage Questions Answered (FAQ)
Let’s tackle a few common questions:
Can I just leave the corms in the pot over winter?
You can, especially if the mother plant remains semi-active with leaves or if you live in a very mild climate and are extremely careful with reducing watering drastically. However, for many indoor growers, the risk of accidental overwatering leading to rot in cold, damp soil is higher. Digging them up for storage gives you much more control over their environment and often leads to better success rates, particularly for less experienced growers.
How long can Alocasia corms be stored successfully?
Typically, they are stored over the main winter dormancy period, which might be anywhere from 3 to 6 months. However, if kept in truly ideal cool, dark, and slightly humid (but not wet) conditions, healthy corms can remain viable for longer, sometimes up to a year or slightly more. Success rates generally decrease the longer they are stored, though.
How do I know for sure if a stored corm is still alive/viable?
The best indicators are firmness (it shouldn’t be mushy/soft or completely rock hard/brittle), the absence of any rot or pervasive mold, and sometimes you might even see a tiny pale bump or point indicating where new growth will eventually emerge. Don’t discount small corms – if they are firm and look healthy, they often have a good chance of sprouting!
Wrapping Up Your Corm Storage Journey
See? Storing alocasia corms isn’t so scary after all! By giving these little powerhouses a bit of attention and the right conditions during their natural rest period, you’re setting them up for fantastic success and potentially multiplying your gorgeous Alocasia collection come springtime.
Remember the key takeaways: keep them cool (but not freezing), dark, with good air circulation, in a storage medium that’s just slightly moist or mostly dry (never wet!), and check on them periodically for any signs of trouble. It’s like carefully tucking tiny plant batteries away safely until they’re recharged and ready to power up new growth. While results can sometimes vary slightly between different Alocasia varieties, these general principles hold true.
I hope this guide empowers you to embrace Alocasia dormancy with confidence rather than worry. Give corm storage a try this winter – you might be surprised how simple and incredibly rewarding it is to witness those stored corms sprout into vibrant new life when spring arrives! Happy growing!