Hey there, fellow Alocasia lover! Let’s talk about something slightly less glamorous than those stunning leaves we adore – pests. Specifically, those little white fuzzy bugs that can sometimes appear on our precious Alocasia plants. If you’ve spotted some suspicious cottony dots and your heart sank a little, take a deep breath. You’re definitely not alone, and the fantastic news is, you can absolutely deal with mealybugs on your Alocasia. I’m here to walk you through exactly how to identify them and, more importantly, how to send them packing! Let’s dive in.
Jump to Sections
ToggleIdentifying the Culprit: Getting to Know Mealybugs
First things first, let’s make absolutely sure we’re dealing with mealybugs. They have a pretty distinct look once you know what to search for.
What Mealybugs Look Like: Spotting the “Cotton Balls”
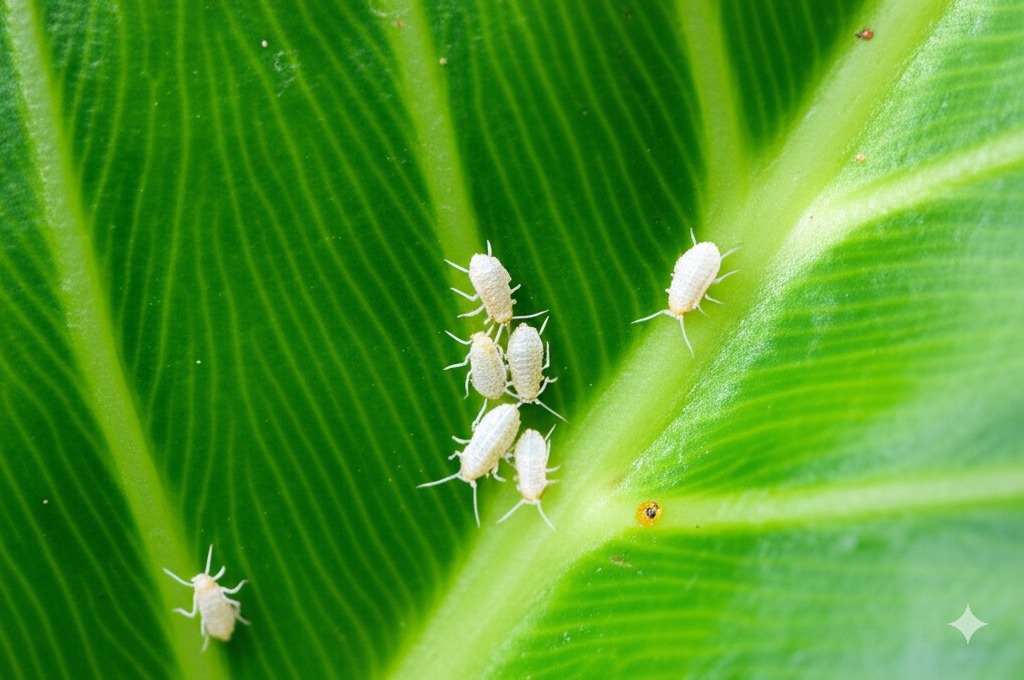
Imagine tiny, oval-shaped bugs, usually only about 1-4 millimetres long. Their key identifier is that protective covering: a white, waxy, almost fluffy or cotton-like substance. They often enjoy company, huddling together and creating noticeable white clusters. If you were to (gently!) poke away the white fluff, you might see the pinkish or greyish soft body of the insect underneath. These are the infamous white fuzzy bugs on alocasia plant causing the bother.
Favorite Hiding Spots on Your Alocasia Jewel
Mealybugs are masters of hide-and-seek! They love tucking themselves into safe, sheltered spots on your Alocasia, especially plants with lots of natural hiding spots like many Alocasia varieties. Grab a magnifying glass if you have one (or just use your keen eyes – you’ve got this!) and check these areas meticulously:
- Leaf Undersides: Especially along the central vein and where smaller veins branch off. Always make flipping those gorgeous leaves part of your inspection!
- Leaf Axils: That snug little nook where the leaf stem (petiole) connects to the main stem. Prime real estate for mealybugs.
- New Growth: Tender, unfurling leaves are a five-star buffet for them. They can be hidden deep inside the delicate new folds.
- Petiole Bases: Check right down where the leaf stems emerge from the main stem or rhizome, sometimes hidden by the papery sheath (cataphyll).
Is it Mealybugs or Something Else?
Occasionally, you might see white marks from hard water minerals left after watering, or even a bit of harmless mold or mildew if conditions are very damp (though often, mold follows mealybugs!). But mealybugs look distinctly like tiny cotton balls or individual insects coated in that waxy covering, frequently clustered together. Another huge clue? That tell-tale sticky residue on alocasia leaves or surfaces nearby. If you see that, mealybugs are highly likely.
Why You Need to Act: The Damage Mealybugs Cause to Alocasias
Okay, so they’re small, but don’t underestimate the trouble these little pests can cause. Mealybugs have tiny, sharp, piercing mouthparts they use to suck the vital sap right out of your Alocasia’s leaves and stems. Think of them as tiny energy vampires!
This constant feeding leads to noticeable problems:
- Yellowing leaves: You might see yellow spots (called stippling) or the entire leaf may gradually turn yellow.
- Leaf drop: As the plant weakens, it may start shedding leaves prematurely.
- Stunted growth: Your Alocasia just won’t have the resources to push out those big, beautiful new leaves you love.
- General decline: The plant might just look ‘off,’ sad, and lack its usual vibrant energy.
But wait, there’s more! As they feed, mealybugs excrete a sticky, sugary waste product called honeydew. This clear substance coats the leaves and stems, making them feel tacky to the touch. Honeydew itself can attract ants (who sometimes protect mealybugs to harvest it!) and, more commonly, it creates the perfect surface for sooty mold to grow. This black, powdery-looking fungus doesn’t usually directly feed on the plant, but it looks messy and can block some sunlight, hindering photosynthesis.
Left unchecked, a severe mealybug infestation can seriously weaken your Alocasia. While resilient, a heavy infestation, especially on a younger or already stressed plant, could potentially lead to its demise. That’s why acting promptly and thoroughly is so important!
Your Alocasia Rescue Mission: Effective Mealybug Removal Strategies
Alright, time to put on your plant rescuer hat! Here’s a practical, step-by-step battle plan:
Step 1: Quarantine Immediately!
This is the absolute first and most crucial step. As soon as you confirm or even strongly suspect mealybugs, move that Alocasia far away from your other plant companions. Mealybugs can crawl or be accidentally transferred easily. Keep the affected plant in isolation throughout the entire treatment process and for several weeks after you think they’re gone, just to be absolutely certain no stragglers remain.
Step 2: Choose Your Treatment Method (Be Gentle but Firm!)
There are several effective ways to tackle mealybugs, and often, using a combination approach gives the best results. Always remember, Alocasias can be a bit dramatic and sensitive sometimes, so starting with gentler methods and always testing first is the smart way to go.
Focus Area: The Targeted Dab – Using Rubbing Alcohol Safely
This is often the go-to first strike for easily visible bugs.
- What you need: Standard 70% Isopropyl Alcohol (check the label to confirm the percentage) and some cotton swabs (Q-tips work perfectly) or cotton pads. Avoid higher concentrations as they are more likely to damage leaves.
- How-to: Dip the cotton swab into the 70% alcohol. Gently but firmly dab it directly onto each visible mealybug and any white, cottony masses. The alcohol works quickly to dissolve their protective waxy coating and dehydrate the bug itself. Be methodical and check all those hiding spots!
- Crucial Warning – Please Don’t Skip This: Alocasia leaves have a reputation for being sensitive! Before applying alcohol widely, you absolutely MUST test it. Dab the 70% alcohol onto a small, hidden part of one leaf (the underside is good). Wait a full 24 to 48 hours and check carefully for any signs of damage like browning, bleaching, spotting, or crisping. If you see any damage, try diluting the alcohol with an equal amount of water (making it ~35%) and test that mixture on a different spot. If even the diluted mix causes issues, it’s best to rely more on the soap or neem oil methods below. Safety first for your plant baby!
- Optional Rinse: After the alcohol has sat for a few minutes (giving it time to work), some find it helpful to gently wipe the treated areas with a cloth dampened with plain water, or even give the plant a gentle shower (if manageable) to remove alcohol residue and dead pests.
- Pros: Kills on contact, very effective for spot-treating visible bugs, inexpensive and readily available.
- Cons: Can be time-consuming for heavy infestations, only kills the bugs it directly touches, carries a real risk of leaf burn on sensitive Alocasias if not tested carefully. This is the core technique for treating mealybugs with rubbing alcohol.
Focus Area: Washing Them Away – Insecticidal Soap Power
A great option when you need broader coverage than just dabbing.
- What to use: Please use a commercially formulated insecticidal soap designed specifically for houseplants. Do not substitute household dish soap, detergents, or other cleaners – these lack the right properties and contain additives that can strip the natural protective oils from Alocasia leaves, causing damage.
- How-to: Carefully mix the insecticidal soap concentrate with water according to the product label directions. Pour into a clean spray bottle. Spray your Alocasia thoroughly, ensuring you achieve complete coverage on all plant surfaces – pay special attention to the undersides of leaves, stems, and those tricky leaf axils where pests hide. The soap works physically by suffocating soft-bodied insects like mealybugs.
- Test First, Spray Smart: Yes, even with gentler soaps, testing on a small, hidden leaf area first is always wise with Alocasias. Wait 24-48 hours to check for reactions. To further minimize risk, apply sprays during the cooler parts of the day, like early morning or late evening, out of direct sunlight.
- Repeat Performance Needed: Insecticidal soap has no residual effect; it only works when it directly contacts the pests while wet. This means you’ll need to reapply consistently, typically every 5-7 days, for several weeks to manage the infestation and catch any newly hatched nymphs.
- Pros: Generally safe for humans and pets when used as directed, relatively low toxicity, effective when applied thoroughly.
- Cons: Requires direct contact to kill, needs diligent repeat applications, still carries a small potential for leaf sensitivity (hence testing!). A solid choice when you need insecticidal soap for alocasia pests.
Focus Area: The Natural Route – Harnessing Neem Oil
A popular plant-derived option with multiple modes of action.
- What to use: Look for a good quality 100% cold-pressed Neem Oil concentrate (not clarified hydrophobic extract, which is less effective as an insecticide). To get it to mix with water, you’ll need an emulsifier – just a few drops of a mild liquid soap (like pure Castile soap, not dish detergent) per litre/quart of water usually does the trick. Follow the neem oil product’s specific mixing ratios for pest control.
- How-to: Add the water, emulsifying soap, and neem oil to your sprayer, shake well, and spray thoroughly, ensuring complete coverage of all plant parts, just like with insecticidal soap. Neem oil works differently – it messes with insect hormones, deters feeding, inhibits growth, and also has some suffocating action.
- Test & Timing are Critical: Absolutely test neem oil on a small leaf area first! And this is vital: Only ever apply neem oil sprays in the very early morning or late evening when the plant is out of direct sunlight. Neem oil + sun = high risk of serious leaf burn for many plants, including Alocasias. Also, be prepared for neem’s distinct natural smell (often described as garlicky or nutty); it’s normal and will dissipate, but noticeable indoors initially.
- Repetition is Key: Neem oil is not an instant knockdown killer. It works over time and requires consistent reapplication, usually every 7 to 14 days, to disrupt the mealybug life cycle effectively.
- Pros: Plant-based/natural origin, has multiple modes of action plus some potential benefits against mites and fungi, offers some residual deterrence. A favored approach for neem oil for mealybugs on alocasia.
- Cons: Strong smell initially, requires very careful mixing and application timing to avoid leaf burn, test patch is non-negotiable, slower acting than contact killers.
Consideration: For Tough Battles – Systemic Insecticides
Okay, let’s talk about the ‘bigger guns’. If you are facing a truly severe, widespread, and persistent mealybug infestation that simply isn’t budging after several weeks of consistent and correct application of the methods above, you might then consider using a systemic insecticide. These products are absorbed by the plant (often through the roots when applied as granules to the soil, or sometimes via foliar spray) and circulate within the plant’s sap. When mealybugs feed, they ingest the insecticide.
- Use With Extreme Caution: These are stronger chemicals and require careful handling. You absolutely must read and follow the product label instructions meticulously. Ensure the product is labeled for use on indoor houseplants and specifically targets mealybugs. Wear gloves and apply as directed.
- A Last Resort Mindset: Speaking as a fellow plant enthusiast who values the health of my plants and home environment, I personally view systemics as a last resort. They are best reserved for situations where a treasured plant is heavily infested and at risk of being lost entirely, and other methods have genuinely failed despite correct application.
- Pros: Provides longer-lasting, internal protection against sucking insects. Can reach pests hidden deep within the plant that sprays might miss.
- Cons: More potent chemicals require careful handling and disposal. They take time to become fully effective throughout the plant (especially soil applications). Potential concerns for beneficial insects if the plant were ever moved outdoors (less of an issue for permanent houseplants).
Step 3: Consistency is Your Best Friend – Follow-Up is Crucial
This is perhaps the most important tip! Whichever treatment method(s) you choose (alcohol dabs, soap sprays, neem oil), don’t expect a single application to wipe out the entire mealybug population. It rarely works that way. There will likely be bugs you missed, and microscopic eggs hidden in crevices can hatch days or weeks later, starting the cycle anew. Patience and consistency are key. You need to repeat your chosen treatment(s) according to their recommended frequency (e.g., check daily/every few days for spot-dabbing, repeat sprays every 5-14 days depending on the product) for at least 3-4 weeks, maybe longer, even if you stop seeing active adult bugs. Keep checking diligently! This persistence is what finally breaks the life cycle.
Keeping the Coast Clear: Preventing Future Mealybug Attacks
Wouldn’t it be nice to avoid this whole drama next time? While no prevention is foolproof, these habits significantly reduce the risk:
Inspect Before You Connect: Smart Plant Shopping
Become a vigilant plant shopper! Before bringing any new green friend home, give it a thorough inspection right there in the store or nursery. Gently turn leaves over, peek into leaf axils, check near the soil line. If you see anything suspicious, it’s better to pass on that specific plant.
The Welcome Home Quarantine Zone
This is a game-changer! Even if a new plant looks perfectly clean, keep it completely separate from your existing plant collection for at least 3-4 weeks. Find a spot in another room if possible. This isolation period gives any sneaky hidden pests or unhatched eggs time to reveal themselves before they have a chance to spread.
Become an Alocasia Detective: Regular Check-Ups
Make pest inspection a quick part of your regular watering or plant admiration routine. When you water, take those extra 30 seconds to glance under a few leaves, check the stems, look at new growth. Catching just one or two mealybugs early is infinitely easier than tackling an established colony!
A Happy Alocasia is a Hardy Alocasia
It’s true – healthy, thriving plants seem better equipped to withstand and recover from pest pressures. Focus on providing your Alocasia with the conditions it loves: the right amount of bright, indirect light; consistent moisture (allowing the top inch or two of soil to dry out between waterings, typically); good humidity (a humidifier or pebble tray can help!); and appropriate feeding during the active growing season. Importantly, avoid excessive nitrogen fertilizer, as overly lush, soft growth can sometimes be more attractive to sap-sucking pests. Following a good alocasia care guide for overall health is excellent pest prevention for alocasia.
Bouncing Back: Helping Your Alocasia Recover Post-Pest
Once you’re confident you’ve won the mealybug battle (high five!), your Alocasia might need a little TLC to fully recover.
- Continue to monitor it closely for several more weeks, just in case any sneaky stragglers reappear.
- Focus on providing consistent, optimal growing conditions (light, water, humidity) to help it regain its strength and focus energy on producing healthy new growth.
- Resist the temptation to immediately repot or make other drastic changes unless absolutely necessary (like confirmed root mealybugs or severe root-bound issues). Let the plant recover from the pest stress first.
- Be patient! It might take a little while for your Alocasia to bounce back fully, but they are often surprisingly resilient.
You’ve Got This, Fellow Alocasia Enthusiast!
Finding pests like mealybugs on your precious Alocasia can definitely feel like a setback, maybe even a little frustrating. But please remember, it’s a common issue and absolutely does not mean you’re a bad plant parent! As many Alocasia owners know, it happens sometimes despite our best efforts.
The keys to success are: accurate Identification, swift Isolation, consistent and careful Treatment (always testing first, especially when treating mealybugs with rubbing alcohol, soaps, or oils), and diligent Prevention habits moving forward.
Your Alocasia ‘jewel’ is worth the effort. With a little patience, persistence, and the right approach, you can absolutely help it overcome this challenge and get back to gracing your home with its stunning beauty. Keep up the great plant care – you’ve got this!