If you have ever lost a prized Alocasia Dragon Scale or Black Velvet to sudden root rot, you are not alone. Alocasias are notorious for needing “moist but not wet” soil—a balance that is incredibly hard to perfect with traditional potting mixes. Enter Lechuza Pon. This mineral-based substrate is revolutionizing how we grow Aroids, offering a near-failproof way to maintain healthy root systems. In this guide, we break down exactly why Alocasias thrive in Pon and how to transition them without killing them.
Lechuza Pon is a mineral substrate ideal for Alocasias because it maintains a perfect air-to-water ratio, preventing root rot. To transition an Alocasia: completely remove all soil from roots, plant in Pon using a self-watering pot, and keep the reservoir dry for the first 2 weeks (top water only) to allow roots to acclimate.
Jump to Sections
ToggleWhat is Lechuza Pon?
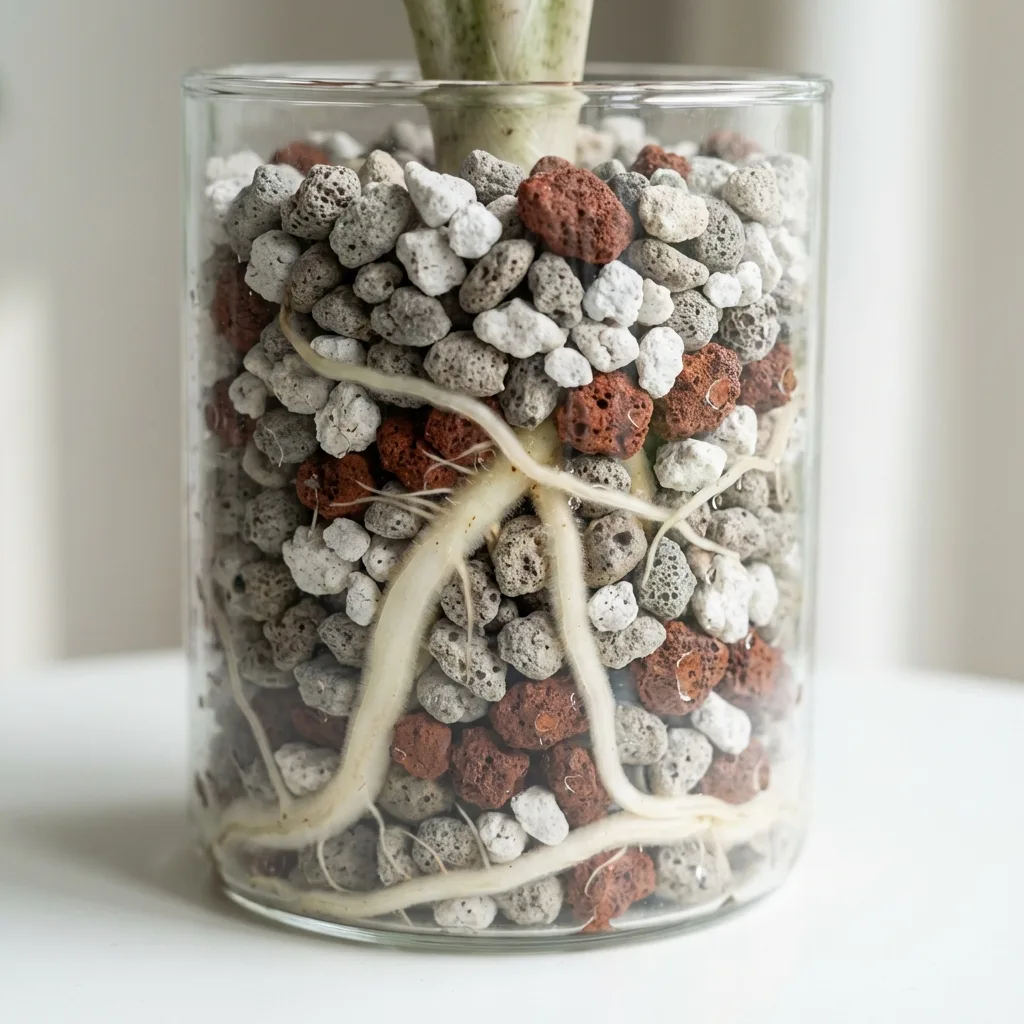
Lechuza Pon is not soil; it is a purely mineral substrate designed for semi-hydroponics. Unlike DIY mixes where you guess the ratios, Pon is chemically stable and structurally consistent. It consists of four distinct components:
- Zeolite: This mineral acts as a pH buffer, stabilizing the acidity around the roots. It also stores nutrients and releases them slowly.
- Washed Pumice: Highly porous volcanic rock that absorbs water like a sponge and releases it via capillary action. It ensures the mix remains airy.
- Light Lava Rock: Provides structural stability (weight) and iron. It creates large air pockets which are essential for oxygen-loving Alocasia roots.
- Slow-Release Fertilizer: Genuine Lechuza Pon comes pre-coated with fertilizer effective for about 6 months, reducing initial maintenance.
The magic of Pon lies in its capillary action. It can wick water upwards from a reservoir against gravity, delivering consistent moisture to the roots without ever suffocating them in standing water.
Why Alocasias Love It
Alocasias (Jewel Alocasias especially) are prone to root rot because their thick, fleshy roots require high levels of oxygen. In dense peat-based soil, water fills the air gaps, choking the roots.
1. Impossible to Overwater: As long as you respect the reservoir line, the roots sitting in the Pon are never submerged. They access water vapor and moisture held in the stones, not liquid water.
2. pH Stability: Alocasias are sensitive to soil acidity changes caused by decomposing peat moss. Since Pon is mineral and doesn’t decompose, the pH remains stable for years.
💡 Pro Tip: Pon is also pest-resistant. Fungus Gnats need decaying organic matter to breed. Since Pon is inorganic, it naturally breaks the gnat lifecycle.
The Ultimate Transition Guide (Step-by-Step)
The transition is the most dangerous moment. If done incorrectly, your Alocasia will shed all its roots (root melt). Follow this strict protocol to minimize shock.
Step 1: The Cleanse (Critical)
Remove the plant from its soil pot. You must remove 100% of the organic soil from the roots. Any soil left attached will rot when exposed to the humidity of the Pon.
- Use a gentle stream of lukewarm water.
- Use a soft toothbrush to scrub stubborn soil from the rhizome.
- If roots are rot-prone, dip them in a 3% Hydrogen Peroxide solution diluted with water (1:3 ratio) for 5 minutes.
Step 2: Choose the Pot
You need a vessel that holds water at the bottom but doesn’t have drainage holes that leak everywhere (unless you use a cache pot).
- Self-Watering Pots: The best option. They have a wick or a separator plate.
- DIY Method: Use a clear glass jar (no drainage). Fill the bottom 1/3 with Pon (reservoir zone) and the top 2/3 with the plant.
Step 3: Planting
Fill the bottom of the pot with Pon. Place the Alocasia so the base of the corm is sitting above the estimated water line. Pour Pon around the roots, tapping the pot gently to let the stones settle into the gaps. Do not compress it manually; you want air pockets.
Step 4: The Dry Phase (The Secret to Success)
DO NOT fill the reservoir immediately. The roots have been damaged by cleaning and need to callous.
For the first 2-3 weeks, treat the plant like it’s in soil. Top-water it gently every few days, letting the water run through (dump excess if using a cache pot). This forces the roots to grow downwards searching for moisture. Only fill the reservoir once you see new root growth.
👉 Related: Traditional Aroid Mix vs Pon
Long-Term Maintenance
Watering Routine
Once established (roots have reached the bottom), simply fill the reservoir to the “MAX” line. Let the plant drink it all. **Crucial:** When the reservoir is empty, wait 2-3 days (Dry Period) before refilling. This mimics the natural wet/dry cycle and prevents bacterial buildup.
Fertilizing
After 6 months, the pre-loaded fertilizer will be depleted. You must add nutrients.
- Liquid Fertilizer: Add a hydroponic nutrient solution (like General Hydroponics Flora Series or Foliage Pro) to the water reservoir at 1/4 strength every watering.
- Slow Release: Sprinkle Osmocote pellets on top of the Pon.
Flushing
Minerals and salts build up in the stones over time (white crust). Once a month, take the pot to the sink and run water through it copiously from the top to flush out excess salts.
Common Problems & Shock
✅ Good Signs
- White, fuzzy roots (water roots)
- New leaf growth within 3 weeks
- Water level drops steadily
❌ Bad Signs
- Yellowing lower leaves: Normal transition shock (don’t panic)
- Sulfur smell: Root rot. Unpot immediately.
- Stem mushiness: Rot has entered the corm.
Frequently Asked Questions
Can I reuse Lechuza Pon?
Yes! That’s the best part. If a plant dies or is repotted, boil the Pon in water for 10 minutes to sterilize it, rinse it, and it’s good as new.
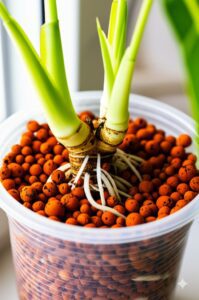
Can I sprout Alocasia corms in Pon?
Absolutely. Pon is one of the best mediums for corms. Use a small cup (shot glass size) with Pon and keep the water level high (halfway up) until leaves emerge.
🌿 Level Up Your Care
Mastering Semi-Hydro is just the beginning.