Hello fellow plant enthusiasts! Have you ever gazed longingly at those stunning Alocasia plants, with their dramatic leaves and exotic vibes, only to hear whispers about how tricky they can be? Maybe you’ve even tried caring for one before and felt a bit discouraged. I absolutely get it! Alocasias, often called ‘Elephant Ears’, certainly have a bit of a reputation for being divas.
But here’s some fantastic news I’m excited to share: not all Alocasias are created equal when it comes to fussiness! There are actually some wonderful varieties out there that are much more forgiving and welcoming to those just starting their Alocasia journey. If you’re looking for easy alocasia for beginners, you’ve definitely come to the right place. Forget the fear factor – let’s explore five reliable, low maintenance alocasia plants that can bring that tropical magic to your home without quite so much drama.
Jump to Sections
ToggleWhat Makes an Alocasia “Beginner-Friendly”? (Setting Realistic Expectations)
Now, let’s be wonderfully honest – “easy” in the Alocasia world isn’t quite the same as “easy” for, say, a nearly indestructible Snake Plant or ZZ Plant. These are still Alocasias, after all, and they have certain needs we need to respect. But the varieties we’ll highlight generally share a few helpful traits that make them more approachable:
- Slightly More Forgiving: They tend to tolerate minor slip-ups in your watering routine or slight dips in humidity a bit better than their more sensitive cousins. They offer a little more wiggle room while you find your groove.
- Readily Available & Affordable: You can often find these varieties more easily at local nurseries or online shops, usually at a friendlier price point. This takes some pressure off – it’s easier to learn with a plant that doesn’t feel quite so precious!
- Good Recovery Potential: If you do hit a small bump in the road (like forgetting a watering for a little too long), these types often have a better tendency to bounce back nicely once you correct the conditions.
- Clear Signals: Sometimes, these varieties might give you slightly more obvious cues – like a noticeable droop – when they’re thirsty or unhappy, helping you respond faster.
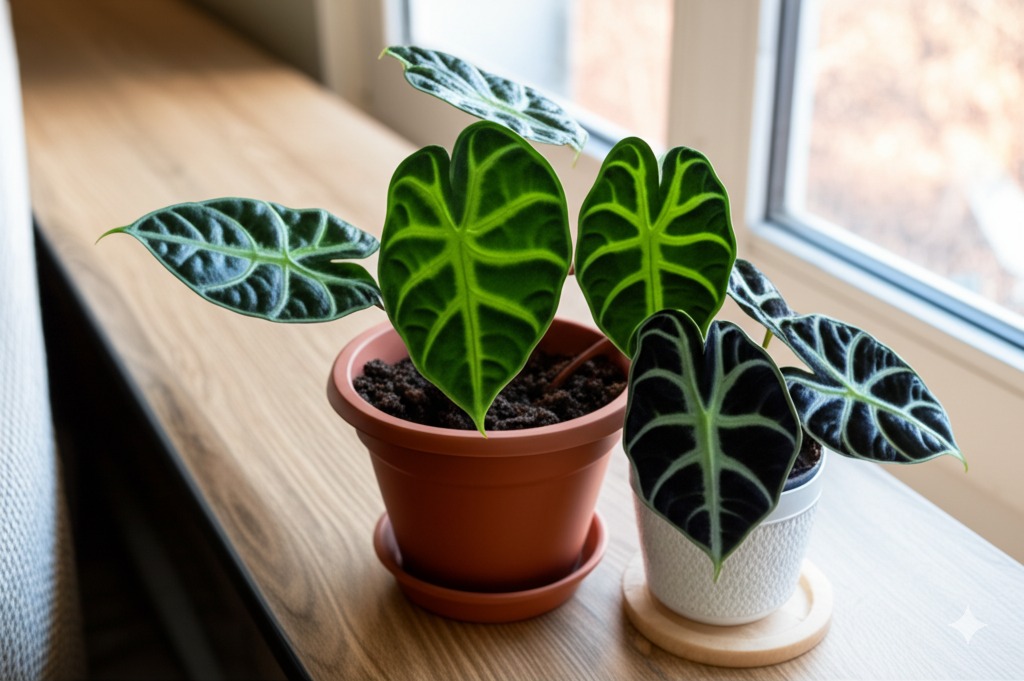
Our Top 5 Easiest Alocasia Picks for Your Indoor Jungle
Ready to meet the stars of the show? Here are five Alocasia varieties renowned for being more approachable and some of the easiest alocasia to keep alive indoors if you give them the right basic care:
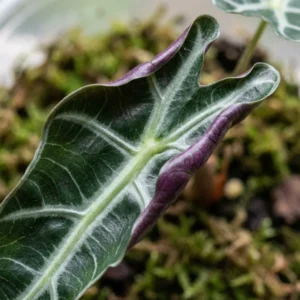
1. Alocasia Polly (Amazonica ‘Polly’) – The Popular Gateway
There’s a very good reason Alocasia ‘Polly’ is often the first Alocasia many people bring home. With its distinctive dark, glossy, arrowhead-shaped leaves and striking silvery-green veins, it’s a true eye-catcher. Its manageable size makes it suitable for various spots in your home.
- Beginner Care Highlight: Consider Polly your friendly Alocasia tutor! It will definitely help you learn by showing you if you’re off track with watering. Consistent moisture (but never soggy soil!) is key. Good drainage in the pot is absolutely non-negotiable to prevent root rot. It appreciates decent humidity but can often adapt reasonably well to average home levels, provided you keep it away from very dry drafts.
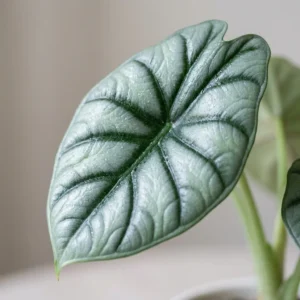
2. Alocasia Black Velvet (Reginula) – The Touchably Toughie
Oh, the Black Velvet! This one is a personal favourite for its incredible, luxurious texture. The leaves are thick, stiff, and feel just like deep, dark velvet, contrasted beautifully by bright silver veins. It stays relatively compact, making it perfect for shelves or desktops where you can admire it up close.
- Beginner Care Highlight: Those thicker leaves aren’t just for show – many growers find they help the plant retain a bit more moisture, making the Black Velvet slightly more tolerant of drying out between waterings compared to Polly. Don’t push it too far, though! Excellent drainage is still crucial. It’s often considered one of the easiest alocasia to keep alive indoors precisely because it’s a little less demanding about constant moisture, but always be careful not to overcompensate and overwater.
3. Alocasia Frydek (Micholitziana ‘Frydek’) – The Velvety Green Gem
If you adore the velvety texture of Black Velvet but fancy a vibrant green, then meet Alocasia Frydek! It boasts similar stunning arrowhead-shaped leaves but in a rich, deep green with bright, almost electric white or light green veins. Some experienced growers find it a bit more vigorous or robust than Polly.
- Beginner Care Highlight: Care is very similar to Black Velvet. It really appreciates consistent conditions – stable temperatures (definitely avoid cold drafts!), bright indirect light, and that careful watering technique. Just be sure you’re getting the standard green Frydek; the gorgeous (and very pricey) variegated version is stunning but definitely not recommended for beginners!
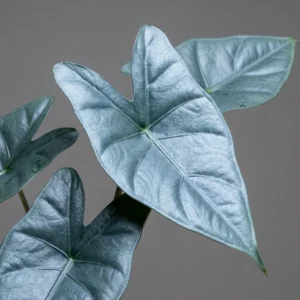
4. Alocasia Zebrina – Stripes and Style
Looking for an Alocasia with a unique architectural flair and personality? Alocasia Zebrina demands attention with its incredible petioles (leaf stalks) patterned with bold, zebra-like stripes! The leaves themselves are elegant, arrow-shaped, and can get quite large, giving the plant a graceful, upward reach that adds real drama.
- Beginner Care Highlight: Zebrina needs good, bright indirect light to thrive and maintain those amazing strong stems. It can be quite expressive about water – the leaves will often droop noticeably when thirsty, which is actually a helpful signal! Just be ready to water it promptly when it asks. Finding that happy watering balance (not too wet, not too dry) is the key here.
5. Alocasia Portodora / Portora – The Gentle Giant
If you have a bit more space and dream of a larger, impressive statement plant, consider the Alocasia Portodora (or its close relative/hybrid Portora). These beauties produce large, wonderfully ruffled, upward-pointing green leaves and can grow quite tall, making a real impact in a room.
- Beginner Care Highlight: Compared to the smaller ‘jewel’ types like Polly or Black Velvet, these larger varieties are generally considered a bit hardier and less sensitive to slightly lower humidity levels, especially once they are established and mature. They still absolutely need bright indirect light and consistent watering in a well-draining pot, but they often feel a bit more robust and ‘plant-like’, perhaps less like a delicate collectible. This makes them a great example of a hardy alocasia variety for those wanting impressive size without extreme fuss.
Essential Care Secrets: Keeping Your Beginner Alocasia Happy
Okay, you’ve hopefully picked your champion! Even these easy alocasia for beginners need the right foundation to truly thrive and look their best. Don’t worry, we’ll keep the core care nice and simple:
Finding the Sweet Spot: Light Requirements
Think “bright, but gentle.” Alocasias crave plenty of bright, indirect light – mimicking the dappled sunlight filtering through a tropical forest canopy.
- Simple Tips: An ideal spot is often near an East-facing window (lovely morning sun) or set back a few feet from a brighter South or West-facing window (avoiding the harsh direct rays). Direct, scorching afternoon sun can easily burn their beautiful leaves. Conversely, a spot that’s too dim will lead to slow growth, weaker stems, and potentially a less vibrant plant. Remember to rotate your plant every so often so all sides get fair exposure to the light.
Watering Wisdom: The “Damp, Not Soaked” Rule
This is often where beginners feel most unsure, but you can absolutely master it! Consistency, not a rigid calendar schedule, is your best friend here. Learn to check the soil first.
- How-to: Gently stick your finger into the soil about 1-2 inches deep. Does it feel dry to the touch at that depth? Then it’s likely time to water! When you do water, do it thoroughly – let the water run all the way through the pot until it freely escapes from the drainage holes. Allow it to drain completely for a few minutes, then discard any excess water that has collected in the saucer or cache pot. This is critically important: Never, ever let your Alocasia sit with its roots submerged in water! That’s the fastest route to dreaded root rot. Using room temperature or lukewarm water is also generally preferred over cold tap water. Your goal is soil like a well-wrung-out sponge – consistently damp, but never soggy or dripping wet. (Handy alocasia watering for beginners tip!)
The Right Foundation: Soil and Potting Mix
This step is absolutely non-negotiable for happy, healthy Alocasia roots! They truly despise dense, waterlogged soil.
- Must-have: Excellent drainage is paramount. Standard houseplant potting mix straight from the bag is usually far too dense and retains too much moisture for their liking.
- Simple Mix Idea: You need something chunky, airy, and fast-draining. You can often buy excellent pre-made “Aroid Mixes” online or at good garden centers these days. Or, if you’re feeling adventurous, you can mix your own! A common recipe involves components like peat moss or coco coir (for some moisture retention), lots of perlite (for aeration), and orchid bark (for chunkiness and drainage). Don’t worry, it’s simpler than it sounds! And the golden rule: please, please make sure your chosen pot has drainage holes at the bottom! (best soil mix for easy alocasia)
Humidity Hacks: Making Them Feel at Home
Remember their tropical rainforest origins? Alocasias adore humidity – ideally, think 60% relative humidity or higher. This is often quite a bit more than the ambient humidity in typical centrally heated or air-conditioned homes.
- Easy Methods to Boost Humidity:
- Group your plants: Plants release moisture through transpiration (like sweating!), so clustering them together creates a slightly more humid little microclimate.
- Use a Pebble Tray: Place the plant pot on top of a tray filled with pebbles and water. Crucially, ensure the bottom of the pot is sitting on the pebbles, well above the water line. As the water evaporates, it increases the humidity directly around the plant.
- Invest in a Humidifier: Honestly, this is generally the most effective and consistent method, especially if your home tends to be very dry. A small humidifier placed near your Alocasia(s) can make a world of difference to their happiness.
- Consider Location: Bathrooms or kitchens can be naturally more humid spots, but only if they also offer sufficient bright, indirect light. An Alocasia won’t thrive in a humid, dark bathroom.
- Avoid Dry Zones: Keep them well away from heating vents, air conditioning units, or drafty windows, as these tend to blast dry air directly at them.
Feeding Fundamentals: Gentle Nourishment
Good news – Alocasias generally aren’t super heavy feeders. In fact, it’s much easier to overdo it with fertilizer than underdo it.
- Keep it simple: Use a standard balanced liquid houseplant fertilizer.
- When: During the active growing season (typically spring and summer), you can feed them roughly every 2 to 4 weeks.
- How much: Always dilute the fertilizer to at least half the strength recommended on the product label. Too much fertilizer can burn their sensitive roots. Cut back significantly or stop fertilizing altogether in the fall and winter when the plant’s growth naturally slows down or stops.
Avoiding Common Pitfalls: Quick Troubleshooting for Beginners
Seeing something amiss with your new plant baby? Don’t panic! Plant care always involves a bit of observation and learning. Here are a few common alocasia problems beginners face and the very first things you should check:
Help! My Alocasia Leaves are Yellowing!
This is perhaps the most frequent cry for help from new Alocasia parents!
- Check First – Moisture!: Nine times out of ten, yellowing leaves point to a watering issue. It’s most often caused by overwatering (the roots are suffocating and potentially rotting in soggy soil) OR underwatering (the plant is stressed and sacrificing older leaves to conserve resources). So, the very first step is to feel the soil! Is it constantly wet and heavy, or is it bone dry deep down? Adjust your watering practices accordingly based on what you find.
- Other Less Common Possibilities: While less frequent, yellowing could occasionally be linked to too much direct sun exposure, not enough light overall, or perhaps a nutrient deficiency (but always rule out watering issues first).
Why the Crispy Brown Tips or Edges on the Leaves?
- Usual Suspect: Low humidity is the prime culprit here. Remember, these plants crave moisture in the air, and dry indoor air (especially in winter) leads to these crispy edges.
- Quick Fixes: Time to revisit those humidity hacks! Grouping plants, setting up a pebble tray, or running a humidifier nearby can really help. Also, double-check that your watering routine is consistent – periods of extreme dryness followed by soaking can also sometimes contribute to tip burn.
Pesky Invaders: Spotting Spider Mites
Okay, let’s talk about the uninvited guests. Ugh, spider mites. Alocasias are unfortunately quite susceptible to these tiny arachnids (yes, they’re related to spiders!), especially when conditions are warm and dry. Early detection is key!
- What to Look For: Get up close and personal with your leaves, paying special attention to the undersides and the points where the leaf stem (petiole) joins the leaf. Do you see any incredibly fine, wispy webbing, almost like a miniature spider web? Can you spot tiny little dots, perhaps reddish or pale, moving around? Those could be spider mites. Another tell-tale sign is stippling – tiny yellow, white, or bronze dots appearing on the leaf surface where the mites have been feeding.
- First Steps if You Spot Them: Act fast! If you suspect mites, immediately isolate the affected plant from your other houseplants to prevent them from spreading. Take a damp cloth (or use the shower sprayer gently) and thoroughly wipe down all the leaves – tops and bottoms – and the stems. Increasing the humidity around the plant can also help, as mites tend to prefer dryness. For more established infestations, readily available insecticidal soap or neem oil spray (always follow product instructions carefully) are common treatments. Apply thoroughly, especially to leaf undersides. You may need repeat treatments to fully eradicate them. Be persistent!
You’ve Got This! Enjoy Your Alocasia Journey
Honestly, choosing one of these easy alocasia varieties is such a fantastic way to dip your toes into the wonderful, rewarding world of Alocasias without feeling immediately overwhelmed. I still remember the thrill (and slight nervousness!) when I brought home my first Alocasia Polly. Learning to trust that ‘top inch dry’ rule for watering truly was a game-changer for me, and it can be for you too!
The key really boils down to focusing on providing those core basics consistently: the right amount of bright, indirect light; careful, observant watering in a fast-draining soil mix; and boosting that humidity as much as you reasonably can in your home environment. Pay attention to your plant – it will often give you subtle (or sometimes not-so-subtle!) clues about what it needs. Remember, plant care is a journey, not a destination. Don’t strive for unattainable perfection right away; aim for happy, healthy plants and enjoy the learning process along the way.
So go ahead, pick one of these five beauties that speaks to you, give it your best shot, and celebrate the stunning, unique foliage they bring into your living space. Happy growing!