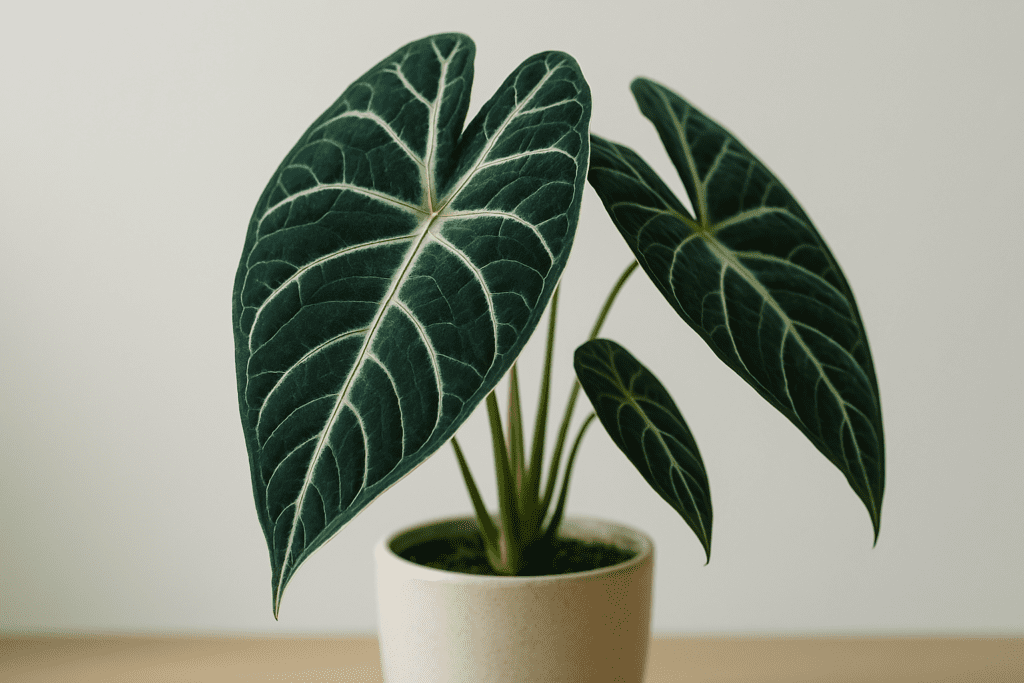
Hello fellow plant lovers! Let’s talk about one of the most striking houseplants out there: the Alocasia Polly. With its deep green, almost black leaves marked by bold silvery veins, it’s a real showstopper. But maybe you’ve heard whispers that it can be a bit of a diva?
Well, I’m here to tell you that Alocasia Polly care can be straightforward and incredibly rewarding. Think of me as your friendly guide, here to demystify its needs and help you keep your gorgeous plant happy. This easy step-by-step guide is all about keeping Alocasia Polly alive and, even better, thriving.
Jump to Sections
ToggleWelcome Your Stunning Alocasia Polly: The “African Mask Plant”
Why We Love the Dramatic Alocasia Polly
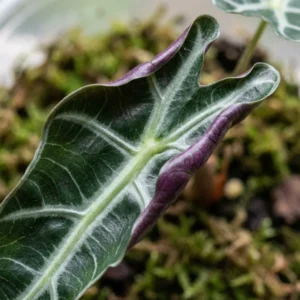
That unique arrowhead shape, those contrasting veins, the slightly ruffled edges, and even the purplish undersides – what’s not to love? The Alocasia Polly, often called the African Mask Plant, brings a touch of the exotic jungle right into our homes. It’s a ‘jewel Alocasia’, meaning it stays relatively compact compared to its giant elephant ear cousins, making it perfect for shelves and tabletops where its beauty can truly shine.
Is It ‘Polly’ or ‘Amazonica’? A Quick Note
You might see this plant labelled Alocasia x amazonica or Alocasia Polly. Technically, ‘Polly’ is a popular, more compact cultivar bred from Alocasia x amazonica. For practical care purposes, the advice is the same. We’ll stick with Polly for simplicity.
Getting the Basics Right: The Essential Pillars of Alocasia Polly Care
Like any plant, Alocasia Polly has its core needs. Nail these five pillars, and you’re well on your way to success!
Pillar 1: Finding the Perfect Light (Bright, Indirect is Non-Negotiable!)
Your Polly craves bright, indirect light. An east-facing window offering soft morning sun is ideal. North-facing works too. South or west-facing? Diffuse with sheer curtains. Direct sunlight scorches leaves; low light slows growth. Rotate occasionally for even exposure.
Pillar 2: Watering Wisdom (Keep Moist, Not Soggy)
Check soil 1–2 inches deep — if dry, water thoroughly until it drains out. Discard excess water. Avoid letting it sit in water. No fixed schedule: base it on light, humidity, pot size, and temperature. Consider filtered or rainwater if leaf tips brown despite good humidity.
Pillar 3: The Ideal Soil Mix
Skip heavy potting soil. Use a well-draining, chunky mix like: 1 part peat moss or coco coir, 1 part orchid bark, and 1 part perlite or pumice. This keeps roots aerated and prevents sogginess.
Pillar 4: Humidity Heaven
Target 60%+ humidity. If air is dry, try:
- A small humidifier
- A pebble tray (with water below pot base)
- Grouping with other plants
- Keeping it in a humid room (with good light)
Pillar 5: Temperature Matters
Ideal range: 65°F–80°F (18°C–27°C). Avoid cold drafts, heaters, and sudden changes. Temps under 60°F (15°C) may trigger dormancy or damage.
Feeding and Potting: Supporting Healthy Growth
Fertilizer Friend
Use a balanced liquid fertilizer (10-10-10 or 20-20-20) at half or quarter strength during spring/summer only. Feed every 2–4 weeks while actively growing. Stop during fall/winter.
Potting and Repotting Your Polly
Repot every 1–2 years, ideally in spring. Choose a pot 1–2 inches wider, with drainage. Loosen roots, plant at same depth, and use fresh airy mix. Expect brief transplant shock — normal!
Troubleshooting Common Alocasia Polly Problems
Yellow Leaves? Don’t Panic!
- Lower leaves yellowing: Often overwatering.
- Multiple leaves yellow + wilt: Root rot or underwatering.
- Washed-out yellow leaves: Low light or nutrient deficiency.
- Yellowing after change: Stress from repotting or relocation.
- Slow yellowing in winter: Natural dormancy beginning.
Pesky Pests: Especially Spider Mites!
Watch for silky webs or stippling on leaves. Also beware of mealybugs (white cotton) or scale (brown bumps).
Treatment: Isolate plant. Spray or wipe with water. Apply neem oil or insecticidal soap. Repeat every 5–7 days. Increase humidity to help deter mites.
Why is My Alocasia Polly Drooping?
Check soil first. If dry, water. If wet, investigate for root rot. Could also be stress from repotting or changes in environment.
Brown Spots or Crispy Edges?
- Crispy tips: Low humidity.
- Large dry patches: Sunburn – move to indirect light.
- Wet-looking spots with yellow halos: Possible fungal/bacterial. Improve airflow, avoid wetting leaves, remove affected foliage.
Understanding Alocasia Polly Dormancy (It’s Natural, Not the End!)
In cooler months, Polly may slow down or drop leaves. This is dormancy, not death. Reduce watering (once every few weeks), stop fertilizing, and be patient. Keep it in stable conditions. New growth will appear in spring.
Keeping Your Alocasia Polly Alive and Thriving: Long-Term Tips
Keep Leaves Clean
Dust leaves gently with a damp cloth every few weeks. Clean leaves = better photosynthesis and fewer pests.
Observation is Your Superpower
Learn your plant’s habits. Notice changes early. Trust your care routine, adjust mindfully, and celebrate each new leaf!
Bonus: How to Propagate Alocasia Polly
Polly grows from rhizomes. During repotting, look for offsets (“pups”) with their own roots. Separate carefully with a clean knife and pot individually.
Important Safety Note: Is Alocasia Polly Toxic?
Yes – toxic to pets and humans if ingested. Contains calcium oxalate crystals, causing severe irritation. Keep out of reach and wash hands after handling.
You’ve Got This! Enjoy Your Beautiful Alocasia Polly
Caring for an Alocasia Polly is about understanding the basics and being patient. Provide the right light, humidity, watering, and soil – and your reward will be stunning tropical foliage and that thrilling moment of a new leaf unfurling. Happy growing!
🌿 More Alocasia Tips:
Dive deeper into care tips for the elegant Black Velvet or explore exotic Alocasia Dragon Scale. Having trouble? Fix drooping leaves easily or understand why you get brown tips.