Hello fellow plant enthusiasts! If you’ve recently welcomed an Alocasia Melo into your home, congratulations! You’re now the proud plant parent of one truly spectacular specimen. With its incredibly textured, almost sculptural leaves, the Melo is a definite standout in the beloved ‘Jewel Alocasia’ family. Now, I know Alocasias sometimes carry a reputation for being a tad fussy, but please don’t be intimidated! Trust me, with a little understanding and consistent care, your Alocasia Melo can absolutely thrive and bring you so much joy. Let’s dive into how you can keep this thick-leaved beauty happy and looking its best!
Jump to Sections
ToggleMeet the Jewel: What Makes Alocasia Melo So Special?
Before we get into the nitty-gritty of care, let’s take a moment to truly appreciate what makes this plant so captivating.
The Incredible Texture: Understanding ‘Rugosa’ Leaves
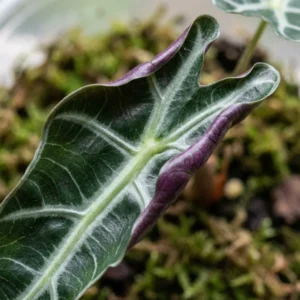
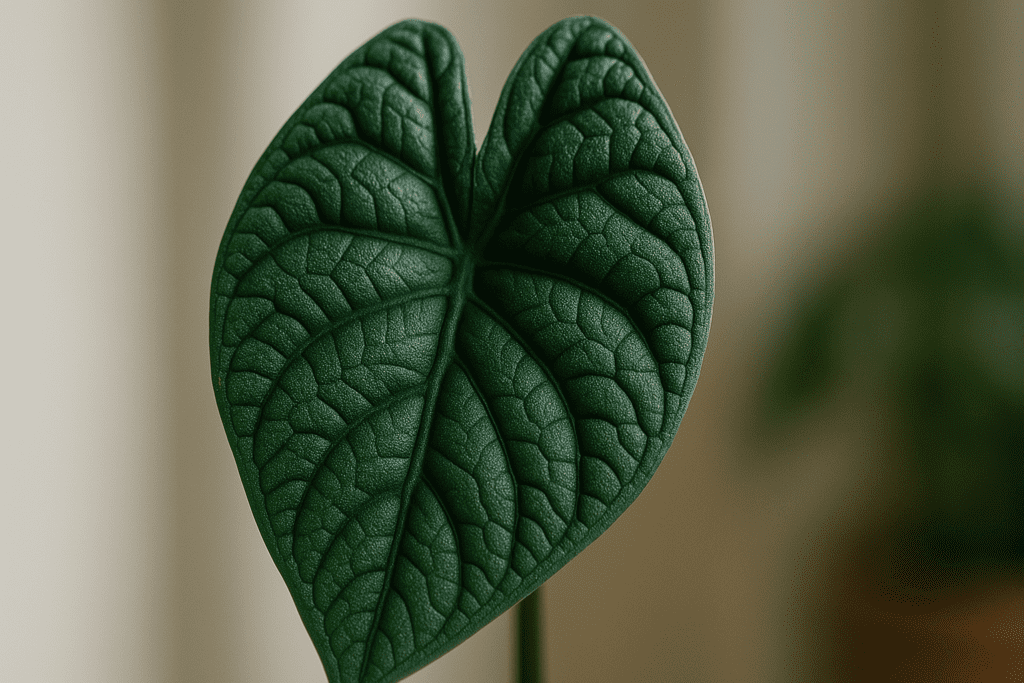
The first thing you’ll undoubtedly notice about Alocasia Melo is its leaves. They are remarkably thick, wonderfully stiff, and deeply textured – the proper botanical term is ‘rugose’. Running your fingers gently over them feels almost like touching intricately carved plastic or perhaps thick cardboard. This unique, pronounced texture, hinting at its origins in Borneo, is its signature feature and a real conversation starter! It’s also why you might sometimes see it referred to by its other common name, Alocasia rugosa.
Why It’s Called a ‘Jewel’ Alocasia
Alocasia Melo belongs to a special group affectionately known as ‘Jewel Alocasias’. Unlike some of their truly giant cousins, these gems tend to stay relatively compact, making them wonderfully suited for indoor spaces and collections. They are highly prized for their stunning and often quite unusual foliage – think of other stars like Alocasia Black Velvet or Dragon Scale. Jewel Alocasias grow from corms (structures similar to little bulbs) and are highly sought after by plant collectors for their unique, concentrated beauty. Honestly, owning a Melo is like having a living piece of natural art!
Essential Alocasia Melo Care: Getting the Basics Right
Alright, let’s talk about creating that perfect environment for your Melo. Remember, consistency and careful observation are truly your best friends on this plant journey. Your plant will often give you subtle (and sometimes not-so-subtle!) clues about what it needs.
Finding the Sweet Spot: Alocasia Melo Light Requirements
Think bright, but gentle sunlight. Your Alocasia Melo absolutely loves plenty of bright, indirect light. An east-facing window providing soft morning sun is often considered ideal. Positions set slightly back from a south or west-facing window usually work very well too. The one major thing to avoid is direct, harsh sunlight, particularly during the intense afternoon hours. Those thick, gorgeous leaves, while tough-feeling, will unfortunately scorch quite easily. If your Melo isn’t receiving enough light, you might notice it becoming ‘leggy’ (stretching out with long stems between leaves) or its vibrant deep green color might start to fade.
Mastering Watering: Keep Your Melo Happy (Not Soggy!)
This aspect often trips up new Alocasia owners, but you can absolutely master it! The golden rule is consistently moist soil, but never waterlogged or soggy. Try to imagine a well-wrung-out sponge – damp, but not dripping. Before you even think about watering, check the top 1-2 inches of the soil with your finger. If it feels dry to the touch, it’s time to give it a thorough watering, allowing any excess water to freely drain out the bottom holes of the pot. If it still feels moist, hold off and check again in a day or two. Alocasia Melo is quite susceptible to root rot if its roots sit in overly wet conditions for extended periods.
Many dedicated growers find using rainwater, distilled water, or filtered water is beneficial. Alocasias can sometimes be sensitive to the minerals often found in hard tap water, which might manifest as brown leaf tips or spots. Also, remember that during the cooler winter months, or if the plant enters a dormancy period, you’ll need to reduce your watering frequency significantly.
Humidity Heaven: Why Your Alocasia Melo Craves Moisture
Always remember its tropical jungle origins! Alocasia Melo thrives in high humidity – ideally aiming for 60% relative humidity or even higher. This is genuinely crucial for keeping those amazing leaves looking pristine, preventing dreaded brown crispy edges, and making the plant less attractive to certain pests like spider mites (who prefer dry conditions). While occasionally misting might feel like you’re helping, its effects are very temporary and, unfortunately, can sometimes encourage unwanted fungal issues on the leaves. The most consistently effective solutions according to standard practices are:
- Using an electric humidifier placed nearby (often the best bet).
- Grouping your Melo with other humidity-loving plant friends.
- Placing the pot on a pebble tray (simply a tray filled with pebbles and water; ensure the bottom of the pot sits on the pebbles, not in the water).
- Situating it in a naturally more humid room, like a bathroom or kitchen, provided the light conditions there are also suitable.
Just Right Temperatures: Keeping Your Melo Comfortable
Good news – your Melo prefers the same comfortable temperatures most of us enjoy indoors. Aim for a consistent range between 65°F and 80°F (that’s about 18°C to 27°C). What’s more important than hitting an exact number is protecting it from sudden temperature fluctuations and chilly drafts. Keep it safely away from drafty windows, doors that open frequently to the outside, or direct blasts from air conditioning or heating vents. Temperatures dipping consistently below 60°F (15°C) can stress the plant or even trigger it into dormancy.
Feeding Your Jewel: Alocasia Melo Fertilizer Guide
During its active growing season (which is typically spring and summer), your Alocasia Melo will definitely appreciate some extra nutrients to fuel its growth. Use a balanced liquid houseplant fertilizer, but it’s generally recommended by experienced growers to dilute it to half the strength suggested on the product label, as Alocasias can be sensitive. Feed your Melo with this diluted solution every 2 to 4 weeks, usually coinciding with a regular watering. It’s really important not to overdo it, as excessive fertilizer can easily burn the sensitive roots and even damage the leaves. Hold off on fertilizing completely during the fall and winter when the plant’s growth naturally slows down or stops.
The Perfect Foundation: Crafting the Ideal Alocasia Rugosa Melo Soil Mix
Now for a really crucial part: the soil. Getting the soil mix right is arguably the most critical element for ensuring long-term health and happiness for your alocasia rugosa melo. Why? Because standard bagged potting mixes are simply too dense. They hold onto far too much water for far too long, which is the fast track to root rot – the arch-nemesis of most Alocasias! We need to create a mix that provides superb drainage and plenty of aeration, allowing those precious roots to breathe easily. Think chunky, airy, and fast-draining!
Key Ingredients for a Happy Melo:
A good Alocasia mix focuses on balancing structure, aeration, and slight moisture retention. Common components include:
- Orchid Bark: Provides essential structure and creates large air pockets for healthy roots.
- Perlite or Pumice: These lightweight volcanic materials are champions of drainage and prevent the mix from compacting over time.
- Coco Coir: Helps retain just enough moisture without becoming waterlogged (often preferred over peat moss for Alocasias as it re-wets more easily).
- Worm Castings: Adds valuable organic matter and provides gentle, slow-release nutrients and beneficial microbes.
- Horticultural Charcoal: Helps keep the soil mix ‘sweet’ by absorbing potential impurities and adds another layer of aeration and drainage.
A Simple Recipe Guideline:
You don’t need to be a chemist here, but a fantastic starting point for a great alocasia melo soil mix could look something like this (feel free to adjust based on your specific growing conditions and available materials):
- Roughly 1 part Coco Coir
- Roughly 2 parts Orchid Bark (medium or small grade works well)
- Roughly 2 parts Perlite or Pumice
- About 1/2 part Worm Castings
- About 1/2 part Horticultural Charcoal
The main goal isn’t precise measurement but achieving that wonderful chunky, airy, fast-draining final texture. When you water, the water should flow through the pot relatively quickly, not sit on top or take ages to drain. Please, resist the temptation to use soil straight from a bag simply labelled “potting mix” or “garden soil”—it just won’t work well for your Melo in the long run!
Troubleshooting Common Alocasia Melo Problems
Hey, even the most attentive plant parents encounter a little hiccup now and then. If you spot something amiss with your Melo, take a deep breath – most common issues are quite fixable with a bit of observation and timely action. Here’s a guide to diagnosing and treating frequent alocasia melo care challenges:
Pesky Invaders: Dealing with Spider Mites & Other Pests
Alocasias, particularly when humidity levels drop, can unfortunately become targets for spider mites. You’ll need to look closely! Check for very fine, delicate webbing, especially on the undersides of leaves and in the little crevices where the leaf joins the stem (the petiole). Affected leaves might look unusually dusty or develop tiny yellow or bronze dots (this is called stippling).
Treatment Plan: First step – immediately isolate the plant to prevent these tiny pests from spreading to your other green friends! Next, gently but thoroughly wipe down all leaf surfaces (both top and bottom) and the stems with a soft, damp cloth. Then, spray the entire plant meticulously with a ready-to-use insecticidal soap or a neem oil solution (always follow the product’s instructions carefully). The key is persistence: repeat this spray treatment every few days for at least two to three weeks. This helps catch newly hatched mites. Finally, making an effort to boost the ambient humidity around the plant will make it a less inviting environment for them in the future. Keep an eye out also for mealybugs (they look like small, fluffy white cotton spots) or scale insects (small, hard brown bumps), and treat them using similar methods.
Decoding Yellow Leaves on Your Alocasia Melo
Seeing a beautiful leaf turn yellow can certainly be alarming, but let’s figure out why it might be happening:
- Completely Normal Shedding: It’s perfectly natural for the oldest, lowest leaf on the plant to gradually yellow and eventually die off. The plant does this to redirect energy towards producing new, healthy growth. No need to worry if it’s just one bottom leaf!
- Overwatering Alert: This is very often the prime suspect when multiple leaves start yellowing, especially if they feel a bit soft. Check the soil immediately – is it soggy? Is it taking a very long time to dry out between waterings? If so, ease up on the watering frequency and ensure the pot is draining well.
- Underwatering Signal: Conversely, if the soil is consistently bone dry when you check it, and the yellowing leaves are also perhaps crispy or limp, you might be waiting just a bit too long between drinks. Try to establish a more consistent checking routine.
- Needs Nutrients? If the yellowing is more widespread, pale, and overall growth seems stunted, it could potentially signal a nutrient deficiency (but only fertilize lightly during the growing season if this is suspected, after ruling out water issues).
- Check for Pests: Don’t forget to do a thorough pest inspection, as significant infestations can definitely stress the plant and cause leaves to yellow.
Help! Why Is My Alocasia Melo Drooping?
Dramatic drooping leaves usually scream “I’m thirsty!” Check the soil – if it feels dry, give your Melo a thorough watering, and it should hopefully perk back up within several hours or by the next day. However, be aware that severe drooping can also occur if the plant is suffering from advanced root rot (damaged roots simply can’t take up water effectively) or if it’s experiencing transplant shock after being recently repotted. Always investigate the soil moisture level first – it provides the most immediate clue.
Alocasia Melo vs Maharani: Spotting the Differences
You’ll often hear Alocasia Melo discussed alongside another Jewel beauty, Alocasia Maharani, sometimes called the ‘Gray Dragon’. They share that desirable Jewel Alocasia status and look somewhat similar, but what are the key distinctions? Let’s compare alocasia melo vs maharani:
Leaf Texture and Color Comparison:
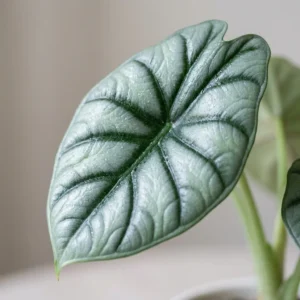
- Alocasia Melo: Really stands out for its incredibly thick, intensely textured (rugose) leaves. The color is typically a solid, rich deep green. The pronounced, almost hard texture is its defining feature.
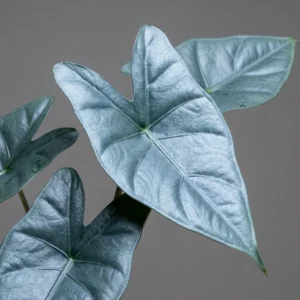
- Alocasia Maharani: This stunning plant is actually a hybrid (most commonly cited as a cross between A. reginula ‘Black Velvet’ and A. melo). Its leaves often possess a captivating greyish or silvery sheen overlaid on the green base. While textured, the rugosity is usually less pronounced and the leaves perhaps slightly less stiff compared to the Melo.
Size and Growth Habit:
Both are considered relatively compact Jewel types, perfect for indoor growing. Under optimal conditions, mature Melo leaves might achieve a slightly larger size than Maharani’s, but both generally maintain a manageable, non-vining stature.
Are Their Care Needs Identical?
For all practical purposes, yes. They share the same fundamental Jewel Alocasia requirements discussed throughout this guide: bright indirect light, consistently high humidity, very careful watering practices, and that absolutely essential chunky, well-draining soil mix. Some anecdotal reports from growers suggest the Maharani might be marginally more forgiving in slightly less-than-perfect conditions, but it’s always best practice to provide both with the optimal care they deserve. The primary differences are truly aesthetic – so you can simply choose the one whose unique look captures your heart the most (or, let’s be honest, maybe find space for both!).
Extra Tips for Long-Term Alocasia Melo Success
Just a few more pointers to help ensure your gorgeous Melo continues to thrive for years to come:
Choosing the Right Pot:
This is non-negotiable: always, always use a pot with drainage holes! While unglazed terracotta pots look lovely, they wick moisture away from the soil very quickly. This can be too drying for a humidity-loving Melo unless you live in a very humid climate or are prepared to water very frequently. Plastic or glazed ceramic pots generally do a better job of helping maintain consistent soil moisture levels between waterings. Regarding size, choose a pot that’s just slightly larger than the plant’s current root ball. Alocasias often seem quite content, and even perform better, when they are slightly snug in their pot rather than ‘swimming’ in an oversized container.
Repotting Your Alocasia Melo:
Only undertake repotting when it’s truly necessary. This is usually when the plant becomes root-bound (you might see roots densely circling the bottom of the pot or even poking out the drainage holes). Typically, this happens every 1 to 2 years. The ideal time for this task is during the active growing season – spring or early summer. When you do repot, use your freshly made, chunky Alocasia soil mix, handle the root ball as gently as possible to minimize disturbance, and place it in a new pot that’s usually just one size larger than the previous one. Water lightly after repotting just to help settle the soil around the roots.
Understanding Dormancy:
Don’t be alarmed if your Alocasia Melo seems to slow down its growth significantly, or even dramatically drops some (or perhaps all) of its leaves during the cooler, darker months of fall and winter. This is a perfectly natural dormancy response for many Alocasia types, especially Jewels. If this occurs, the key is to drastically reduce your watering frequency – just provide enough moisture occasionally to keep the underground corm from completely drying out. Stop all fertilizing during this period. Keep the pot in its usual bright spot. With the return of warmer temperatures and longer daylight hours in spring, you should see signs of new growth emerging. If you’re worried, you can gently probe the soil to feel the corm – it should feel firm, not soft or mushy.
A Quick Note on Toxicity:
It’s important to be aware that, like all plants in the Alocasia genus, the Melo contains calcium oxalate crystals. These microscopic crystals make all parts of the plant toxic if ingested by pets (like cats and dogs) or humans. Chewing on the leaves or stems can cause immediate irritation, painful swelling of the mouth and throat, drooling, and vomiting. Therefore, it’s always wisest to place your Alocasia Melo safely out of reach of curious pets and small children.
Your Alocasia Melo Journey: Patience and Observation Are Key
Honestly, growing an Alocasia Melo is such a uniquely rewarding experience. There’s a special kind of plant parent joy in watching a new, perfectly textured leaf slowly unfurl! Just remember the core pillars of successful alocasia melo care: provide ample bright indirect light, maintain high humidity levels, use that super chunky and well-draining soil mix, and master the art of careful watering, always letting the topsoil dry sufficiently between drinks.
Pay attention to your plant; it will communicate its needs if you learn to read the signs. Be patient with yourself and with your Melo – learning is part of the fun! Don’t be discouraged by the occasional minor setback; view it as a learning opportunity. Celebrate every new leaf, enjoy the incredible, unique beauty of your thick-leaved jewel, and most importantly, happy growing!