Jump to Sections
ToggleIs Your Gorgeous Alocasia Looking a Bit Washed Out? Let’s Figure It Out!
Okay, fellow plant parent, let’s talk about something that can cause a little flutter of worry: noticing your stunning Alocasia’s leaves looking pale, faded, or just not as vibrant as they once were. You likely brought this ‘jewel’ home for its dramatic foliage, right? So when that signature color starts to wash out, it’s completely natural to feel concerned.
But here’s the good news: Don’t panic! This is a fairly common signal from Alocasias, and more often than not, it’s something we can definitely address. These beauties can sometimes be a bit dramatic, expressing their needs quite clearly, but they usually tell us what they need if we learn to read the signs. This guide is here to help you play plant detective, figure out the likely reasons behind your alocasia losing color, and find simple, actionable solutions to bring back that beautiful vibrancy.
First Things First: What Does Healthy Alocasia Color Look Like?
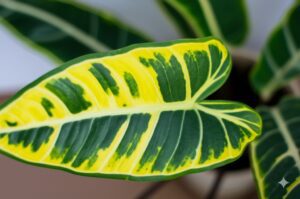
Before we dive into potential problems, let’s quickly refresh our memory on what we’re aiming for. Healthy Alocasia leaves boast rich, defined colors. Depending on your specific variety, this could mean the intense, glossy dark green with bold silver veins of an ‘Polly’, the incredibly deep, near-black velvety texture of a ‘Black Velvet’, or the bright, cheerful green canvas of a ‘Zebrina’ (accented by those amazing striped stems!). Recognizing your specific Alocasia’s healthy baseline look is key to spotting when something’s slightly off. It’s worth noting that even healthy new leaves often emerge a lighter shade and naturally darken as they mature over several days or weeks, so don’t immediately worry about a pale new leaf unless it fails to darken up.
Why Are My Alocasia Leaves Fading? Unpacking the Common Culprits
Several factors can cause those beautiful leaves to lose their punch. Think of these as the usual suspects when your alocasia leaves are fading. Let’s investigate each one methodically, as based on common horticultural knowledge:
The Light Situation: Finding the ‘Just Right’ Zone
Alocasias have definite opinions about light! It’s often the very first thing to check.
- Too Much Direct Sun: If your plant is basking in harsh, direct sunlight (especially intense afternoon sun), the leaves can get overwhelmed. You might see them looking bleached, developing scorched brown patches, or taking on a generally washed-out, pale appearance. Think of it like a bad sunburn; the intense light is literally damaging the chlorophyll pigment responsible for color.
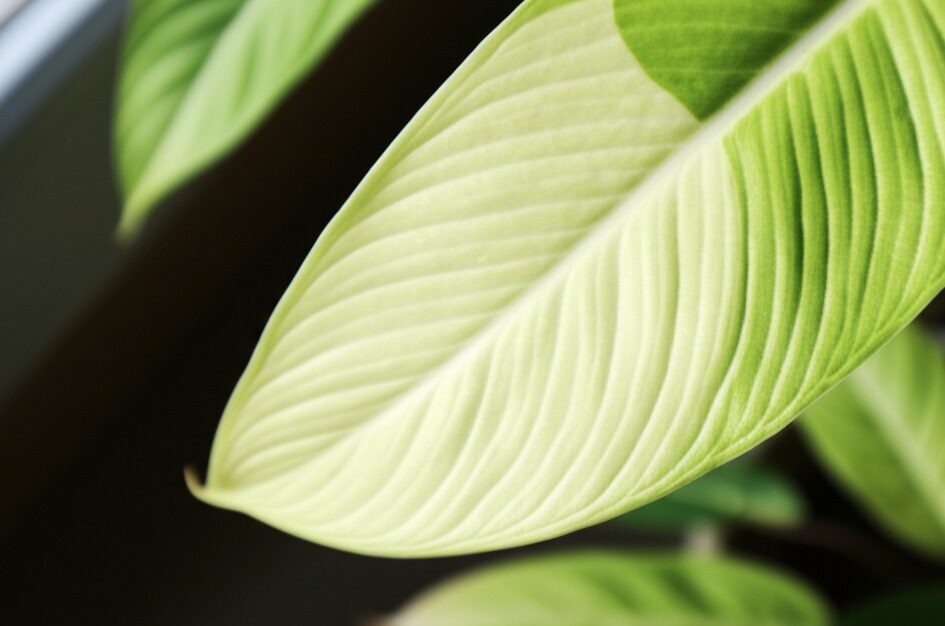
- Not Enough Light (Insufficient / Low Light): Conversely, if your Alocasia is relegated to a dim corner far from a window, it simply won’t have enough light energy to produce and maintain that rich coloration. Leaves might turn a dull, pale green, lacking their usual depth and vibrancy. You might also notice new growth stretching towards the light source (a phenomenon called ‘legginess’), and beautifully variegated types can frustratingly lose their distinct patterns. They need adequate light to power up those colours!
The ideal scenario? Bright, indirect light. Imagine the dappled sunlight filtering through a leafy tree canopy. Near an east-facing window often provides gentle morning light. Alternatively, place it a few feet back from a brighter south or west-facing window, or filter the light with a sheer curtain.
Nutrient Niggles: Is Your Alocasia Hungry or Overfed?
Just like us, plants need a balanced diet to thrive! Nutrients play a crucial role in maintaining healthy leaf color.
- Nutrient Deficiency Alocasia: This is a very common reason for gradual paleness. If your Alocasia isn’t getting the necessary nutrients from its soil, you’ll often observe a general pale green or yellowish-green color develop. This frequently starts on the older, lower leaves first. Why? Because the plant, based on established plant physiology principles, moves mobile nutrients (like Nitrogen) from older leaves to support its precious new growth. Nitrogen deficiency is the most frequent culprit behind this overall pale look. Less commonly, Magnesium or Iron deficiencies might cause yellowing between the leaf veins while the veins themselves stay green (a pattern called interveinal chlorosis), though diagnosing specific micronutrient issues visually can be tricky without testing.
- Over-fertilization: While feeding is important, too much fertilizer can be detrimental. Excess fertilizer salts can accumulate in the soil, ‘burning’ sensitive roots. This damage can manifest as leaf issues, sometimes including yellowing, brown tips/edges, or general stress, though it’s less commonly the sole cause of pure paleness compared to deficiency.
The key lies in balanced feeding. Using the right fertilizer for alocasia color appropriately during the active growing season is often essential.
Watering Woes: The Overwatering vs. Underwatering Puzzle
Ah, watering – perhaps the most discussed aspect of houseplant care! Both extremes – too much and too little – can unfortunately cause alocasia leaves fading or yellowing.
- Overwatering: This is a frequent pitfall for Alocasia parents, as these plants appreciate moisture but absolutely detest sitting in constantly soggy soil. If the soil remains wet for too long, the roots can’t breathe, begin to suffocate, and become vulnerable to root rot caused by fungal or bacterial pathogens. Common symptoms include pale, yellowing leaves that might feel unusually soft or even mushy. Usually, the lower leaves are affected first. If you suspect this, the soil will likely feel heavy and damp long after watering, and you might even detect a faint musty or unpleasant smell from the pot if root rot has begun.
- Underwatering: On the other hand, consistently forgetting to water or not watering thoroughly enough also puts significant stress on the plant. You’ll typically see drooping, wilting leaves first, followed perhaps by crispy brown edges or tips. While severe or chronic underwatering can lead to an overall dullness or fading of color due to dehydration stress, pronounced yellowing is more classically associated with overwatering. The plant generally just looks thirsty, limp, and unhappy.
Proper watering alocasia technique involves finding that happy medium – maintaining consistent moisture, but always allowing the top layer of soil to dry out before watering again, and ensuring excess water drains away freely.
Unwanted Guests: Pests That Drain the Color
Tiny, unwelcome critters can cause surprisingly big problems, including literally draining the color right out of your Alocasia’s magnificent leaves.
- Spider Mites Alocasia Pale Leaves: These minuscule arachnids (often difficult to see without magnification!) are perhaps the most common pest villains behind fading Alocasia leaves. They feed by piercing leaf cells and sucking out the contents, including chlorophyll. The very first sign is often tiny pale yellow or white dots clustered on the leaves, known as stippling – it might look like the leaf has been lightly dusted. As the infestation progresses, the leaves take on a generally dusty or hazy appearance, eventually becoming noticeably pale, faded, bronzed, or even yellowed as damage accumulates. Look very closely, especially on the undersides of leaves and where leaves join the stem, for extremely fine, silk-like webbing – a tell-tale sign of their presence.
- Other Pests: While perhaps less frequently the primary cause of just paleness, other pests like Mealybugs (identifiable as small, white, cottony masses hiding in crevices) and Thrips (which cause silvery patches on leaves and leave behind tiny black fecal dots) can also significantly stress the plant, contributing to poor overall health and potentially affecting leaf color.
Making regular plant inspection a habit is your best defense against major pest problems! Many experienced growers recommend this simple preventative step.
Just Getting Older: Understanding Natural Leaf Senescence
Before you worry too much about a single pale leaf, consider this: sometimes, it’s perfectly normal!
- Symptoms: You observe that only the single, oldest leaf on a particular stem (the one positioned lowest down) is gradually turning yellow, then perhaps progressing to brown, and eventually shriveling. Crucially, the rest of the plant – including newer leaves – looks vibrant and healthy, possibly even actively producing new growth.
- Why: This is a natural biological process called senescence. The plant is simply withdrawing valuable nutrients and resources from that aging leaf to redirect them towards supporting its younger, more productive parts. It’s a sign of efficient resource management!
- Key Distinction: If it’s genuinely just one bottom leaf declining gracefully while the rest of the plant is thriving, take a deep breath. This is not the same issue as widespread alocasia losing color due to stress or deficiency.
Other Stress Factors: Environment & Change
Sometimes, the environment itself or recent changes can contribute to stress that manifests as less-than-ideal leaf color.
- Acclimation Stress: Have you just brought your Alocasia home from the nursery or shop, or recently moved it to a significantly different location within your home? It might take some time to adjust to its new environment (light, temperature, humidity levels). A bit of temporary paleness or even dropping a leaf isn’t unusual during this acclimation period. Provide stable conditions and give it time – patience is often required here.
- Temperature Extremes: Alocasias prefer relatively stable, warm conditions, ideally between 65-80°F (18-27°C), according to standard care guides. Sudden cold drafts from open windows or doors, or blasts of hot, dry air from heating vents, can certainly stress them out.
- Low Humidity: Hailing from tropical rainforests, these plants naturally thrive in high humidity (think 60% or higher). While chronic low humidity more typically causes issues like crispy leaf edges or tips, it does place the plant under general stress, which could indirectly impact its overall vibrancy or make it more susceptible to other problems.
- Repotting Shock: Repotting, while sometimes necessary for growth, is inherently a stressful event for a plant. It’s common for Alocasias to show some signs of temporary shock afterwards, which might include some leaf paleness or drooping. Handle gently during the process and provide consistent care afterwards.
Playing Plant Detective: How to Diagnose Your Pale Alocasia
Okay, armed with knowledge of the potential causes, how do you pinpoint what’s actually ailing your specific plant? It requires a little careful observation – becoming a plant detective!
- Examine the Paleness Closely: Where exactly is the issue? Is it affecting all leaves, or concentrated on the older, lower ones? Or perhaps primarily the newest growth? What kind of paleness is it – a uniform light green, more distinctly yellow, or a bleached, almost white appearance? Are there spots, patches, or specific patterns (like only between the veins)?
- Assess the Light Situation: Be objective about its current location. Is it receiving direct, harsh sunbeams at any point during the day? Conversely, is it situated many feet away from the nearest window, in what might be considered deep shade? Have you moved it recently?
- Investigate Soil Moisture: Time to get your hands slightly dirty! Stick your finger into the potting mix, down about 1-2 inches. What does it feel like? Bone dry? Pleasantly moist? Soaking wet? Lift the pot – does it feel unexpectedly heavy (likely very wet) or surprisingly light (likely very dry)? Critically, does the pot have drainage holes at the bottom, and are they unobstructed?
- Conduct a Pest Inspection: This step is non-negotiable! Get up close. Examine the tops of the leaves, but pay extra special attention to the undersides, as this is where many pests like to hide. Look along the veins and where the leaf attaches to the stem (petiole). Are there any tiny dots (moving or stationary), fine webbing, sticky residue, or actual visible insects (like little white cotton balls)? A magnifying glass can be incredibly helpful for spotting tiny culprits like spider mites.
- Recall Feeding Habits: Think back – when did you last give your Alocasia fertilizer? What kind did you use, and was it diluted according to instructions? Is it currently spring or summer, the typical active growing season when feeding is most beneficial?
- Consider Recent Events: Is this a relatively new addition to your plant family? Did you repot it within the last month or so? Have there been any other significant changes in its environment or care routine?
- Check Root Health (If Overwatering is Suspected): If the soil consistently feels too wet and you suspect overwatering might be the issue, it can be informative to gently slide the plant out of its pot for a quick root inspection. Healthy Alocasia roots are typically firm, plump, and whitish or light tan in color. Roots suffering from rot will appear brown or black, feel mushy or slimy to the touch, and may even have a distinctly unpleasant, decaying odor. Handle the root ball gently during inspection.
Often, considering the answers to several of these questions together will help you narrow down the possibilities and identify the most likely cause, or combination of causes.
Let’s Fix It! Actionable Solutions for Fading Alocasia Leaves
Once you have a stronger idea of what’s causing the paleness, it’s time to take corrective action! Here are practical fixes tailored to each potential issue:
Fixing Light Issues: Finding the Sweet Spot
- If Too Bright: Immediately relocate your Alocasia out of the path of direct sunlight. Find a spot where it receives plenty of bright, ambient light, but where the sun’s rays don’t hit the leaves directly, especially during the intense midday and afternoon hours. Filtering the light through a sheer curtain on a sunny window is a common and effective strategy.
- If Too Dim: Carefully move your plant to a location offering more bright indirect light. Avoid making a sudden, drastic shift from very low light to very bright conditions, as this can shock the plant. Introduce it to brighter light gradually if possible. Monitor its response over the following weeks. If good natural light is simply unavailable, consider investing in a quality LED grow light designed for houseplants.
Feeding Your Plant: The Right Way to Fertilize
- Action: If signs point towards a nutrient deficiency and it’s the active growing season (typically spring through summer), it’s generally recommended to introduce fertilizer. Choose a balanced liquid houseplant fertilizer (look for formulas with roughly equal N-P-K numbers, like 10-10-10 or 20-20-20). Crucially, dilute it to half or even quarter the strength recommended on the packaging – Alocasias can be sensitive to over-fertilization, and it’s always safer to under-fertilize than over-fertilize. Always apply fertilizer solution to already moist soil, never to bone-dry soil, to avoid burning the roots. Aim for application every 2-4 weeks during periods of active growth. Ensure the fertilizer also contains essential micronutrients like Magnesium and Iron.
- Important Notes: Significantly reduce or completely stop fertilizing during the fall and winter months when the plant’s growth naturally slows or stops. Also, avoid fertilizing a plant that is clearly stressed from other issues like severe overwatering, underwatering, or a major pest infestation – address the primary stressor first. Getting the feeding regime right is often a key part of the pale green alocasia leaves fix.
Correcting Water Habits: Achieving Consistent Moisture
- If Overwatered: The immediate action is to stop watering! Allow the top 1-2 inches (or potentially more, depending on the pot size and mix) of the soil to dry out thoroughly before even considering watering again. Double-check that the pot has functional drainage holes and that the plant isn’t left sitting in a saucer full of drained water. If you’ve confirmed root rot, more drastic action is needed: carefully remove the plant, trim away all dead, mushy roots with clean scissors, and repot into a fresh, well-draining potting mix. Water sparingly initially after repotting rotted roots.
- If Underwatered: Give your thirsty plant a proper, thorough drink. Water the soil evenly until water begins to flow out of the drainage holes at the bottom. Allow it to drain completely, then discard any excess water collected in the saucer. Going forward, aim for more consistency. Use the finger-check method regularly to gauge soil moisture and water whenever that top layer feels dry to the touch.
Evicting Pests: Showing Unwanted Visitors the Door
- Action: First things first: isolate the infested plant immediately to prevent the pests from migrating to your other cherished houseplants. For common culprits like spider mites and mealybugs, begin with physical removal. Gently wipe down all leaves (both tops and undersides!) with a soft, damp cloth, or take the plant to a sink or shower and give it a thorough rinse with lukewarm water (this can dislodge many pests). Follow up by treating the entire plant meticulously with insecticidal soap or neem oil spray – these are generally considered safer options for home use. Make sure to get complete coverage, including undersides and stems. Persistence is key; you will likely need to repeat the spray treatment every 5-7 days for several weeks to eliminate newly hatched pests from eggs. Improving air circulation around the plant and boosting humidity levels can also help make the environment less hospitable, particularly for spider mites.
Addressing Older Leaves: When to Prune
- Action: If your detective work has confidently concluded that the single pale or yellowing leaf is simply the oldest one undergoing natural senescence, there’s no ‘fix’ needed for the plant’s health. For aesthetic reasons, once the leaf is mostly yellowed or starting to brown, you can simply use a pair of clean, sharp scissors or pruning shears to snip it off cleanly near the base of its stem (petiole). This just tidies the plant’s appearance and allows it to focus energy elsewhere.
Managing Environmental Stress
- Action: Focus on providing a stable and suitable environment. Try to position your Alocasia away from drafty areas (windows, doors, AC/heating vents). If your home’s air is very dry, especially during winter when heating systems run, take steps to increase humidity around the plant. Grouping plants together helps create a more humid microclimate. Using a pebble tray (a tray filled with pebbles and water, with the pot sitting on top of the pebbles, not in the water) or running a small humidifier nearby are effective, commonly used methods. For new or recently repotted plants, the best approach is patience and providing consistent, optimal care while they adjust.
Prevention is Key: Keeping Your Alocasia Vibrant and Happy
After you’ve successfully navigated the issue, how can you maintain that lush, vibrant foliage moving forward? Proactive, consistent care based on established best practices is the secret:
- Light: Ensure consistent bright, indirect light. Pay attention to seasonal changes that might affect light intensity or duration.
- Watering: Perfect your watering alocasia technique. Always check the soil before watering, water thoroughly when the top layer is dry, use pots with good drainage, and never let the plant sit in standing water.
- Feeding: Implement a regular feeding schedule using a diluted, balanced fertilizer, but only during the active growing season (spring/summer).
- Soil: Use a high-quality, chunky, well-aerated potting mix specifically designed for aroids, or amend a standard mix with plenty of orchid bark, perlite, or coco coir to improve drainage and airflow to the roots. Good drainage is paramount for Alocasias.
- Humidity: Provide adequate humidity whenever possible, aiming for 60% or higher if you can manage it. Your Alocasia’s leaves will often look much healthier and more vibrant for it.
- Pest Patrol: Make inspecting your plant for pests (don’t forget under the leaves!) a regular part of your care routine, perhaps every time you water. Catching infestations early makes them significantly easier to manage.
- Stability: Alocasias generally don’t appreciate frequent moves or abrupt changes in their environment. Try to find a good spot where it seems happy and let it settle in.
You’ve Got This! Final Encouragement for Alocasia Parents
Seeing your prized alocasia losing color can certainly be disheartening, especially given how spectacular these plants are primarily for their foliage. But please remember, it’s usually just your plant’s way of communicating that something in its environment or care routine isn’t quite right. By taking the time to observe carefully, playing plant detective using the steps outlined here, and responding with thoughtful, appropriate care adjustments, you absolutely have the power to help your Alocasia recover and return to its former glory.
Be patient with the process – plants operate on their own timeline, and it might take a little while to see improvements or for vibrant new growth to emerge. Learning the specific preferences and signals of your unique Alocasia is all part of the fascinating and rewarding journey of plant parenthood. Many plant parents find that consistency is key with these beauties. Keep observing, keep learning, and soon enough, you’ll likely be celebrating those stunning, colorful leaves once again! Happy growing!