Hey plant friends! Alex here, your guide to the wonderful world of Alocasias. Today, we’re diving into a truly charming variety: the Alocasia cucullata, affectionately known as the ‘Buddha’s Hand’ Alocasia. If you’ve recently welcomed one into your home or are thinking about it, you’re in the right place! This guide will walk you through everything you need for successful Alocasia Cucullata care, helping your green gem thrive. Let’s get those gorgeous leaves looking their best!
Jump to Sections
ToggleMeet the Charming Alocasia Cucullata: Your ‘Buddha’s Hand’ Plant
Why is it Called ‘Buddha’s Hand’? Origin and Unique Look
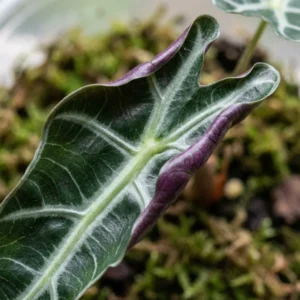
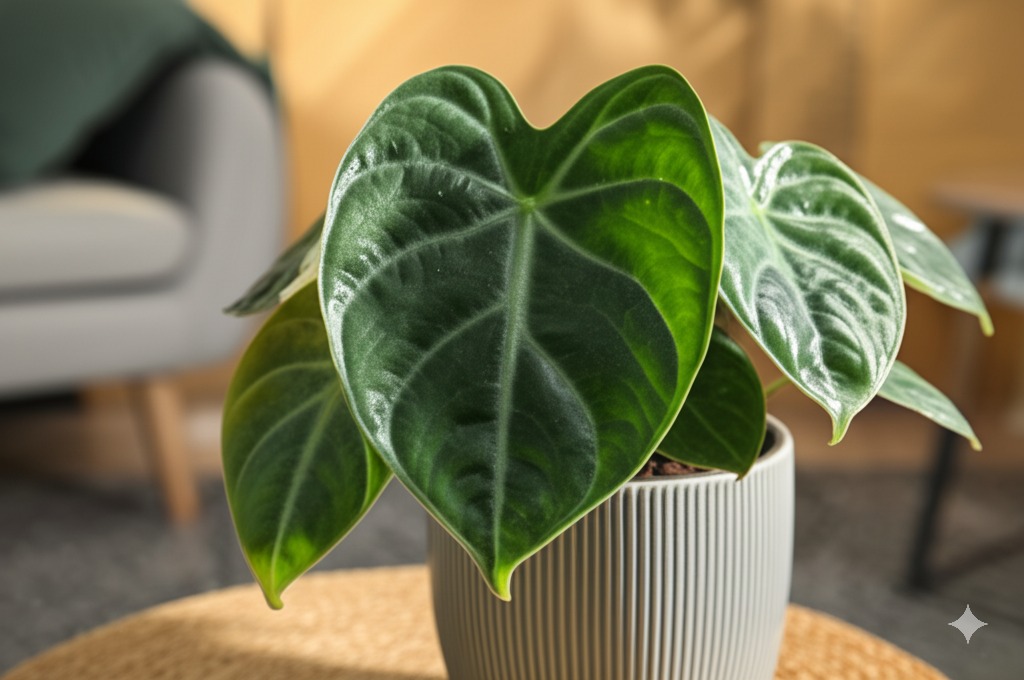
First off, what makes this Alocasia stand out? Native to the tropical rainforests of Southeast Asia, Alocasia cucullata boasts beautiful, glossy, heart-shaped leaves held proudly on slender green stems. The name ‘cucullata’ actually means ‘hooded,’ hinting at the gentle upward curve or cupping shape the leaves often develop. This unique form reminded people of the depictions of Buddha’s welcoming, cupped hand, earning it the lovely nickname ‘Buddha’s Hand’. It’s a plant that brings a sense of calm and lushness to any indoor space.
Quick Facts & Why It’s a Favorite
Compared to some of its larger Alocasia cousins, the Cucullata tends to stay relatively compact, making it a great fit for many homes. It’s also known for being a bit quicker growing than some of the ‘jewel’ varieties, which can be really rewarding, especially if you’re newer to Alocasias. Its vibrant green leaves bring year-round tropical vibes.
Important Note: Toxicity for Pets and Humans
Before we dive into care, a quick but crucial safety note: Like all Alocasias, the Cucullata contains insoluble calcium oxalate crystals. This means it’s toxic if ingested by cats, dogs, or humans. Chewing or swallowing parts of the plant can cause significant irritation, swelling of the mouth and throat, drooling, and vomiting. It’s best practice to keep this plant well out of reach of curious pets and small children. Safety first, always!
Getting the Basics Right: Core Alocasia Cucullata Care Needs
Alright, let’s talk about giving your Buddha’s Hand the environment it loves. Getting these core elements right is 90% of the battle!
Finding the Sweet Spot: Light Requirements (Bright, Indirect Light is Key)
Alocasia Cucullata thrives in bright, indirect light. Think of the dappled sunlight filtering through a rainforest canopy. Direct, harsh afternoon sun is a no-go – it will scorch those beautiful leaves, leaving brown marks.
- Ideal Spots: Near an East-facing window (gentle morning sun), a few feet back from a South or West-facing window, or under suitable grow lights.
- Too Little Light? It might survive in lower light, but it won’t thrive. Expect slower growth, smaller leaves, and potentially weaker stems (legginess).
Quenching its Thirst: Watering Wisdom for Your Cucullata (Consistency without Soggy Soil)
Watering is where many new Alocasia parents stumble, but you can master it! The key for Alocasia Cucullata watering is consistency. Aim to keep the soil evenly moist, but never waterlogged or soggy.
- When to Water: Check the top 1-2 inches of the soil. If it feels dry to the touch, it’s time to water. If it’s still damp, wait a bit longer. A simple finger test works well, or use a moisture meter if you prefer.
- How to Water: Water thoroughly until water runs out of the drainage holes at the bottom. This ensures the entire root ball gets hydrated. Critically important: Discard any excess water sitting in the saucer after about 15-20 minutes. Letting the plant sit in water is a fast track to root rot.
- Frequency: This varies based on light, temperature, pot size, and soil mix. You might water once a week in summer, and much less in winter. Always check the soil first rather than sticking to a strict schedule.
- Winter Care & Dormancy: Reduce watering frequency significantly during cooler months or if you notice growth slowing down. Alocasias can enter dormancy in winter; if this happens, water very sparingly until new growth resumes in spring.
The Perfect Foundation: Best Soil Mix for Alocasia Cucullata (Drainage is Non-Negotiable)
This is crucial! Alocasia roots need oxygen and hate sitting in dense, wet soil. The best soil for Alocasia Cucullata is a well-draining, airy mix.
- Avoid: Standard houseplant potting mix straight from the bag is usually too heavy and retains too much water.
- DIY Mix: A great starting point often recommended by growers is blending equal parts quality potting soil, perlite (for aeration), and orchid bark (for chunkiness and drainage). Adding components like coco coir or horticultural charcoal can further improve structure.
- Pre-Made Mixes: Look for mixes specifically labelled for Aroids, as these are formulated for good drainage and aeration.
- The Goal: A substrate that holds some moisture but allows excess water to drain quickly and freely. Good drainage holes in your pot are absolutely essential too!
Creating a Humid Haven: Humidity & Temperature Preferences (Think Tropical!)
Remember its rainforest origins? Alocasia Cucullata loves high humidity – ideally aiming for 60% or more. Most homes are much drier, especially when heating or air conditioning is running.
- Boost Humidity:
- A humidifier placed nearby is the most effective and consistent method.
- Group plants together – they naturally release moisture through transpiration, creating a more humid microclimate.
- Use a pebble tray: Place the pot on a tray filled with pebbles and water, ensuring the bottom of the pot sits on the pebbles, above the water level.
- Locate it in a naturally more humid room like a bathroom or kitchen, provided the light conditions are adequate.
- Misting: While often suggested, misting provides only very temporary humidity and isn’t a reliable long-term solution. Frequent misting, especially with poor air circulation, can sometimes encourage fungal issues on the leaves.
- Temperature: Keep your Cucullata in a consistently warm spot, ideally between 65-80°F (18-27°C). Protect it from cold drafts (near leaky windows, AC vents) and sudden temperature drops. Avoid temperatures below 60°F (15°C).
Troubleshooting Common Problems: Why Are My Alocasia Cucullata Leaves Yellow?
Seeing yellow leaves can be worrying, but don’t panic! It’s often the plant’s way of signaling something’s slightly off in its environment. Let’s decode the common alocasia cucullata yellow leaves problem.
Decoding Yellow Leaves: The Top 5 Culprits & Solutions
- Overwatering (The Usual Suspect): This is perhaps the most frequent cause. Soil stays wet for too long, roots can’t breathe and may begin to rot. Lower leaves often yellow first, and the base of the stem might feel soft.
- Fix: Immediately check soil moisture deep down. Let the soil dry out much more thoroughly between waterings. Ensure your pot has effective drainage holes and the soil mix is genuinely airy. If you suspect root rot, gently remove the plant, inspect the roots (trim away any brown, mushy parts with clean shears), and repot in fresh, appropriate soil.
- Underwatering: The soil is allowed to get completely bone dry for extended periods. Leaves may yellow, droop significantly, and develop crispy brown edges.
- Fix: Check the soil moisture more frequently. When the top layer is dry, water thoroughly until water drains. Try to maintain consistent moisture without extremes of drought.
- Nutrient Deficiency: Particularly if older leaves are yellowing somewhat uniformly while newer growth seems okay, the plant might be hungry. Nitrogen deficiency is a common cause of general yellowing.
- Fix: If it’s the growing season, implement a regular fertilizing routine (see below) using a balanced fertilizer.
- Incorrect Light: Too much direct sun can scorch leaves, causing yellow or brown patches. Conversely, significantly insufficient light can lead to pale, weak yellowing and stunted growth.
- Fix: Evaluate the plant’s location. Gradually move it to a spot with consistent bright, indirect light.
- Acclimation Stress: It’s quite normal for an Alocasia to sacrifice an older, lower leaf (which turns yellow) when adjusting to a new home environment or shortly after being repotted.
- Fix: Be patient! Provide consistent, optimal care, and avoid making further drastic changes. The plant should settle in. You can remove fully yellow leaves so the plant redirects energy to new growth.
Pesky Invaders: Identifying and Dealing with Common Pests (Spider Mites Beware!)
Alocasias, including the lovely Cucullata, are unfortunately quite susceptible to spider mites. These tiny arachnids are hard to spot initially but cause damage by sucking plant juices. Look for fine webbing (like tiny spider webs) on leaf undersides and where stems meet leaves, plus tiny yellow or white dots (stippling) on the leaf surface. Also keep an eye out for mealybugs (small, white, cottony masses) and scale insects.
- Action Plan:
- Inspect Regularly: Make it a habit to check your plant thoroughly, especially leaf undersides and crevices, at least once a week. Early detection is key!
- Isolate: If you find pests, immediately move the affected plant away from your other houseplants to prevent spreading.
- Treat: Gently wipe down leaves (top and bottom) with a damp cloth to physically remove pests. Follow up with a thorough spray of insecticidal soap or neem oil, carefully following product instructions. Ensure complete coverage. Repeat treatments every 5-7 days for a few weeks to catch subsequent life cycles.
- Boost Humidity: Spider mites prefer dry conditions, so maintaining high humidity can help deter infestations.
Other Worries: Drooping Leaves and Brown Tips Explained
- Drooping Leaves: The most common reason is thirst! Always check the soil first – if dry, a good watering should perk it up within hours. However, if the soil is wet and the plant is drooping, it could ironically signal overwatering and root damage (damaged roots can’t absorb water effectively). It can also be a temporary symptom of transplant shock.
- Brown Leaf Tips/Edges: This is frequently a sign of low humidity. It can also be caused by inconsistent watering (letting it get too dry then soaking it) or potentially a buildup of minerals or salts from tap water. Try increasing humidity consistently, ensuring a more even watering schedule, and consider using filtered, distilled, or rainwater if you suspect tap water issues.
Helping Your Buddha’s Hand Thrive: Growth & Maintenance Guide
Beyond the core needs, these practices will encourage lush, healthy growth.
Feeding Time: Fertilizing Your Alocasia Cucullata for Lush Growth
During the active growing season (typically spring through summer), your Cucullata will benefit from regular feeding.
- What: A balanced liquid houseplant fertilizer is generally recommended.
- How Much: Always dilute the fertilizer, usually to half the strength suggested on the packaging. It’s much safer to under-fertilize than to over-fertilize, which can burn the sensitive roots.
- How Often: Feed your plant roughly every 2-4 weeks while it is actively producing new leaves.
- When to Stop: Significantly reduce or completely stop fertilizing during the fall and winter months when growth naturally slows or the plant becomes dormant. Never fertilize a plant that is stressed, recently repotted, or showing signs of root rot.
Room to Grow: When and How to Repot Your Alocasia Cucullata
Eventually, your growing Buddha’s Hand will need more space for its roots.
- When: Plan to repot every 1-2 years, or sooner if you notice clear signs it’s rootbound (roots are densely filling the pot, circling the bottom, or emerging significantly from the drainage holes).
- Best Time: Spring is the ideal time for repotting, just as the plant is ramping up its growth for the season.
- How: Select a new pot that is only about 1-2 inches larger in diameter than the current one. Going too large can make it difficult to manage soil moisture. Use a fresh batch of that crucial well-draining Alocasia Cucullata soil mix. Gently remove the plant from its old pot, carefully loosen any tightly bound roots, place it in the new pot at the same soil depth it was previously, and fill around the root ball with the fresh mix. Water lightly to settle the soil.
Keeping it Tidy: Simple Pruning for Health and Aesthetics
Pruning your Alocasia Cucullata is mainly about removing leaves that are no longer serving the plant. Simply snip off any yellow, brown, dead, or significantly damaged leaves as they appear. Use clean, sharp scissors or pruning shears and make the cut close to the main stem or base. This helps the plant direct its energy towards healthy foliage and maintains a clean, attractive appearance.
Expanding Your Collection: A Quick Note on Propagation (Offsets/Corms)
Interested in creating more Buddha’s Hand plants? The most common and straightforward method is through division. Alocasia cucullata frequently produces offsets, often called ‘pups,’ which are smaller plants growing from the base of the mother plant. When you repot, you can often gently separate these pups, ensuring each division has some healthy roots attached. Pot them up individually in a suitable mix. You might also discover small, bulb-like structures called corms in the soil during repotting; these can sometimes be sprouted separately in moist sphagnum moss or similar media.
The Big Question: Is Alocasia Cucullata Easy to Care For?
This is a very common question, especially for those venturing into the world of Alocasias! So, is Alocasia Cucullata easy to care for?
The Honest Answer: Easier Than Some, But Requires Attention
Here’s the balanced view: compared to some of the more famously demanding Alocasias (like ‘Polly’, ‘Frydek’, or ‘Black Velvet’), the Alocasia Cucullata is generally considered one of the easier and more forgiving members of the genus. It tends to demonstrate a bit more resilience and tolerance if your conditions aren’t absolutely textbook perfect all the time.
However, let’s keep expectations realistic: it’s still an Alocasia! This means it isn’t a ‘set it and forget it’ type of houseplant like a Snake Plant or ZZ Plant. It absolutely does require consistent care and attention to its specific preferences, particularly regarding avoiding waterlogged soil (excellent drainage is key!), providing sufficient bright, indirect light, and maintaining decent humidity levels.
Why It’s Often Called a Great ‘Starter’ Alocasia
Many plant enthusiasts find the Cucullata to be a good introduction to caring for Alocasias because:
- It displays a bit more adaptability than some of its fussier relatives.
- It typically grows somewhat faster, providing encouraging visual feedback for your care efforts.
- Mastering its care provides a good foundation for understanding the needs of other Alocasias, should you wish to expand your collection.
Setting Realistic Expectations for Success
The bottom line? If you’re prepared to provide the right light conditions, commit to checking the soil before watering, ensure excellent drainage, and make a reasonable effort to boost humidity, you stand a very good chance of succeeding with Alocasia Cucullata, even if you’re at a beginner-to-intermediate level with houseplants. Don’t aim for perfection instantly; learning the specific rhythm of any new plant is part of the fun.
Final Tips for Happy Alocasia Cucullata Parenting
Let’s wrap this up with a quick summary and a little encouragement for your journey!
Quick Care Checklist Recap
- Light: Bright, indirect is best. No direct sun.
- Water: Water thoroughly when top 1-2 inches of soil are dry. Must have good drainage. Never let it sit in water. Reduce in winter/dormancy.
- Soil: Use an airy, chunky, well-draining Aroid mix.
- Humidity: Aim high (60%+). Use a humidifier, pebble tray, or grouping.
- Temperature: Keep warm, 65-80°F (18-27°C). Avoid cold drafts.
- Fertilize: Feed with diluted balanced fertilizer every 2-4 weeks during active growth (spring/summer). Stop in fall/winter.
- Pests: Inspect regularly, especially under leaves, for pests like spider mites. Treat promptly.
- Toxicity: Remember it’s toxic if ingested – keep away from pets and children.
Embracing the Journey (Encouragement)
Growing Alocasias, including the beautiful Buddha’s Hand, is such a rewarding experience. There’s a special kind of plant parent joy in watching a new, glossy leaf unfurl! Like many plant parents, I initially struggled with getting Alocasia care just right, but learning to really observe the plant and consistently check the soil before reaching for the watering can made all the difference. Be patient with yourself and your plant. Pay attention to the signals it gives you (like those yellow leaves!), make adjustments as needed, and most importantly, enjoy the process and celebrate the healthy growth. You absolutely can do this!
Happy growing!