Hello fellow plant enthusiasts! Are you captivated by the striking, arrowhead leaves and dramatic veining of the Alocasia Bambino? You’re not alone! This gorgeous plant, often called the ‘Bambino Arrow’ or simply a ‘Jewel Alocasia’, packs a powerful visual punch despite its compact size. It’s frequently described as a dwarf version of the very popular Alocasia ‘Polly’, making it an excellent choice for smaller spaces or a standout addition to any growing collection of unique houseplants.
But let’s be honest, Alocasias sometimes carry a reputation for being a tad demanding. Please don’t let that scare you away! While the Alocasia Bambino certainly appreciates specific conditions, truly understanding its needs is the key to unlocking its breathtaking potential. I’m Alex, your friendly Alocasia aficionado, and I’m excited to help demystify Alocasia Bambino care in simple, actionable terms. Together, let’s learn how to make this little jewel thrive in your home!
Jump to Sections
ToggleWelcome the Jewel: Meet Your Alocasia Bambino
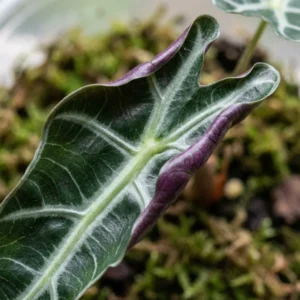
What makes the Bambino so special? First off, its delightful size. As one of the most charming small alocasia varieties, it fits beautifully on shelves, desks, or nestled amongst other plants without overwhelming the space. But its undeniable star quality comes from its foliage: deep, glossy green leaves shaped like elongated arrows, dramatically highlighted by bold, silvery-white or light green veins. The undersides often surprise with a rich purple hue, adding another layer of visual interest. It absolutely earns its status as a jewel alocasia. Ready to give it the five-star treatment it deserves? Let’s dive right in!
Getting the Basics Spot-On: Core Alocasia Bambino Care Needs
Alocasias flourish when you strive to mimic their native tropical rainforest environment. Master these core elements, and your Bambino will reward you with vigorous, stunning growth. Remember, consistency is your best friend here!
Lighting: Finding That Perfect Glow (Not Scorch!)
Your Alocasia Bambino absolutely craves bright, indirect light. Imagine the soft, dappled sunlight filtering through a dense tree canopy – that’s the kind of illumination you’re aiming for.
- What does ‘indirect’ mean? It means a well-lit room, but one where the powerful, direct rays of the sun don’t hit the leaves for prolonged periods, especially during the hottest parts of the day. Direct sun will scorch those beautiful leaves, leaving permanent brown patches. No thank you!
- Prime Locations: Often, near an East-facing window (offering gentle morning sun) or a North-facing window provides these ideal conditions. If your main options are South or West-facing windows, ensure the plant is placed several feet back or the intense sunlight is diffused by a sheer curtain.
- Signs of Insufficient Light: You might observe the plant’s growth slowing down, new leaves emerging smaller than previous ones, or the stems becoming ‘leggy’ as the plant literally stretches towards a brighter light source.
Watering Wisdom: Quenching Thirst Without Drowning
Watering is often where new Alocasia owners feel unsure, but you can definitely get the hang of it! The golden rule for watering Alocasia Bambino is to maintain consistently moist soil, but never allow it to become soggy or waterlogged.
- The Finger Test is Your Friend: Before reaching for the watering can, insert your finger about 1-2 inches (2.5-5 cm) down into the soil. Does it feel dry at that depth? Then it’s likely time to water. If it still feels noticeably damp, hold off for another day or two and check again. Simple!
- Watering Technique: When it is time, water thoroughly. Let the water run through the soil until it flows freely from the pot’s drainage holes. This ensures the entire root system gets access to moisture. But here’s the crucial part: always empty the cache pot or saucer after about 15-20 minutes. Letting your Bambino sit in a puddle of excess water is one of the quickest ways to invite root rot.
- Water Quality Can Matter: These plants can be sensitive to the chlorine, fluoride, and minerals often present in hard tap water, which sometimes contributes to unsightly brown leaf tips. Many experienced growers find that using filtered water, distilled water, or collected rainwater can make a noticeable difference if tap water seems to cause issues. Letting tap water sit out uncovered overnight may help some chlorine evaporate, but it won’t remove fluoride or dissolved minerals.
- Overwatering Danger Zone: Remember, this is a frequent pitfall. Persistently wet, soggy soil prevents oxygen from reaching the roots, leading to suffocation and root rot – a serious condition that’s often difficult to reverse. Yellowing leaves are frequently the first visible symptom. When in doubt, it’s generally safer to let the soil dry out slightly more than to keep it constantly saturated.
- Adjusting Seasonally: Naturally, your Bambino will require less water during the cooler, darker months of fall and winter, particularly if it enters a dormant phase. Always rely on the soil check to determine watering needs, rather than sticking rigidly to a calendar schedule.
The Right Foundation: Best Soil for Alocasia Bambino
Step away from that dense, standard bagged potting mix! It typically holds too much moisture for too long, which is bad news for Alocasia roots. The best soil for Alocasia Bambino absolutely must offer fantastic drainage and aeration. Think light, airy, and chunky.
- Why Does it Matter So Much? An airy, well-draining mix allows excess water to escape quickly, preventing waterlogging. Crucially, it also ensures that vital oxygen can reach the roots, keeping them healthy and functioning properly, warding off devastating root rot. Standard practices suggest a mix promoting aeration.
- Whip Up Your Own Mix: It’s easier than you think! A reliable base involves combining roughly equal parts of:
- A high-quality indoor potting mix base
- Orchid bark (medium grade adds great structure and air pockets)
- Perlite (a lightweight volcanic rock that dramatically improves drainage)
- A smaller portion of coco coir or peat moss (to help retain just a bit of moisture without making the mix heavy)
- Pot Choice is Key: Whatever pot you choose, it must have drainage holes at the bottom. No exceptions! Terracotta pots are porous and help the soil dry out more quickly (a good option if you’re worried about overwatering). Plastic pots retain moisture longer (which can be beneficial in very dry homes, but requires more vigilant monitoring to avoid staying too wet).
Humidity Heaven: Creating a Tropical Paradise
Let’s revisit that tropical rainforest origin – because high humidity is arguably your Alocasia Bambino’s number one desire! These plants truly thrive in moist air, ideally 60% humidity or higher. Consistently low humidity is often the underlying cause of frustrating leaf issues and pest problems.
- Why is Humidity So Critical? Firstly, inadequate humidity is a primary driver of those annoying crispy brown leaf tips and edges. Even more importantly, dry air significantly increases the plant’s susceptibility to pests, especially the dreaded spider mites, which absolutely thrive in dry conditions.
- Effective Ways to Increase Humidity:
- Use a Humidifier: This is generally the most reliable and effective solution, especially if you live in a dry climate or during winter months when central heating saps moisture from the air. Place the humidifier near your Bambino for maximum benefit.
- Create a Pebble Tray: A simple, classic technique. Fill a shallow tray with pebbles, add water (keeping the water level below the top of the pebbles), and place the plant pot on top. As the water evaporates, it increases the humidity directly around the plant. Just ensure the bottom of the pot isn’t sitting in the water itself.
- Group Your Plants: Plants naturally release moisture through a process called transpiration. Grouping several houseplants together creates a more humid microclimate around them. Power in numbers!
- Choose a Humid Location: If possible, placing your Bambino in a naturally more humid area of your home, like a bathroom or kitchen, can be very beneficial – provided, of course, that the location also offers sufficient bright, indirect light.
- Regarding Misting: While misting your plant might feel like you’re helping, it actually provides only a very fleeting, temporary increase in humidity. It doesn’t address the need for consistent ambient moisture and, if done excessively or in poor airflow, can sometimes even encourage fungal spots on the leaves. It’s better to focus on the more sustainable methods listed above for lasting results.
Temperature: Keeping Your Bambino Cozy
Here’s some good news: Alocasia Bambino generally enjoys the same temperature range that most people find comfortable indoors. No special heating required!
- The Sweet Spot: Aim to maintain a consistent room temperature between 65-80°F (18-27°C).
- Things to Avoid: Protect your precious Bambino from exposure to cold drafts (watch out for leaky windows, frequently opened exterior doors, or direct blasts from air conditioning vents) and abrupt temperature shifts (like placing it right next to a heating radiator or vent). Temperatures consistently dipping below 60°F (15°C) can cause stress, slow growth, and potentially damage the leaves according to common plant care knowledge.
Feeding Your Jewel: Fertilizer Facts (Remember: Less is More!)
Alocasias are considered relatively heavy feeders during their active growing season, but they are also notoriously sensitive to over-fertilization. With these plants, it is always, always better to err on the side of caution and under-feed rather than over-feed.
- Timing is Everything: Offer fertilizer only during the spring and summer months, when your Bambino is actively putting out new leaves and growing.
- Choose Wisely: Use a balanced liquid houseplant fertilizer. Look for formulas where the three main numbers (N-P-K) are roughly equal, such as 10-10-10 or 20-20-20, as generally recommended for foliage plants.
- Dilution is Crucial: This is perhaps the most important fertilizing tip! Always dilute the fertilizer to half or even quarter the strength recommended on the product’s label. Applying fertilizer at full strength is often too intense for Alocasia roots and can easily lead to ‘fertilizer burn,’ damaging both roots and leaves.
- Frequency: Apply this diluted fertilizer solution roughly every 2-4 weeks, but only during the active growing season. Observe your plant; if it’s growing vigorously, lean towards every 2 weeks; if slower, stretch it to 4.
- Winter Rest: Completely stop fertilizing in the fall and through the winter. The plant’s growth naturally slows down or stops during this period (dormancy), and it doesn’t need the extra nutrients.
Alocasia Bambino Arrow vs Polly: Telling Them Apart
We know the Bambino is often dubbed the “dwarf version” of the ubiquitous Alocasia Polly. But when you actually have them (or pictures) side-by-side, what are the key visual distinctions that help you definitively tell them apart? It mainly boils down to two factors:
Size Isn’t Everything (But It’s a Major Clue!)
This is usually the first and most striking difference you’ll notice. The Alocasia Bambino truly lives up to its name, maintaining a wonderfully compact size. It typically matures at less than 15 inches (around 38 cm) in height, with leaves that are proportionally smaller. In contrast, the Alocasia Polly can become a significantly larger, more commanding presence in a room, easily reaching heights of 2 feet (60 cm) or sometimes even more, with much broader, bigger leaves. If available space is a limiting factor, the Bambino is definitely the more practical choice.
The Leaf Shape Showdown: Distinctly Arrow vs. Broad Shield
Beyond the overall size, zoom in on the individual leaf shape – this is often the most reliable identifier.
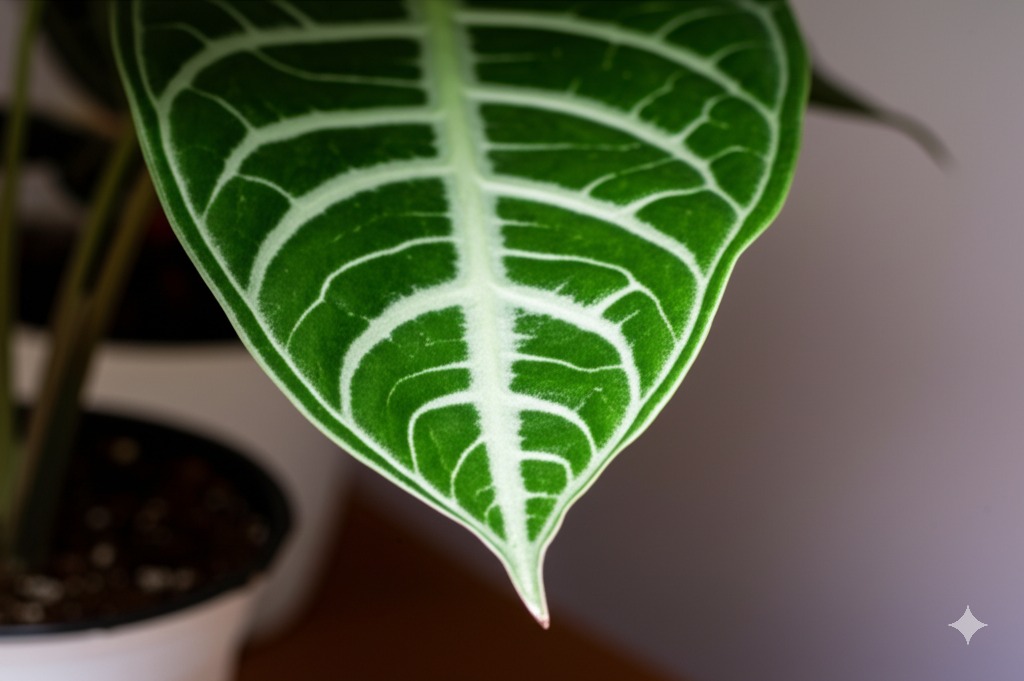
- Alocasia Bambino: Characteristically displays leaves that are noticeably narrower and more elongated compared to Polly’s foliage. They taper gracefully to a more pronounced, sharper point, strongly resembling an arrowhead (the botanical term is sagittate). This distinct shape is precisely why it frequently goes by the name ‘Bambino Arrow’.
- Alocasia Polly: Features significantly broader leaves. Their shape is better described as a shield or a wider heart-shape (cordate). While they certainly have a pointed tip, they lack that specific stretched, narrow, arrow-like silhouette that defines the Bambino.
- While both varieties boast that stunning, high-contrast vein pattern that Alocasias are famous for, paying attention to the fundamental leaf shape makes identification straightforward.
Do Their Care Needs Actually Differ?
From a practical, day-to-day care perspective? Very little, actually. The fundamental Alocasia Bambino care principles – its requirements for bright indirect light, high ambient humidity, exceptionally well-draining soil, careful and consistent watering, and protection from cold drafts – are virtually identical to those needed for a happy Alocasia Polly, based on generally accepted horticultural practices. The main difference really is just the scale and the amount of space they occupy. So, take heart: if you’ve successfully kept an Alocasia Polly thriving, you already possess the core skills needed to care for a Bambino! It’s familiar territory, just miniaturized.
Uh-Oh! Troubleshooting Common Alocasia Bambino Problems
Okay, real talk: even with the most diligent care, you might encounter a little bump in the road. It happens to all of us plant parents! The key is not to panic. Learning to recognize the common signs of trouble and understanding their likely causes will empower you to intervene quickly and get your Bambino back to its beautiful self. Let’s decode some common distress signals.
Why Are My Bambino Leaves Turning Yellow?
Seeing Alocasia Bambino yellow leaves is understandably concerning, but it’s a general symptom that can point to several different underlying issues:
- Overwatering: This is very often the prime suspect, especially for newer Alocasia owners. Is the soil staying consistently wet or soggy for days after watering? Overly wet conditions suffocate the roots, preventing them from functioning and often leading to yellowing leaves. If you suspect this, you might need to gently check the roots for any signs of brown, mushy rot.
- Underwatering: Conversely, if you consistently allow the soil to become completely parched and stay dry for extended periods, the plant may conserve water by shedding its older leaves, which often turn yellow first.
- Inappropriate Lighting: Too much harsh, direct sunlight can scorch the leaves, causing yellow or brown patches. On the other hand, persistently low light levels can sometimes lead to a gradual, overall pale yellowing and a general lack of energy or vigor.
- Nutrient Deficiency: While less common than watering issues, a lack of essential nutrients could be the cause if the plant hasn’t been fertilized appropriately during its active growing season for a very long time.
- Pest Infestation: Annoying little critters like spider mites feeding on the leaves can cause yellow stippling or overall yellowing. Always perform a close inspection (especially on leaf undersides!).
- Entering Dormancy: Particularly as the days get shorter and cooler in fall, yellowing leaves can simply be a natural sign that the plant is preparing to enter its dormant period.
- Normal Leaf Aging: Don’t forget this one! It’s perfectly natural and expected for the oldest leaf on the plant (usually the lowest one) to gradually yellow, wither, and eventually fall off as the plant matures and directs its energy towards producing new growth. If it’s just one leaf behaving this way, and the rest of the plant looks healthy and is actively growing, there’s usually no cause for concern.
- Investigate Before Acting: The crucial step is diagnosis. Methodically review your recent watering habits, physically check the soil moisture a few inches down, assess the light exposure it’s receiving, and give the leaves (both sides!) and stems a thorough visual inspection for any signs of pests. Only adjust your care routine once you have a clearer idea of the likely cause.
Banishing Brown Leaf Tips and Edges
Ah, the dreaded crispy brown bits! This is another very common Alocasia complaint, and it almost always points back to issues with moisture – either insufficient moisture in the air (humidity) or problems related to water uptake or quality in the soil.
- Low Humidity: Nine times out of ten, this is the main culprit behind Alocasia Bambino brown tips. Remember, these are tropical plants that crave atmospheric moisture. If your home air is dry, you’ll likely see this. Revisit the “Humidity Heaven” section and diligently implement one or more of those strategies – a humidifier often makes the biggest difference.
- Inconsistent Watering: Allowing the soil to fluctuate dramatically between being completely bone dry and then suddenly saturated can stress the plant’s vascular system and manifest as brown, crispy tips and edges. Strive for that consistent level of moisture mentioned earlier.
- Water Quality Problems: As noted in the watering section, the buildup of minerals (like calcium and magnesium from hard water) or chemicals (like fluoride or chlorine) from tap water can accumulate in the leaf extremities over time, causing tip burn. Switching to filtered, distilled, or rainwater is often an effective fix if this is the suspected cause, as many growers report success with this change.
- Potential Over-Fertilization: An excess buildup of fertilizer salts in the soil can also ‘burn’ the sensitive tissues at the leaf tips. If you think you might have been a bit too enthusiastic with feeding, you can try ‘flushing’ the soil at the next watering by letting a large volume of water run through the pot to help wash away excess salts.
Pesky Invaders: Dealing with Spider Mites (and Others)
Stay vigilant, plant friends! Alocasias, including the lovely Bambino, are unfortunately quite attractive to spider mites. These minuscule arachnids (they’re related to spiders, not insects) absolutely adore the warm, dry conditions found in many centrally heated homes, making adequate humidity one of your best preventative defenses. Early detection is key!
- How to Spot Spider Mites: They are incredibly tiny, so you need to look closely! Grab a magnifying glass if you have one. Pay special attention to the undersides of the leaves and the small crevices where the leaf stems (petioles) join the main stems or leaves. Telltale signs to watch for include:
- Delicate, fine webbing, resembling tiny strands of silk, often clustered in leaf axils or along veins.
- Minute moving specks – they can be pale, reddish, or dark. Easy to miss if you’re not looking for them!
- A generally unhealthy look to the leaves: perhaps some yellow or bronze stippling (tiny dots), a dusty appearance, or just a lack of vibrancy, caused by the mites feeding on plant cells.
- Treatment Plan (Act Fast and Be Persistent!):
- Isolate Immediately: The moment you confirm spider mites, quarantine the affected plant far away from all your other houseplants. These pests spread easily!
- Wash Them Away: Take the plant to a sink or shower. Use a moderately strong spray of lukewarm water to thoroughly wash down all leaf surfaces (top and bottom – especially the bottom!) and the stems. This physically dislodges a large number of the adult mites and eggs. Alternatively, you can meticulously wipe down every single leaf and stem with a soft, damp cloth.
- Apply Treatment: Thoroughly spray the entire plant (again, focusing on undersides and crevices) with a solution of insecticidal soap or neem oil, common treatments found effective by many houseplant owners. Always follow the product’s dilution and application instructions carefully. Ensure complete coverage for effectiveness.
- Repeat, Repeat, Repeat: This step is non-negotiable for success. Spider mite eggs hatch every few days, and treatments often don’t kill the eggs. You must repeat the wash/wipe and treatment application every 5-7 days for at least 3-4 consecutive cycles to interrupt their life cycle and eliminate newly hatched nymphs before they can reproduce. Persistence pays off!
- Boost Humidity: After treatment, maintaining high humidity around the plant makes the environment far less favorable for any surviving mites or future infestations.
- Watch for Others: While spider mites are definitely the most frequent pest problem for Alocasias, occasionally keep an eye out for mealybugs (look like tiny white cottony spots, often clustered) or aphids (small, pear-shaped insects, often green or black, usually on new growth). Treatment strategies are similar: isolate, physically remove as many as possible (wash, wipe, cotton swab dipped in alcohol for mealybugs), and treat thoroughly with insecticidal soap or neem oil, repeating as necessary.
Is It Dead or Just Dormant? Understanding Alocasia Dormancy
Picture this: your Alocasia Bambino was thriving, but as fall or winter sets in, it suddenly stops growing and starts dropping leaves one by one. Your first thought might be, “Oh no, I’ve killed it!” But before you toss it in the compost bin, take a deep breath and consider dormancy.
- What Exactly is Dormancy? For many Alocasias, it’s a completely natural resting phase, typically triggered by environmental cues like shorter daylight hours and cooler ambient temperatures. The plant isn’t dead; it’s simply conserving its energy, which is stored safely underground in its rhizome or corm (a specialized, bulb-like storage organ). It’s a survival mechanism.
- How Does Dormancy Look? The most obvious sign is a complete cessation of active growth. This is often accompanied by the gradual yellowing and eventual dropping of some, many, or even all of its existing leaves. It can look quite dramatic!
- Don’t Despair! Even if all the leaves drop, that corm hidden beneath the soil surface is likely perfectly healthy and just waiting for conditions to improve. Think of it as hibernating.
- Adjusting Care During Dormancy:
- Water Sparingly: This is crucial. Drastically reduce your watering frequency. You only need to provide enough moisture to prevent the corm and any remaining roots from completely drying out and shriveling. The soil should be allowed to become mostly dry between waterings. This might mean watering only once a month, or even less often, depending on your specific home environment.
- Hold the Fertilizer: No food is needed while the plant is resting. Stop fertilizing completely once dormancy begins.
- Maintain Location: Generally, keep the pot in its usual spot that receives bright, indirect light. A slightly cooler location (but not cold – remember the temperature limits!) is acceptable.
- The Grand Reawakening: Be patient. As spring returns, bringing longer days and warmer temperatures, keep an eye on the soil surface. You should eventually see a new sprout bravely emerge! Once you spot this sign of active growth resuming, you can gradually increase your watering frequency back towards its normal schedule and slowly reintroduce diluted fertilizer. It’s a rewarding moment!
Extra Love: Bonus Tips for a Thriving Bambino
Just a couple more quick pointers to help ensure your Alocasia Bambino continues to flourish for years to come:
Time for a New Home? Repotting Your Alocasia Bambino
Like most houseplants, your Bambino will eventually outgrow its pot and benefit from being repotted.
- Signs It’s Time: You’ll typically know it’s time for repotting Alocasia Bambino when it becomes noticeably root-bound. Look for signs like a dense mass of roots circling the bottom of the pot when you lift it, roots visibly growing out of the drainage holes, or water running straight through the pot extremely quickly without seeming to wet the soil. This usually happens every 1-2 years, but timing depends on growth rate. Alocasias generally don’t mind being slightly snug in their pots, so don’t feel the need to repot unless you see these clear signs.
- The Repotting Process: Select a new pot that is only about 1-2 inches (2.5-5 cm) larger in diameter than its current one. Choosing a pot that’s too large can lead to excess soil staying wet for too long, increasing the risk of root rot. Gently slide the plant out of its old pot. Carefully loosen any tightly coiled or circling roots with your fingers (or sterile snips if necessary). Place the plant in the new pot, ensuring it sits at roughly the same soil depth as before. Fill in the gaps around the root ball with your fresh, best soil for Alocasia Bambino mix, gently firming it down. Water lightly afterwards to help settle the soil.
- Optimal Timing: The best time to repot is during the spring or early summer, as the plant is entering its period of most vigorous growth and will recover and establish itself in the new pot more easily.
Growing More Jewels: A Quick Note on Propagation
Interested in expanding your Bambino collection or sharing with friends? Alocasia Bambino propagation is most reliably achieved through division when you repot.
- Look for Offsets (‘Pups’): As your Bambino matures, it may produce small baby plants, often called offsets or ‘pups,’ right at its base. When you have the plant out of its pot for repotting, you can check if these pups have developed their own independent root systems. If they have, you can carefully separate them from the mother plant (sometimes they detach easily, other times you might need a clean knife) and pot them up individually in small pots with appropriate soil.
- Discover Hidden Corms: While repotting, gently sift through the old soil around the roots. You might discover several small, hard, bulb-like structures – these are corms! They often look like dark, rounded pebbles or large beads. Don’t discard them! You can plant these corms (usually with the slightly pointier end facing up, though they often figure it out regardless) just below the surface of a pot filled with moist sphagnum moss or a light medium like perlite. Keep this medium consistently moist (but not soaking wet) and place the pot in a warm spot with bright, indirect light. Covering the pot with a plastic bag or placing it in a propagation box can help maintain the necessary high humidity. Be patient – it can take several weeks or even months, but eventually, many of these corms will sprout roots and leaves, growing into brand new Bambino plants!
Important Safety Note: Toxicity Awareness
This is a critical piece of information for any household, especially those with curious pets or young children. Please take note.
- Clear and Direct Warning: Be fully aware that all parts of the Alocasia Bambino plant are toxic if chewed or ingested. This applies to humans, cats, dogs, and potentially other pets. The toxicity comes from insoluble calcium oxalate crystals present in the plant tissues, a well-documented characteristic of the Araceae family.
- Potential Reactions: Contact with these sharp, microscopic crystals causes immediate and often intense pain, burning, and irritation of the mouth, tongue, lips, and throat upon chewing or swallowing. Other potential symptoms include excessive drooling, difficulty swallowing, swelling, and vomiting.
- Essential Precautions: Because of this toxicity, it is absolutely essential to place your Alocasia Bambino well out of reach of any pets or small children who might be tempted to nibble on the leaves or stems. It’s also a good practice to wash your hands thoroughly after handling the plant, particularly after pruning or repotting when sap might be present, as some individuals may experience mild skin irritation from contact.
The Verdict: Is the Alocasia Bambino Right for You?
So, considering everything we’ve discussed, should you welcome the captivating Alocasia Bambino into your home and heart? If you’re someone who truly adores dramatic, architectural foliage packed into a conveniently compact form, and if you’re prepared to be a mindful and attentive plant parent, then the answer is almost certainly yes!
But let’s directly address the common question: Is Alocasia Bambino easy care? Based on general grower experience, its care level is best described as moderate difficulty. It is definitely not a “set it and forget it” type of plant. Achieving success hinges on consistently providing the specific conditions it prefers, particularly regarding careful watering, adequate bright indirect light, and, perhaps most importantly, high ambient humidity. It simply won’t tolerate prolonged neglect in the way that some hardier houseplants (like a Snake Plant or ZZ Plant) often can.
However, the reward for this diligence is immense. Witnessing a brand new, perfectly formed leaf, complete with those intricate veins, slowly unfurl is a uniquely satisfying experience for any plant lover! If you’re genuinely willing to learn its preferences, provide the right environment, and commit to keeping a regular, watchful eye out for potential issues (especially those sneaky spider mites!), then the Alocasia Bambino is an incredibly rewarding and undeniably stunning addition to any indoor plant collection. Don’t let its reputation intimidate you – embrace the learning curve, observe your plant’s subtle cues, and truly enjoy the journey of Alocasia Bambino care! Happy growing!