Hey there, fellow plant enthusiast! Ever been captivated by a plant that just stops you in your tracks? If the stunning Alocasia Sarian has caught your eye, you’re in for a treat. With its dramatic, arrow-shaped leaves held high on distinctively striped stems, it’s a true showstopper. But maybe you’ve heard Alocasias can be a bit… particular? Don’t you worry! I’m here to walk you through everything you need to know about alocasia sarian care. Think of me as your friendly guide on this exciting plant parenting journey. Together, we’ll help your Sarian not just survive, but truly thrive!
Jump to Sections
ToggleMeet the Striking Alocasia Sarian: A Unique Houseplant Jewel
So, what makes this Alocasia stand out from the crowd? It’s all about its fascinating family tree!
What Makes the Alocasia Sarian So Special?
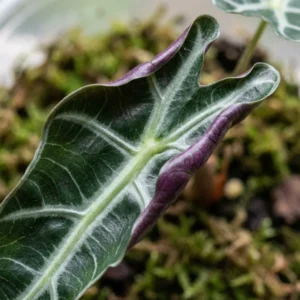
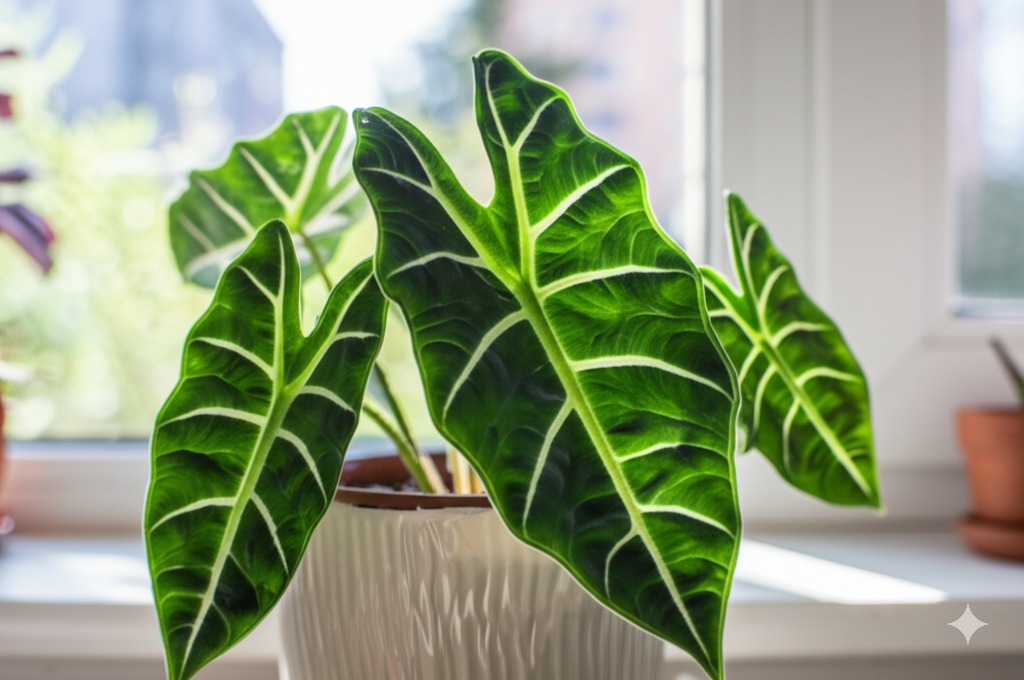
The Sarian isn’t found in the wild; it’s a carefully crafted hybrid, a beautiful blend of two other gorgeous Alocasias: Alocasia zebrina and Alocasia micholitziana (often the ‘Frydek’ variety). This parentage gives it the best of both worlds, and the visual contribution of each is quite clear! From A. zebrina, it inherits those incredible, eye-catching zebra-striped petioles (the leaf stalks) that demand attention. And from A. micholitziana, it gets those large, impressive, arrow-shaped leaves with bold, contrasting veins that create such a dramatic look. While not as deeply velvety as ‘Frydek’, the leaves possess a wonderful texture and presence.
Indoors, with the right care, it can become quite a statement piece, potentially reaching several feet tall! Its upright growth habit really gives it an architectural feel, making it a fantastic focal point in a room. Understanding this Alocasia zebrina x Alocasia micholitziana care heritage helps appreciate its unique Alocasia Sarian characteristics.
Getting the Basics Right: Essential Alocasia Sarian Care
Alright, let’s get down to the nitty-gritty. Like many Alocasias, the Sarian appreciates consistency. It might sound like a lot initially, but take it one step at a time. Master these core elements, and you’re well on your way to a happy plant.
Finding the Sweet Spot: Alocasia Sarian Light Needs
Light is energy for your plant! Alocasia Sarian thrives in bright, indirect light. Think of the dappled sunlight filtering through a rainforest canopy – that’s the goal.
- Ideal Spots: An east-facing window offering gentle morning sun is often perfect. A spot near a south or west-facing window, but shielded by a sheer curtain or placed far enough back to avoid direct rays, also works well.
- Watch Out For: Direct, harsh afternoon sun will scorch those beautiful leaves – you’ll see brown, burnt patches appear quickly. Too little light isn’t great either; your Sarian might grow slowly, produce smaller leaves, or become ‘leggy’ as it stretches towards the light source. Persistently low light also makes it easier to accidentally overwater. Finding that alocasia sarian light needs balance is crucial for healthy growth.
Watering Wisdom: Keeping Your Sarian Happy (Not Soggy!)
Watering Alocasias can feel like a balancing act, but you’ll get the hang of it with observation! The golden rule is consistently moist, but never soggy or waterlogged.
- How to Check: Don’t rely on a strict schedule! Environmental factors change how quickly soil dries. Instead, make it a habit to check the soil moisture. Stick your finger about 1-2 inches deep into the pot. If it feels dry at that depth, it’s time to water. If it’s still damp, wait another day or two and check again. This is the most reliable way.
- Watering Technique: When it’s time, water thoroughly. Let water run all the way through the pot and out the drainage holes. This ensures all the roots get access to moisture. Crucially, empty the saucer or cache pot after about 10-15 minutes. Letting your Sarian sit in standing water is a fast track to root rot.
- Frequency Factors: How often you end up watering alocasia sarian will depend heavily on light levels, temperature, humidity, the type and size of pot, and your soil mix. Observation truly is your best tool! You’ll naturally water less often in winter or if the plant enters dormancy.
- Water Quality Tip: Some tap water can be high in chlorine, fluoride, or other minerals that sensitive plants like Alocasias dislike, sometimes contributing to brown leaf tips. If you notice this consistently despite good humidity, you might try using filtered, distilled, or rainwater.
The Perfect Foundation: Best Soil Mix for Alocasia Sarian
The right soil is absolutely vital for preventing that dreaded root rot and keeping the roots healthy. Standard houseplant potting mix straight from the bag is usually too dense and retains far too much moisture for Alocasias. They need excellent drainage and plenty of aeration around their roots, mimicking their natural environment.
- Go for Chunky: The best soil mix for alocasia sarian is a chunky, well-draining aroid mix. You can often buy pre-made
aroid mixbags specifically formulated for plants like these, or it’s quite easy and often cheaper to make your own! - DIY Mix Idea: A great starting point involves combining roughly equal parts:
- Good quality indoor potting soil (provides nutrients and substance)
- Orchid bark (adds essential chunkiness and large air pockets)
- Perlite (improves drainage and prevents compaction)
- Optional Additions: Many plant parents also like to mix in some coco coir/chunks (helps retain moisture without becoming waterlogged) or horticultural charcoal (can help with aeration and ‘sweeten’ the soil). The main goal is a light, airy well-draining soil mix that doesn’t stay soggy.
Humidity Heaven: Meeting Alocasia Sarian Humidity Requirements
Remember those tropical rainforest origins we talked about? Alocasia Sarian loves and needs high humidity! This is often one of the most crucial, yet frequently overlooked, aspects of their care, especially in typical home environments which can be quite dry. Low humidity is a major stressor for these plants.
- Target Humidity: Aim for 60% humidity or higher if possible for optimal growth and leaf health. While they might tolerate slightly lower levels, consistently being below 50% often leads to visible problems.
- Signs of Low Humidity: Crispy, brown leaf edges or tips are a classic tell-tale sign. Additionally, low humidity makes your plant much more susceptible to pests, particularly spider mites who thrive in dry conditions.
- How to Boost Humidity: Thankfully, meeting the alocasia sarian humidity requirements can be done in several ways:
- Humidifier: This is generally the most effective and reliable method to consistently raise the ambient humidity in a room, especially vital in dry climates or during winter when central heating dries out the air.
- Grouping Plants: Plants release moisture through a process called transpiration. Grouping several plants together creates a slightly more humid microclimate around them.
- Pebble Tray: Place the plant pot on top of a tray filled with pebbles and water. It’s important that the bottom of the pot sits on the pebbles, above the water line (so the soil doesn’t wick up excess moisture). The evaporating water provides a localized humidity boost.
- Location Choice: Bathrooms or kitchens can sometimes be naturally more humid areas of the home, but only choose these spots if they also offer the necessary bright, indirect light your Sarian needs. Don’t sacrifice light for humidity! Increase humidity for alocasia sarian should be a priority for lush foliage.
Temperature & Environment: Creating a Cozy Home
Alocasia Sarian prefers stable, warm conditions, generally similar to temperatures most people find comfortable indoors. Consistency is helpful.
- Ideal Range: Keep temperatures reliably between 65°F and 80°F (18°C – 27°C). They appreciate warmth.
- Avoid Extremes: Protect your Sarian from sudden temperature drops and cold drafts. Keep it away from leaky windows or doors in winter, and also avoid placing it directly in the path of blasts from air conditioning or heating vents. Temperatures dipping below 60°F (15°C) can cause stress and may even trigger dormancy. Keeping the alocasia sarian temperature range stable helps prevent shock.
Feeding Your Alocasia Sarian: Fueling Growth
During the active growing season (typically spring through summer), your Sarian is working hard producing those magnificent leaves and will appreciate some extra nutrients to support this growth.
When and How to Fertilize Your Sarian
- Frequency: As a general guide, feed your plant roughly every 2-4 weeks only while it’s actively putting out new leaves. If growth slows, reduce frequency.
- Fertilizer Type: A balanced liquid houseplant fertilizer is usually recommended. Look for formulas with relatively even numbers, like 10-10-10 or 20-20-20.
- Dilute! This is very important – Alocasias can be sensitive to fertilizer burn. Always dilute the fertilizer to half, or even quarter, strength of what the product label recommends. It’s always safer to under-fertilize than over-fertilize.
- Hold Off When: Stop using alocasia sarian fertilizer completely in the late autumn and winter months when growth naturally slows or stops. Also, don’t fertilize if the plant seems stressed or if you suspect it might be entering dormancy.
Troubleshooting Common Alocasia Sarian Problems
Even with the best care routines, you might encounter a hiccup or two along the way. Don’t panic! Spotting the issue early is the first step to resolving it. Here are some of the most frequent alocasia sarian common problems:
Decoding Yellow Leaves: What’s Your Plant Telling You?
Seeing alocasia sarian yellow leaves is perhaps the most common concern, but it can stem from several different causes. Playing detective is key:
- Overwatering: Often the primary suspect! If the soil stays consistently wet for long periods, roots can’t breathe and start to rot. Check the soil moisture deep down – is it soggy? Let the soil dry out significantly more between waterings and always ensure good drainage.
- Underwatering: Conversely, if the soil is completely dry and pulling away from the pot edges, and the leaves perhaps drooped dramatically first, it might simply be extreme thirst. Water thoroughly.
- Nutrient Deficiency: If it’s mainly the older, lower leaves yellowing uniformly while the plant is otherwise actively growing (and you’ve ruled out water issues), it could indicate a need for fertilizer.
- Light Issues: Too much direct sun causes scorching, which can then lead to yellowing. Persistently low light can cause a general paleness or weak yellowing over time. Evaluate its position.
- Pests: Always, always check the undersides of leaves carefully for tiny unwanted guests. Spider mites, in particular, can cause yellowing stippling.
- Natural Senescence: It is perfectly normal for the oldest, lowest leaf on an Alocasia to gradually yellow and die off as the plant matures and directs energy towards new growth up top. If the rest of the plant looks vibrant and healthy, this usually isn’t something to worry about.
Pesky Pests: Identifying and Tackling Common Intruders
Alocasias, unfortunately, seem to be particularly attractive to certain pests, especially when grown indoors where humidity might be lower than ideal. Early detection is crucial!
- Spider Mites: These tiny arachnids (alocasia sarian spider mites) are the arch-nemesis for many Alocasia lovers! They are very small and thrive in dry, warm conditions. Look for:
- Fine, delicate webbing, often concentrated where the petioles meet the leaves or in leaf crevices.
- Tiny moving dots (you might need a magnifying glass) on the undersides of leaves – they can be reddish, brown, or pale.
- Leaves starting to look faded, dusty, or developing a stippled pattern (lots of tiny pale dots).
- Treatment: Act fast and be persistent! Isolate the affected plant immediately to prevent spreading to others. Thoroughly wipe down all leaf surfaces (top and bottom) and stems with a damp cloth or paper towel to physically remove as many mites and eggs as possible. Follow up by spraying diligently with an insecticidal soap or neem oil solution. Ensure complete coverage, paying extra attention to the undersides of leaves and joints. Repeat these treatments every few days for at least a couple of weeks, as new mites can hatch. Most importantly, significantly increase the humidity around the plant, as spider mites hate moist conditions.
- Mealybugs & Scale: Less common than spider mites on Alocasias, but still possible. Mealybugs appear as small, white, cottony masses, often clustered in leaf axils or along veins. Scale insects look like small, hard, immobile bumps, usually brown or tan.
- Treatment: For small infestations, you can dip a Q-tip in rubbing alcohol (isopropyl) and directly dab each visible pest to kill it. Then, follow up with a broader treatment of insecticidal soap or neem oil spray.
Regularly inspecting your alocasia sarian pests situation, especially under the leaves, should be part of your care routine.
Drooping Leaves or Browning Tips? Let’s Investigate
- Drooping Leaves (
alocasia sarian drooping leaves): More often than not, this simply means the plant is thirsty. Always check the soil moisture first! However, if the soil is actually wet and the plant is drooping, it could paradoxically indicate root rot (damaged roots can’t take up water). Drooping can also occur due to shock (like right after repotting) or exposure to extreme hot or cold temperatures. - Browning Tips/Edges (
alocasia sarian brown tips): The most frequent culprit here is low humidity. This is usually the first thing to address. Other potential causes include allowing the soil to get completely bone dry between waterings (inconsistent moisture) or potential sensitivity to minerals or chemicals in tap water.
Beyond the Basics: Extra Tips for Sarian Success
Once you’ve got the fundamental care down, here are a few more points to keep in mind for the long-term health and enjoyment of your Alocasia Sarian.
Repotting Your Growing Alocasia Sarian
As your Sarian grows, its roots will eventually fill the pot, and it will benefit from being moved to slightly larger accommodation.
- When to Repot: Signs that it’s time include roots visibly circling the bottom of the pot, roots growing out of the drainage holes, or the plant drying out extremely quickly after watering. Typically, this might be needed every 1-2 years, depending on growth rate. The best time for alocasia sarian repotting is during the active growing season in spring or early summer.
- How to Repot: Choose a new pot that’s only 1-2 inches larger in diameter than the current one. Using a pot that’s too large can lead to the soil staying wet for too long around the root ball, increasing the risk of root rot. Gently remove the plant from its old pot, carefully loosen any tightly bound roots, and trim away any that look dead or mushy. Place it in the new pot, filling around it with fresh, chunky
aroid mixat the same depth it was previously planted. Water lightly after repotting to settle the soil. Expect a little temporary drooping or shock – this is normal.
Understanding Alocasia Dormancy (It’s Perfectly Normal!)
Many Alocasia owners experience moments of panic, especially during their first fall or winter with the plant, when growth suddenly stops, or leaves start to yellow and die back for no apparent reason. This might well be dormancy, and it’s a completely normal and natural process for many Alocasias, including potentially the Sarian.
- What is it? It’s essentially the plant’s way of resting and conserving energy in response to changing environmental cues, most commonly shorter day lengths, lower light intensity, and sometimes cooler temperatures. Think of it like hibernation.
- Signs: Growth halts completely. Some, or even all, of the leaves might gradually yellow, wither, and die back to the soil level, leaving just the underground corm.
Alocasia Sarian Dormancy Care: The absolute key is: Don’t panic, and drastically change your watering! Continuing to water a dormant Alocasia as if it were actively growing is the surest way to rot the corm. Reduce watering dramatically. You only need to provide just enough moisture to prevent the corm from completely desiccating – perhaps a very small splash of water maybe once a month or even less frequently, depending on your conditions. Many growers move dormant Alocasias to a slightly cooler, dimmer spot until spring.- Spring Awakening: Be patient. When the days get longer and warmer again, usually in spring, you should eventually see signs of new life poking up from the soil. Once you see new growth emerging, you can gradually resume your normal watering and care routine. Knowing that does alocasia sarian go dormant is possible and understanding how to manage it prevents unnecessary worry and plant loss.
Propagation: Multiplying Your Sarian Joy
Fallen in love with your Sarian and want more? Alocasia sarian propagation is possible, primarily through two methods:
- Offsets (Pups): As the main plant matures, it may produce small baby plants, often called offsets or pups, around its base. These can sometimes be gently separated from the mother plant during repotting. If the offset has developed its own set of roots, it can be potted up individually into its own small pot with appropriate soil mix.
- Corms: Often when you repot your Alocasia, you’ll discover small, hard, bulb-like structures in the soil or attached near the root base – these are alocasia sarian corms (sometimes called bulbils). These are essentially storage organs that can grow into new plants.
- Sprouting Corms: Clean off any soil from the harvested corms. You can try sprouting them by placing them (pointy side up, if you can tell, otherwise just resting on the surface) in a container filled with lightly moist sphagnum moss or perlite. Keep the container warm and maintain high humidity (covering it with a clear plastic bag or lid helps create a mini-greenhouse effect). Be patient; sprouting can take anywhere from a few weeks to several months!
A Quick Note on Toxicity
It’s important to be aware, like all members of the Alocasia genus, the Sarian contains calcium oxalate crystals.
- Warning: All parts of the plant are considered toxic if ingested by pets (like cats and dogs) or humans. Chewing or swallowing plant material can cause immediate irritation, pain, and swelling of the mouth, tongue, and throat, as well as drooling, difficulty swallowing, and vomiting.
- Safety First: Because of this, it’s always best practice to keep your Alocasia Sarian placed safely out of reach of curious pets and small children who might be tempted to nibble. Knowing is alocasia sarian toxic to cats/dogs allows you to enjoy its beauty responsibly.
Your Alocasia Sarian Care Journey: Enjoy the Growth!
Whew, that might seem like a comprehensive list! But truly, the heart of successful alocasia sarian care lies more in observation and understanding your specific plant and environment, rather than just blindly following a set of rigid rules. Pay close attention to your Sarian – it will often give you subtle (and sometimes not-so-subtle!) cues about its needs regarding light, water, and overall happiness. Adjust your care routines based on how it responds.
Growing Alocasia Sarian indoors is an incredibly rewarding experience. There’s a unique satisfaction in watching those stunning, architectural leaves unfurl and mature. Yes, there might be challenges along the way (those pesky spider mites!), but learning to identify and tackle them is all part of the journey and makes you a more knowledgeable and confident plant parent.
You’ve got this! Embrace the learning process, enjoy the spectacular beauty your Alocasia Sarian brings to your home, and celebrate every new leaf. Happy growing!