Jump to Sections
ToggleUh Oh, Spots on Your Alocasia? Don’t Panic!
So, you’ve noticed some unwelcome spots on the stunning leaves of your Alocasia. Perhaps it’s your elegant ‘Polly’, your velvety ‘Black Velvet’, or your striking ‘Zebrina’. Discovering imperfections on these jewel-like plants can certainly cause a flutter of worry. We completely understand! As fellow Alocasia enthusiasts, we know how much care these beauties require, and spots can feel like a significant setback.
But here’s the encouraging news: while Alocasias can be sensitive, leaf spots are a frequent issue that you can often manage successfully. The absolute key is figuring out what kind of spot you’re dealing with. Is it a fungal problem, or is it bacterial? Knowing the difference is vital because the best path forward depends heavily on the cause.
Don’t fret, you don’t need a lab coat for this! This guide is designed to help you become a plant detective. We’ll walk through identifying the likely culprit behind that alocasia leaf spot and outline the essential first steps to help your plant recover. Let’s investigate together.
Spot the Difference: Is It Fungal or Bacterial Leaf Spot?
Alright, let’s take a closer look at those spots. Careful observation is your most powerful diagnostic tool.
Clues Pointing to Fungal Leaf Spot
Fungal infections are common houseplant ailments, especially when conditions are damp and air circulation is poor. Microscopic fungi release spores that can land on leaves and proliferate if the environment is favorable.
- Visual Signs: Fungal spots often begin small and may enlarge over time. Look for shapes that are somewhat regular or roughly circular. Occasionally, you might observe concentric rings developing within the spot, creating a distinctive “target” appearance. The texture is typically dry. In very humid settings, you might sometimes see fuzzy or powdery mold growth, but this isn’t always present. Spot colors vary, including brown, tan, black, and sometimes reddish hues.
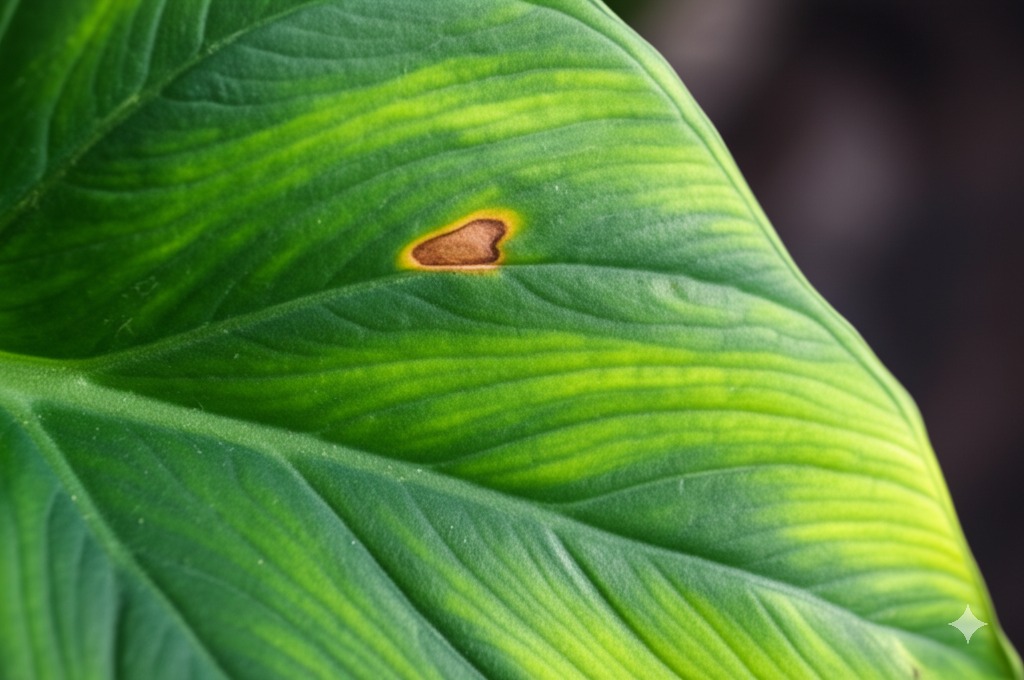
- The Telltale Sign: Brown Spots with Yellow Halo on Alocasia: This is a classic indicator for many fungal leaf spots! You’ll notice a central area of dead tissue (the brown spot) encircled by a distinct yellow ring. This ‘halo’ represents the plant’s tissue reacting to the advancing infection. Seeing these characteristic brown spots with yellow halo on alocasia makes fungal issues a strong suspect.
- How it Spreads: Fungal spores are light and travel easily via water splashing, air currents, or on contaminated tools or hands. Consequently, fungal spots might appear somewhat randomly distributed across leaves initially.
Clues Pointing to Bacterial Leaf Spot
Bacterial infections present differently. These microorganisms often require a wound or natural leaf opening (like stomata) for entry, and they thrive in moisture, which fuels their multiplication and spread.
- Visual Signs: Bacterial spots frequently have a unique starting appearance. They might first emerge as small, dark green, water-soaked areas – looking almost translucent as if water is trapped within the leaf tissue. These spots can enlarge rapidly, often becoming irregular or angular as their spread might be contained by leaf veins. As tissue dies, spots typically turn dark brown or black. The texture can appear slimy or wet, particularly in high humidity, and you might even observe sticky bacterial ooze in advanced cases.
- Key Differences from Fungal: The initial water-soaked look is a significant clue for bacteria. Note the irregularity and potential wet or slimy texture. While surrounding tissue might yellow as it dies, bacterial spots generally lack the distinct, dry, target-like rings often associated with fungal infections.
- How it Spreads: Water acts as a superhighway for bacteria. Splashing from watering, misting leaves directly, or handling wet foliage can spread bacteria quickly. This underlines why keeping leaves dry is paramount if you suspect bacteria.
Quick Comparison: Fungal vs. Bacterial at a Glance
| Feature | Fungal Leaf Spot | Bacterial Leaf Spot |
|---|---|---|
| Shape | Often roundish, may have concentric rings (target) | Often irregular, angular, may follow veins |
| Texture | Usually dry, sometimes powdery/fuzzy | Often starts water-soaked, can become slimy/oozy/mushy |
| Edges/Halo | Often distinct border, classic yellow halo common | Less defined, maybe water-soaked edge, halo less common |
| Spread | Spores via air, water splash, contact | Primarily via water splash, handling wet leaves |
Your Action Plan: Treating Fungal Infections on Alocasia
Based on the clues, does it seem fungal? Don’t lose heart! Here’s a step-by-step approach for treating fungal infections on alocasia. Remember, patience is essential!
Step 1: Isolate Your Patient!
- Why: To prevent easily spread fungal spores from reaching your other plants.
- How: Gently relocate the affected Alocasia away from other houseplants into a temporary ‘recovery zone’.
Step 2: Prune Away the Problem Spots
- Why: Removing infected tissue eliminates the source of fungal spores.
- How: Use clean, sharp scissors or pruning shears. Wipe the blades with rubbing alcohol or a dilute bleach solution (1:9 bleach to water) before starting and between each cut. This prevents accidental spore transfer.
- For leaves with numerous or large spots, removing the entire leaf at its base is usually wisest.
- For just one or two tiny spots, you could trim the affected part plus a small healthy margin, but whole leaf removal is often the safer bet.
- Dispose of pruned material immediately in the trash (not compost).
Step 3: Improve Airflow and Watering Habits
- Why: Fungi flourish in stagnant, moist conditions. Modifying the environment hinders their growth.
- How:
- Air Circulation: Ensure adequate space around your Alocasia. Avoid crowding. A small, oscillating fan on a low setting in the room (not pointed directly at the plant) can significantly improve air movement.
- Watering: This is critical. Water at the soil level, carefully avoiding wetting the foliage. Allow the top 1-2 inches of soil to dry before re-watering. Consistent sogginess is detrimental. Ensure the pot has functional drainage holes.
Step 4: Consider a Fungicide Treatment (If Needed)
- When to Use: If pruning and environmental adjustments aren’t halting new spots, or if the initial infection was widespread.
- Common Options:
- Neem Oil: A good starting point for mild issues or prevention. It acts mainly as a surface protectant. Always follow label dilution and application instructions. Test on a small leaf area first (wait 24-48h) to check for sensitivity.
- Copper-Based Fungicides: More potent, broad-spectrum options. They form a protective barrier inhibiting fungal germination. Crucial: Read and follow label directions precisely. Incorrect use can harm sensitive Alocasia leaves. Test application on a small area first if uncertain. Copper sprays work by creating a protective layer on the leaf surface that inhibits fungal spore germination and can also suppress some bacteria.
- Application Tips: Apply early morning or evening, out of direct sunlight. Ensure thorough coverage (including leaf undersides if directed). Reapply periodically per label instructions. Always follow product label instructions carefully, as concentrations and application methods matter significantly for both effectiveness and plant safety.
Tackling Bacterial Leaf Spot: A More Cautious Approach
Did the symptoms strongly suggest a bacterial infection? Okay, take a steadying breath. Bacterial issues are often trickier to resolve completely, but prompt, decisive action can help manage them.
Step 1: Isolate and Prune IMMEDIATELY
- Why: Bacterial spread can be alarmingly fast, especially with moisture. Containment is the top priority, and strict hygiene is vital.
- How: Isolate the plant instantly. Use sterilized tools, wiping blades between every single cut. Avoid touching healthy plant parts after handling infected areas. Remove affected leaves entirely and dispose of them carefully. Wash hands thoroughly afterwards.
Step 2: Keep Leaves Dry and Boost Air Circulation
- Why: Water is the main vehicle for bacterial spread on leaf surfaces. Create an unfavorable environment.
- How: Implement a strict NO overhead watering or misting policy. Water only the soil. Maximize air movement (spacing, fan). While Alocasias like humidity, extremely high and stagnant humidity is problematic; consider slightly reducing localized humidity while focusing heavily on airflow until the spread stops.
Step 3: Treatment Options (Manage Expectations)
- Copper-Based Sprays: As noted, some possess bactericidal properties. Applied correctly, they may help suppress bacterial spread but are rarely a cure for established infections. Use cautiously per label.
- Focus on Control: The primary goal is often containment. Diligent pruning of new spots and rigorous environmental management are your most effective tools.
Step 4: Knowing When to Let Go
- The Difficult Decision: Sometimes, despite best efforts, bacterial infections overwhelm a plant. If it spreads rapidly across most leaves, discarding the plant might be the most responsible action to protect others. It’s a tough call, but it happens – don’t feel discouraged. It can happen even to the most experienced plant parents.
Prevention Power! Keeping Leaf Spots Away from Your Alocasia
Proactive care is your strongest defense! Integrating good habits into your routine is the best strategy against fungal and bacterial leaf spots.
Master Your Watering Routine
- Tip: Learn your Alocasia’s specific needs. Check soil moisture with the finger test (dry 1-2 inches down? Time to water). Water thoroughly until excess drains, then discard saucer water. Avoid soggy soil! Water the soil, not the foliage.
Let the Air Flow!
- Tip: Essential for Alocasias! Provide space. Use a fan if air is still. Good circulation helps leaves dry quickly, deterring pathogens.
Humidity Balance
- Tip: Alocasias enjoy humidity, but combine it with airflow. Humidifiers or pebble trays are fine, provided air circulates to prevent stagnant moisture.
Inspect New Arrivals
- Tip: Check new plants meticulously (under leaves, stems) before introducing them. A quarantine period is a wise precaution.
Clean Tool Policy
- Tip: Regularly clean tools (pruners, pots) with soap/water or rubbing alcohol, especially between plants or after handling sickness.
You’ve Got This! A Final Word for Alocasia Parents
Discovering spots on your Alocasia can be concerning, but armed with this knowledge, you’re better prepared to diagnose and respond. Key takeaways:
- Identify: Observe closely – fungal or bacterial signs?
- Act Promptly: Isolate, prune correctly, adjust environment (airflow, water).
- Treat Appropriately: Consider treatments (neem, copper) if needed, following labels, especially for fungal issues. Maintain realistic expectations for bacteria.
- Prevent: Prioritize consistent, excellent care – particularly proper watering and airflow – to foster strong, resilient plants.
Learning your plant’s needs and managing occasional issues like alocasia leaf spot is a natural part of the rewarding plant parenting experience. Stay observant and patient! Your beautiful Alocasia can certainly overcome these hurdles and continue to thrive with your dedicated care. Happy growing!