Hello fellow Alocasia admirers! If you’re anything like me, you adore these stunning plants – those striking leaves make them true jewels of the indoor jungle. But let’s be honest, Alocasias can sometimes be a little dramatic, especially when it comes to change. That’s why the thought of repotting alocasia can feel a bit nerve-wracking. Will it throw a tantrum? Will it sulk for weeks?
Don’t worry! While these beauties appreciate stability, repotting is a necessary step for their long-term health. The trick is knowing when to do it and how to do it gently. This guide is here to walk you through the entire process, step-by-step, focusing on keeping your precious Alocasia happy and minimizing that dreaded transplant stress. We’ll cover everything from spotting the signs it’s time for a new pot, to choosing the right supplies, the actual repotting method, and crucial aftercare. Ready to give your Alocasia some breathing room? Let’s dive in!
Jump to Sections
ToggleSpotting the Signs: Is Your Alocasia Ready for a New Home?
So, how exactly does your Alocasia tell you it needs a change of scenery? Thankfully, they drop some pretty clear hints. Keep an eye out for these signs alocasia needs repotting:
The Obvious Clue: Root Bound Cues
Have you noticed roots peeking out of the drainage holes at the bottom of the pot? Or maybe when you water, you see a thick mat of roots circling the base? That’s a classic sign your Alocasia is becoming root bound – it’s running out of space! Think of it like outgrowing a pair of shoes. You might also notice that its growth has significantly slowed down, even during the active spring and summer months.
Watering Troubles: Too Fast or Too Slow?
Pay attention during watering time. Does the water seem to rush straight through the pot almost instantly? This could mean there’s more root than soil left, leaving little to hold onto moisture. Conversely, if the soil stays soggy for days after watering, the soil might be old and compacted, leading to poor drainage and the risk of root rot – another good reason to repot.
Time Flies: The 12-18 Month Refresh
Even if you don’t see dramatic root-bound signs, it’s generally a good practice to repot your Alocasia every 12 to 18 months. Why? Over time, soil breaks down, loses its structure, and nutrients get depleted. A refresh gives your plant new, nutrient-rich soil and improves aeration around the roots. Younger, faster-growing plants might even appreciate an annual repot. Consider how often to repot alocasia based on its growth rate.
Feeling Wobbly? Instability Issues
As your Alocasia grows taller and produces larger leaves, it might become top-heavy in its current pot. If it seems unstable or easily tips over, moving it to a slightly larger, heavier pot can provide a more secure base.
Timing is Everything: The Best Time to Repot Alocasia
Okay, you’ve spotted the signs! Now, when is the ideal time to perform the operation? Timing can make a big difference in how well your Alocasia handles the move.
Spring & Summer: Riding the Growth Wave
The undisputed best time to repot alocasia is during its active growing season – typically spring and early summer. During this period, the plant is full of energy, pushing out new growth, and its metabolism is high. This means it has the resources to recover more quickly from the stress of repotting and establish its roots in the new pot. Think of it as moving house when you have plenty of energy!
Hold Off! When NOT to Repot Your Alocasia
Just as important as knowing when to repot is knowing when not to. Avoid repotting if:
- It’s Dormant: In late fall and winter, Alocasias naturally slow down or go dormant. Repotting during this rest period puts unnecessary stress on the plant and increases the risk of shock or rot. So, can I repot alocasia in winter? It’s best avoided unless absolutely necessary (like severe root rot).
- It’s Already Stressed: If your plant is currently battling pests, recovering from disease, severely underwatered or overwatered, or stressed from a recent move, give it time to recover before adding the stress of repotting.
- It Just Arrived: Just brought your Alocasia home? Congratulations! But resist the urge to repot immediately. Let it acclimate to your home’s environment for at least a few weeks, or even a month or two, unless the nursery pot is in truly terrible shape (e.g., completely root-bound, waterlogged soil).
Gearing Up: Choosing the Right Pot Size and Soil Mix for Alocasia
Having the right supplies ready makes the repotting process much smoother and sets your Alocasia up for success. Let’s talk pots and soil!
Pot Perfect: Choosing the Right Pot Size for Alocasia
This is SUPER important! Resist the temptation to give your Alocasia a massive pot to “grow into.” The golden rule, trusted by many experienced growers, is to choose a new pot that is only 1-2 inches (2.5-5 cm) larger in diameter than the current one. Why? A pot that’s too large holds a lot of excess soil that stays wet for too long, creating the perfect conditions for dreaded root rot because the roots can’t absorb the moisture fast enough. Alocasias often prefer being slightly snug in their pots. And non-negotiable: the new pot must have drainage holes! This is crucial for choosing the right pot size for alocasia and preventing waterlogged roots. The best pot for alocasia is one that’s just slightly bigger and drains well.
Pot Material Matters: Terracotta vs. Plastic?
- Terracotta (Clay): These pots are porous, meaning they allow air and moisture to pass through the sides. This helps the soil dry out faster, which is great if you tend to overwater or live in a humid climate. The downside? You’ll likely need to water more frequently. They are also heavier, adding stability.
- Plastic or Glazed Ceramic: These retain moisture longer, which can be helpful in dry homes or if you sometimes underwater. Just be extra sure the drainage is excellent and your soil mix is supremely airy.
- Alex’s Advice: Both can work wonderfully! Choose based on your watering habits and home environment. Success lies more in the right size and soil mix than the pot material itself.
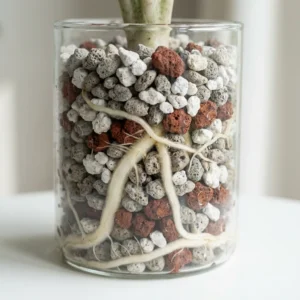
The Perfect Foundation: Crafting the Ideal Alocasia Repotting Mix
Forget dense, heavy garden soil or standard potting mix straight from the bag! Alocasias thrive in a soil mix that is chunky, airy, and extremely well-draining, yet holds onto some moisture. Think ‘tropical rainforest floor’ – rich but not heavy. You want water to flow through easily, preventing soggy roots, but not so fast that the plant dries out instantly. The key is excellent drainage and aeration.
- DIY Mix Idea: Start with a base of good quality indoor potting mix (one based on peat moss or coco coir is fine). Then, generously amend it to improve structure and drainage. Common and effective additions include:
- Perlite or Pumice: Lightweight volcanic rock that creates essential air pockets (aim for roughly 20-30% of the mix).
- Orchid Bark or Coco Chips: Larger chunks that dramatically improve aeration and prevent compaction (aim for roughly 10-20%).
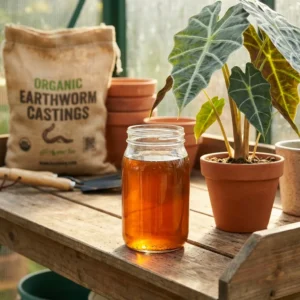
- Some growers also add a small amount of horticultural charcoal (optional, thought to help absorb impurities) or worm castings (for a gentle nutrient boost).
- The goal for your alocasia repotting mix or best soil for alocasia after repotting is achieving that perfect balance. If DIY feels daunting, look for pre-made “Aroid Mixes” online or at specialty plant shops – they’re specifically designed for plants like Alocasias.
The Gentle Repotting Process: Your Step-by-Step Guide
Alright, supplies ready? Plant showing signs? Timing right? Let’s get down to the actual repotting. Remember, the key word here is gentle. Treat your Alocasia with care.
Step 1: Prep Your Station
Lay down some newspaper (it can get messy!). Have your new pot, prepared soil mix, and any tools (like a small trowel or clean scissors) handy. Lightly moisten your new soil mix so it’s slightly damp, not soaking wet – this helps reduce immediate water stress on the roots. Watering your Alocasia lightly the day before you plan to repot can sometimes help the root ball slide out more easily than if bone dry or waterlogged.
Step 2: Gently Free Your Alocasia
Tip the current pot on its side. Support the base of the plant stems and the soil surface with one hand, and gently try to slide the plant out. If it’s stuck, please don’t yank the stems! Try gently squeezing the sides of the pot (if it’s plastic) or carefully run a clean, dull knife or spatula around the inside edge to loosen it. Always support the weight of the root ball as it comes out.
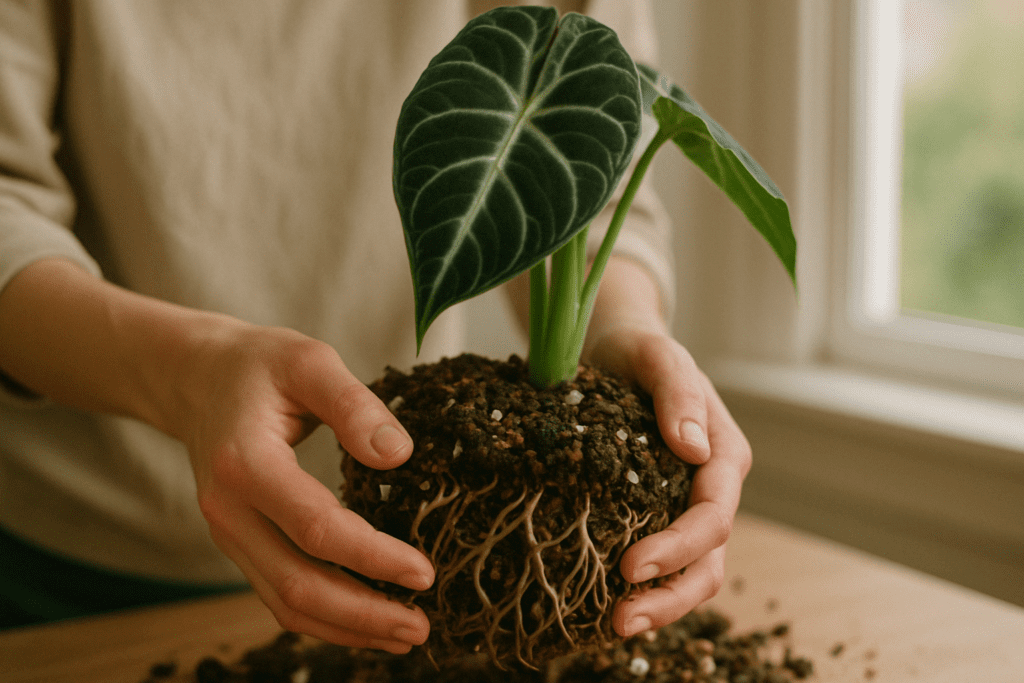
Step 3: Inspect Those Roots (and Maybe Prune Lightly)
Once it’s out, gently loosen any roots that are tightly circling the bottom or sides of the root ball with your fingers. Shake off some of the excess old soil, but don’t feel you need to remove all of it. Leaving some familiar soil can reduce shock. Now, take a good look at the roots:
- Healthy roots are typically firm and light-colored (whitish, cream, or tan).
- Unhealthy roots (root rot) will be dark brown or black, mushy to the touch, and might even smell foul. Trim these away cleanly using sterile scissors or pruners right back to healthy tissue. Also, trim any obviously dead, thin, papery roots.
- If the roots look generally healthy and plump, keep trimming to an absolute minimum! Less disturbance equals less stress.
Step 4: Settle In: Potting Up Correctly
Place a small layer of your fresh, airy soil mix in the bottom of the new pot (enough so the plant sits at the right height). Position your Alocasia in the center. Crucially, ensure the top of the root ball sits at the same soil level it was in the old pot, or perhaps very slightly higher. Planting it deeper than before is a common mistake that can lead to stem or crown rot because the base of the plant isn’t meant to be buried.
Step 5: Fill ‘Er Up (But Don’t Pack It In!)
Add your fresh potting mix around the sides of the root ball. Use your fingers or a small trowel to gently distribute the soil, removing any large air pockets and ensuring good contact between the roots and the new mix. Resist the urge to pack the soil down tightly! Remember, Alocasias need air around their roots just as much as water. Lightly firm is enough.
Step 6: To Water or Not to Water Immediately?
Ah, the million-dollar question! There’s a friendly debate about this:
- Option A (Water Now): Water thoroughly right away, allowing excess water to drain completely through the drainage holes. This helps settle the soil nicely around the roots.
- Option B (Wait a Day): Wait 24 hours or so before watering, especially if you did any significant root trimming. This theory suggests it allows any cuts on the roots to callous over slightly, potentially reducing the risk of infection or rot.
- Alex’s Take: Both methods have merit. If your new soil mix was nicely pre-moistened and you barely disturbed the roots, watering immediately is usually fine. If you did some trimming or are generally cautious about overwatering, waiting a day is often the safer bet for watering alocasia after repotting. When you do water, use lukewarm or room temperature water to avoid shocking the roots.
Bonus Tip! Keep an Eye Out for Alocasia Corms
While you have the roots exposed, look closely! You might find small, hard, roundish nuggets, often dark brown or black, attached to the roots or sometimes loose in the soil. These are corms – essentially little energy packages that can grow into new plants! You can gently detach them (they often pop off easily) and pot them up separately in moist sphagnum moss or soil. It’s like finding treasure during repotting alocasia corms and a fun way to propagate!
Post-Repotting TLC: Minimizing Shock and Encouraging Recovery
You did it! The repotting itself is done. But don’t walk away just yet! Attentive alocasia care after repotting is vital to help your plant recover smoothly and minimize that common transplant shock. Think of it as tucking your plant into bed after its move.
Location, Location, Location
Place your newly repotted Alocasia back in a spot where it receives plenty of bright, indirect light – ideally the same spot it was thriving in before, if possible. Avoid sudden exposure to harsh direct sunlight, which can scorch the leaves, especially when the plant is vulnerable. Also, keep it away from cold drafts (like open windows or AC vents) or drastic temperature fluctuations. Stability is key right now.
Humidity is Your Friend
Alocasias are tropical plants that adore high humidity. Maintaining good ambient humidity (ideally 60%+) around the plant after repotting is incredibly helpful. It reduces the amount of water the plant loses through its leaves (transpiration), easing its stress while the roots settle in. Keep using your humidifier, place it on a pebble tray with water (ensure the pot bottom isn’t submerged), or group it with other humidity-loving plants.
Watering Wisdom: Adjust Your Routine
Now, pay close attention here, as your watering needs will likely change in the new, larger pot with fresh soil. Don’t just stick to your old schedule. The fresh mix might dry out faster or slower depending on its composition and the pot size. The best approach? Monitor the soil moisture carefully. Water thoroughly only when the top 1-2 inches of the soil feel dry when you poke your finger in. When you do water, let the excess drain completely – never, ever let the pot sit in a saucer full of water, as this is a fast track to root rot. Consistency without constant sogginess is the goal.
Hold the Fertilizer!
This is important: Do not fertilize your Alocasia immediately after repotting. The plant is putting all its energy into establishing its roots in the new environment, not into pushing out lush new foliage. Fertilizing stressed roots can actually burn them and cause more harm than good. Besides, fresh potting mix usually contains enough nutrients to sustain the plant for a little while. Wait at least 4-6 weeks, or better yet, until you see clear signs of new, active growth (like a new leaf unfurling steadily). When you do resume fertilizing, start with a half-strength dilution of your usual fertilizer to be safe.
Patience, Grasshopper: Understanding Recovery
It’s perfectly normal – expected, even – for your Alocasia to look a little unhappy or droopy for a few days, or sometimes even a week or two, after repotting. This is the infamous alocasia shock after repotting. It might even decide to sacrifice an older, lower leaf (which might turn yellow and eventually wither). Please don’t panic if this happens! It’s often just the plant adjusting and redirecting energy. Be patient, provide consistent, gentle care as outlined above, and watch for positive signs like the leaves perking back up or, the ultimate reward, the slow emergence of a brand new leaf spike. Recovery isn’t always instant. Many growers find their Alocasia bounces back surprisingly well with this gentle approach.
Worried? Troubleshooting Common Post-Repotting Issues
Even with the best care, sometimes things look a bit concerning after a repot. Here are a couple of the most common worries and what to do:
Help! My Alocasia is Drooping After Repotting!
Seeing alocasia drooping after repotting? Take a breath! As we’ve said, some drooping is very common due to transplant shock as the roots adjust. First, double-check your watering – is the soil bone dry or soaking wet? Aim for that ‘evenly moist but not soggy’ state. Ensure humidity is high. Keep it out of direct sun or drafts. Usually, with patience and consistent care, it should perk up within a week or two as the roots start functioning properly in their new home.
Uh Oh, Yellow Leaves After Repotting?
Are you noticing alocasia yellow leaves after repotting? If it’s just one leaf, typically the oldest, lowest one on the plant, it’s very likely just the plant naturally shedding an older leaf to conserve energy for root recovery – a normal part of the shock response. However, if multiple leaves start yellowing rapidly, especially newer ones, the most frequent culprit after repotting is overwatering. The larger volume of fresh soil in the new pot holds moisture longer than the plant might be used to. Check the soil moisture deep down – don’t just trust the surface. Let it dry out more thoroughly between waterings. Less commonly, persistent yellowing could indicate significant root damage occurred during the repot, or perhaps severe underwatering, though overwatering is far more common.
Conclusion
See? Repotting your precious Alocasia doesn’t have to be a source of anxiety! By tuning into your plant’s signals, choosing the best time to repot alocasia, ensuring you use the right pot size and that all-important chunky, airy alocasia repotting mix, handling it with gentle care during the move, and providing patient, attentive aftercare, you’re doing a wonderful thing for its long-term health and vitality.
Remember that a little post-repotting sulk is often part of the process, so practice patience. Before you know it, your Alocasia will likely settle in and reward your efforts with those magnificent leaves we all adore, thriving happily in its refreshed space. You absolutely can do this! Happy Alocasia parenting, everyone!