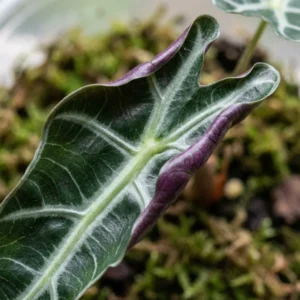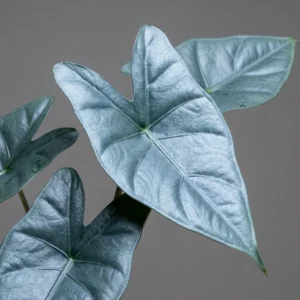
Hello fellow plant lovers! Are you captivated by the weirdly wonderful world of Alocasias? If the stunning Alocasia Stingray has swum into your collection, you’re in for a real treat! With its truly unique leaves that look like a squadron of elegant stingrays gliding through the air, it’s a plant that never fails to spark conversation.
But like many beautiful things, it has its preferences. Don’t let the “diva” reputation of some Alocasias scare you off! As your friendly neighborhood Alocasia aficionado, I’m here to share everything you need to know about Alocasia Stingray care. We’ll demystify its needs and tackle common worries (yes, we’ll definitely talk about those alocasia stingray getting yellow leaves!) so you can keep your Stingray happy and thriving. Let’s dive in!
Jump to Sections
ToggleMeet the Alocasia Stingray: An Exotic Gem for Your Home
First off, what makes this plant so special? The Alocasia Stingray gets its name from its incredible leaves. Each leaf has a distinctive, elongated “tail” or “stinger” extending from the main leaf body, strongly resembling the shape of a graceful stingray. Coupled with often beautifully mottled stems (similar to its cousin, the Alocasia Zebrina), it’s a real showstopper.
Like most of its Alocasia relatives, the Stingray hails from the tropical rainforests of Southeast Asia. Thinking about its natural home gives us the best clues for its care: it loves warmth, moisture (especially in the air!), and dappled sunlight filtering through a canopy. It’s no wonder this elephant ear Stingray relative has become such a sought-after plant for enthusiasts wanting a touch of the exotic indoors.
Essential Alocasia Stingray Care: Your Core Checklist for Success
Ready to give your Stingray the VIP treatment? It’s easier than you might think! Consistency is truly key here. Here’s the core checklist for successful Alocasia Stingray care:
Lighting: Finding the Perfect Bright, Indirect Spot
Alocasias crave light, but the wrong kind can spell trouble. Your Stingray needs plenty of bright, indirect light to flourish. Imagine that dappled sunlight on a rainforest floor – that’s the goal!
- Do: Place it near an east-facing window where it gets gentle morning sun, or a few feet back from a brighter south or west-facing window. A spot receiving bright, filtered light throughout the day is perfect.
- Don’t: Expose it to harsh, direct afternoon sun. This will quickly scorch those beautiful, unique leaves, leaving brown crispy patches. Ouch!
- Signs of Trouble: Too little light? Growth might become leggy, with stems stretching and leaves staying small or pale. Too much direct sun? Scorch marks! Finding that sweet spot is crucial when considering Alocasia Stingray light requirements.
Watering Wisdom: Quenching Its Thirst (The Right Way)
Watering is probably the aspect that causes the most concern for many Alocasia parents, but let’s simplify it. The aim is consistently moist, but absolutely not waterlogged soil. Soggy roots are a fast track to root rot, and we don’t want that!
- The Golden Rule: Always check the soil first! Poke your finger about 1-2 inches deep. If it feels dry at that depth, it’s time for watering Alocasia Stingray. If it’s still damp, give it another day or two.
- Technique: When you do water, water thoroughly. Let the water run all the way through the pot and out the drainage holes. This ensures all the roots get a good drink. Crucially, empty the saucer afterwards – never let your Stingray sit in standing water.
- Water Quality: Alocasias can sometimes be sensitive to chemicals in tap water. If you notice persistent brown tips or edges despite good humidity, try using filtered, distilled, or rainwater if you can.
- Remember: Overwatering is a far more common issue than underwatering for these beauties and a primary cause of alocasia stingray getting yellow leaves. When in doubt, it’s often better to wait one more day.
Soil Secrets: The Ideal Foundation for Healthy Roots
Forget standard houseplant potting mix – it’s usually too dense and holds too much water for Alocasias like the Stingray. They absolutely need breathing room for their roots! An airy, well-draining soil mix is non-negotiable.
- What to Use: Think chunky and light! An “aroid mix” is ideal. You can often buy these pre-made, or have fun mixing your own. Good ingredients to look for or include are:
- Coco coir or peat moss (for some moisture retention)
- Perlite or pumice (essential for aeration and drainage)
- Orchid bark (adds chunkiness and vital airflow)
- A bit of horticultural charcoal (can help keep the soil ‘sweet’)
- Worm castings (offer gentle nutrients)
- The Goal: The perfect Alocasia Stingray soil mix allows excess water to drain freely while still holding enough moisture to keep the plant happy between waterings. It also ensures plenty of oxygen can reach those precious roots.
Humidity & Temperature: Mimicking Its Tropical Home
Remember those lush Southeast Asian rainforests? Your Alocasia Stingray certainly does! It thrives in high humidity and consistently warm temperatures.
- Humidity: Aim for 60% humidity or higher if you can manage it. Low humidity is frequently the culprit behind those frustrating crispy brown leaf edges or tips.
- Boost it: Place your plant near a humidifier (honestly, the most effective method!). Grouping your plants together also helps raise the ambient humidity slightly. A pebble tray (a tray filled with pebbles and water, with the pot sitting on top of the pebbles, not in the water) can offer a small localized boost. Bathrooms or kitchens can be good spots, but only if the light is adequate. And misting? While it feels nice, it offers only very temporary benefits and isn’t a reliable long-term solution for Alocasia Stingray humidity needs.
- Temperature: Keep your Stingray in a warm spot, ideally consistently between 65-80°F (18-27°C). Average room temperatures are usually fine, but be mindful to protect it from cold drafts from windows, doors, or powerful air conditioning vents. Sudden temperature drops can stress the plant or even nudge it towards dormancy.
Feeding Your Stingray: Essential Nutrients for Growth
Alocasias can be quite hungry during their active growing season, which is typically spring and summer.
- When & How Often: Feed your Stingray roughly every 2-4 weeks while you see it actively pushing out new leaves.
- What to Use: A balanced liquid houseplant fertilizer generally works well. Always dilute it to half the strength recommended on the package instructions – it’s better to underfeed than overfeed and risk burning the roots.
- Winter Break: Reduce or completely stop fertilizing Alocasia Stingray in the fall and winter. Growth naturally slows down during this time, so it doesn’t need the extra nutrients.
Solving Common Problems: Why Are My Alocasia Stingray Leaves Turning Yellow?
Okay, let’s dive into the question that brings many plant parents seeking answers: why are my alocasia stingray leaves turning yellow? Seeing those vibrant green leaves fade is alarming, but it’s usually a sign something in their environment isn’t quite right, and often, it’s fixable! Think of yellowing as your plant’s way of waving a little flag. Here’s how to decode the message:
Decoding Yellow Leaves: Common Causes & Fixes
Time to put on your plant detective hat! Consider what might have changed recently in its care or environment. Check these common culprits for Alocasia Stingray problems:
- Overwatering: Still the #1 suspect! Are the lower leaves yellowing first, perhaps feeling a bit soft or mushy at the base? Is the soil staying constantly wet deep down? Fix: Definitely allow the soil to dry out more between waterings. Double-check that your pot has good drainage holes and that it’s not sitting in excess water in its saucer. If you suspect root rot (mushy, brown/black roots), you may need to gently unpot, trim away affected roots with clean shears, and repot into fresh, appropriate, slightly moist soil.
- Underwatering: Are leaves yellowing, perhaps accompanied by drooping, and maybe feeling dry or developing crispy brown edges quickly? Is the soil pulling away from the sides of the pot? Fix: Give it a thorough watering soak. You might need to check the soil moisture more frequently or adjust your watering routine to be more consistent.
- Improper Light: Pale, washed-out yellow leaves can indicate insufficient light. Yellow leaves that also have brown, burnt-looking patches suggest too much direct sun exposure. Fix: Carefully assess the light conditions based on our earlier discussion (bright, indirect is key!) and relocate your plant if needed.
- Pest Infestation: Tiny unwelcome guests can literally suck the life out of leaves, leading to yellow stippling (tiny dots), patches, or overall yellowing. Fix: Inspect all parts of the plant (especially leaf undersides and new growth) very closely for any signs of pests (more details in the next section!).
- Nutrient Issues: If you haven’t fertilized your plant in a very long time (many months during the growing season), widespread yellowing could point to a nutrient deficiency. Conversely, applying too much fertilizer or fertilizing too often can burn roots and also cause yellowing or brown tips. Keep in mind, it’s also perfectly natural for the single oldest, lowest leaf to gradually yellow and eventually die off as the plant matures and directs energy towards new growth – this is different from multiple leaves yellowing at once. Fix: Ensure you’re following a sensible fertilizing schedule – balanced fertilizer, diluted, only during active growth.
- Dormancy: If the seasons are changing towards cooler weather and shorter days (fall/winter), yellowing of the lower leaves might simply be the plant preparing for dormancy. Fix: Don’t panic! See the dormancy section below for guidance.
- Acclimation Stress: Did you just bring your Stingray home from the nursery, or did you recently repot it? It’s quite common for plants to show a bit of stress by dropping a leaf or two as they adjust to a new environment. Fix: Provide consistent, stable care as outlined here, avoid further major changes for a while, and give it some time and patience to settle in.
Pesky Pests: Evicting Unwanted Guests (Especially Spider Mites!)
Alocasias, including our lovely Stingray, unfortunately, have a reputation for attracting spider mites. These minuscule arachnids (not insects!) thrive in the warm, dry conditions often found indoors, making Alocasia Stingray pests a common issue.
- Spotting Spider Mites: Look for very fine, delicate webbing, often concentrated where leaves join stems or along the leaf veins on the undersides. You might see tiny moving dots – they can be reddish, brown, or pale (a magnifying glass is your friend here!). Affected leaves often look dusty, lose their sheen, and develop tiny yellow or whitish speckles (this is called stippling).
- Fighting Back (Persistence is Key!):
- Isolate: The moment you suspect spider mites, move the infected plant far away from your other houseplants to prevent spread.
- Wipe/Wash: Thoroughly wipe down all leaves (tops and bottoms) and stems with a damp cloth. Alternatively, give the plant a good shower in your sink or tub, using lukewarm water to physically blast many mites off.
- Treat: Apply an insecticidal soap or neem oil solution. Spray the entire plant meticulously, ensuring complete coverage, especially on the undersides of leaves and in crevices. Follow the product instructions carefully. You’ll likely need to repeat treatments every 5-7 days for several weeks to break their life cycle and catch newly hatched mites.
- Boost Humidity: Remember, spider mites dislike high humidity. Running a humidifier near your treated plant can help deter their return.
- Other Potential Pests: Keep an eye out as well for mealybugs (they look like small, white, cottony masses, often tucked into leaf joints) or thrips (tiny, slender dark insects that cause silvery patches or streaks on leaves). Treat these similarly with manual removal (wiping) and appropriate insecticidal sprays. Regular inspection is truly your best defense! Catching pests early makes controlling them much, much easier.
Is My Stingray Just Sleeping? Understanding Dormancy
Sometimes, especially as fall turns into winter, you might notice your Alocasia Stingray slowing down its growth significantly. It might stop producing new leaves altogether, and the lower, older leaves may start to yellow and die back, even if your care seems on point. Don’t immediately assume the worst – it could simply be entering Alocasia Stingray dormancy.
- What it is: This is a natural rest period for many Alocasias, typically triggered by the combination of cooler temperatures and reduced light levels during shorter days. The plant isn’t dying; it’s conserving energy in its underground corm (a bulb-like structure).
- What to do During Dormancy: The key is to adjust your care. Significantly reduce watering. You only need to provide enough moisture to keep the soil from becoming bone dry and prevent the corm from shriveling completely – perhaps a small sip every few weeks is all it needs. Stop fertilizing entirely. You can keep it in its usual spot, or move it to a slightly cooler area (but ensure it stays well above freezing temperatures).
- The Spring Awakening: Be patient. With the return of warmer weather and longer daylight hours in spring, you should eventually see signs of new life as a sprout emerges from the soil. Once you see active growth resuming, you can gradually increase watering back towards its normal frequency and resume light fertilization.
The Big Question: Is Alocasia Stingray Rare?
So, let’s tackle that common question directly: is Alocasia Stingray rare? The answer has evolved over time.
- Past vs. Present: A few years back, the Alocasia Stingray was definitely considered a rarer find in the houseplant world. It commanded higher prices and was sought after by serious collectors. Finding one often required dedicated searching.
- Current Status: Fortunately for enthusiasts, increased tissue culture and propagation efforts have made it much more accessible today. While you might not find it in every big-box store garden center, it’s frequently available at well-stocked independent plant nurseries, specialty houseplant boutiques (both physical and online), and from dedicated Aroid sellers.
- The Verdict: So, is it rare? Perhaps “uncommon” or “sought-after” is a more accurate description now. It’s not as ubiquitous as an Alocasia Polly or a common Pothos, but it’s certainly obtainable for those looking for it. It absolutely retains its special “collector’s item” appeal and stands out as a truly unique Alocasia variety.
Growing Your Stingray Family: Simple Propagation Tips
One of the most rewarding parts of being a plant parent is watching your collection grow – especially when you propagate them yourself! The Alocasia Stingray propagation process can feel quite magical. Here are the main ways to multiply your Stingray:
- Offsets (Pups): As your mother plant matures and becomes well-established, it might start producing small baby plants right next to its base. These are often called “pups” or “offsets.” Wait until these pups have developed a few leaves and, ideally, their own small root system. Then, during your next repotting session, you can gently tease them apart from the main plant, ensuring you keep their roots intact. Pot these little ones up individually in an appropriate Alocasia Stingray soil mix, keep them warm and humid (maybe under a cloche or in a propagation box initially), and care for them just like you would a smaller version of the parent plant.
- Corms: Here’s where the treasure hunt begins! When you repot your Alocasia Stingray, gently sift through the soil around the root ball. You might discover small, firm, bulb-like structures – these are Alocasia Stingray corms. They are essentially little energy storage units capable of growing into a whole new plant.
- How to Sprout Corms: Gently clean off any excess soil. Take a small nursery pot and fill it with a lightly moistened propagation medium like sphagnum moss or a very light, airy soil mix. Plant the corm with the pointy end facing upwards, just barely covered by the medium. To maintain high humidity (which is crucial for sprouting), you can cover the pot with a clear plastic bag (with a few air holes) or place it inside a clear plastic storage bin (a makeshift greenhouse!). Keep it in a warm place with bright, indirect light. Now comes the hardest part: patience! It can take anywhere from a few weeks to several months for a corm to sprout a leaf and roots. Keep the medium lightly moist but not soggy during this time.
A Quick Note on Toxicity
This is an essential piece of information for all Alocasia owners: Alocasia Stingray, like all plants in the Alocasia genus, is toxic if ingested. All parts of the plant contain sharp, microscopic calcium oxalate crystals.
- Safety First: If chewed or swallowed by humans or pets (like cats and dogs), these crystals can cause significant irritation and swelling of the mouth, lips, and tongue, as well as drooling, vomiting, and difficulty swallowing. Please be sure to place your Alocasia Stingray safely out of reach of curious children and pets. Admire its stunning beauty, but ensure it’s not accessible for a potential nibble! Knowing if Alocasia Stingray toxic to cats/dogs is crucial for responsible pet ownership.
Final Tips for Happy Alocasia Stingray Parenting
Whew! We’ve covered a lot of ground on Alocasia Stingray care, haven’t we? Hopefully, you’re feeling much more equipped and confident to help your unique plant thrive. Remember, the absolute key is careful observation and aiming for consistency in its environment.
- Your Stingray Care Mantra: Bright, indirect light. Water thoroughly only when the top layer of soil is dry, always ensuring excellent drainage. Boost that humidity! Use a chunky, airy soil mix that lets roots breathe. Feed appropriately during the growing season. And stay vigilant for pests!
- Listen to Your Plant: Your Stingray is pretty good at communicating. Drooping leaves, yellowing patches, crispy edges – these are all visual cues telling you something might need adjusting in its care routine. Pay close attention to these signals.
Most importantly, enjoy the journey! There’s something truly special about nurturing such a unique and sculptural plant. Watching those incredible, ray-shaped leaves unfurl is a reward in itself. With a little mindful attention to its specific needs, your Alocasia Stingray will undoubtedly be a stunning, conversation-starting, and happy resident in your home for years to come. Happy growing, fellow Alocasia aficionado!
🌿 Continue Exploring Unique Alocasias:
Try caring for the impressive Alocasia Regal Shields or the majestic Maharani. Quick troubleshooting guides available for yellow leaves and brown tips.